Developing Juzu portlets – Step 3: Building a sexy secret wall

Previous steps:
– Learn how to develop great Juzu portlets for eXo Platform!
– Step 2: viewing and posting secrets
In the previous blog post, we learned how to add some functionality to our application. We can now see a list of secrets and share new ones. It works but it’s ugly… so during this blog post we will focus on the UI of JuZcret.
We are assuming that you have already implemented step 1 and step 2. If not you can still download from GitHub the source code resulting from step 2 to start this step 3.
Introduction
It’s time to think a little bit about the design of the JuZcret application.
We have to display a list of secrets that can be enhanced by an image. To do this, we will create a beautiful secret wall page.
Don’t forget also that we want to add new secrets. We need a new add secret page with a nice form so we can share secrets easily.
During this step you will learn how to incorporate JavaScript and Less files easily in a Juzu application.
Why Less and not only CSS
Because Less is an amazing dynamic style sheet language that we love to use in eXo and the integration with Juzu is so easy that you won’t have any excuses for not using it.
Just declare the style and Juzu will transform it into CSS during compilation.
For newbies, you just need to know that Less extends the CSS language with many interesting features, like variables, mixins, operations and functions. If you want more information, check out the Less website.
Create a mockup
This tutorial will also give you some good practice in developing a nice application. So, before taking the code by storm we will create a UI mockup (and then nicely ask the Design and UI teams for some help, which they always do with a smile ;)).
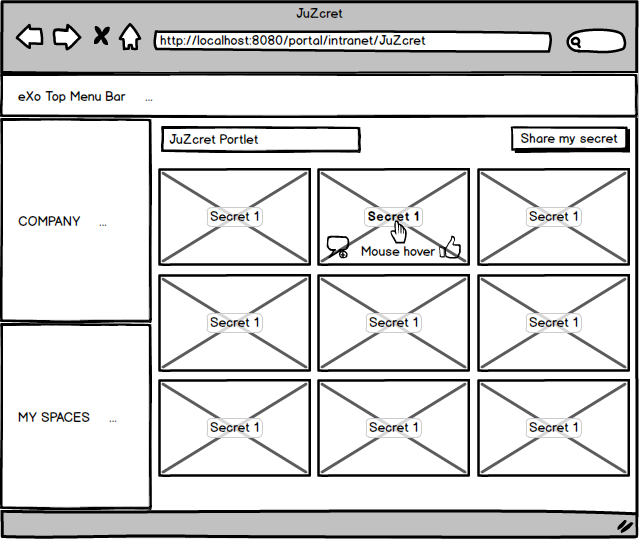
After hours and hours of thinking, this is what I created with Balsamiq as a mockup for the secret wall:
I gave it to the Design team and after some tricky things on Photoshop this is what they give me:
Ok, I yield!
And for free, the add secret page:
Adding Less
Before using Less, we need to add a dependency to in the POM:
<dependency>
	<groupId>org.juzu</groupId>
	<artifactId>juzu-plugins-less4j</artifactId>
	<version>1.0.0-cr1</version>
</dependency>
The Juzu plugin Less4j will take care of automatically compiling the Less file into a CSS file during the Maven compilation. The only thing that we have to do is to create a new file in the package and then declare it in :
@Less(@Stylesheet("styles/juzcret.less"))
@Assets("*")
If you want to be more productive and create style sheets that are easily maintainable and extendable, I advise you to use Less. If you don’t want to, then, yes, you can directly use a CSS file in a Juzu application. Add your CSS file to the package and declare it in as below:
@Stylesheets({@Stylesheet(value = "styles/my.css")})Notice the @Assets annotation. This annotation is used to declare assets (a style sheet or script) that will be loaded when the portlet is displayed. By setting (“*”) we declare all assets.
Adding jQuery
We will use JavaScript to set the width of the secret boxes randomly on the secret wall. To simplify this task, we will use the jQuery library.
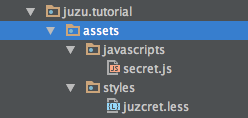
First create a new file in the package:
The jQuery library will be simply retrieved from WebJars thanks to the Juzu WebJars plugin. The Juzu WebJars plugin allows us to use an awesome JavaScript library easily (take a look here) in our Juzu project. We just need to add the WebJars dependency to our and declare it in . This saves us from downloading and cloning the library file and facilitates the management of our JavaScript dependencies.
In our case we want to use jQuery. We just have to add and the jQuery WebJars dependency in :
<dependency>
	<groupId>org.juzu</groupId>
	<artifactId>juzu-plugins-webjars</artifactId>
	<version>1.0.0-cr1</version>
</dependency>
<dependency>
	<groupId>org.webjars</groupId>
	<artifactId>jquery</artifactId>
	<version>1.10.2</version>
</dependency>
Before we use it in our application, we need to declare in package-info.java jQuery WebJars and the two assets, and for our app , using the @Script annotation:
@WebJars(@WebJar("jquery"))
@Scripts(
	{
		@Script(id = "jquery", value = "jquery/1.10.2/jquery.js"),
		@Script(value = "javascripts/secret.js", depends = "jquery")
	}
)
@Assets("*")
Notice that we declare that depends on jQuery. This ensures that jQuery is available to at run time.
Test Less and jQuery
We have now created and declared all the necessary files for implementing step 3.
We will configure the Juzu project with JRebel if it’s not done already and compile it:
$ mvn clean install
We will replace the WAR file in the web app directory of eXo Platform with the new one just created and start the server:
$ ./start_eXo.sh --dev
Go to the JuZcret page and you will see exactly the same thing as at the end of step 2:
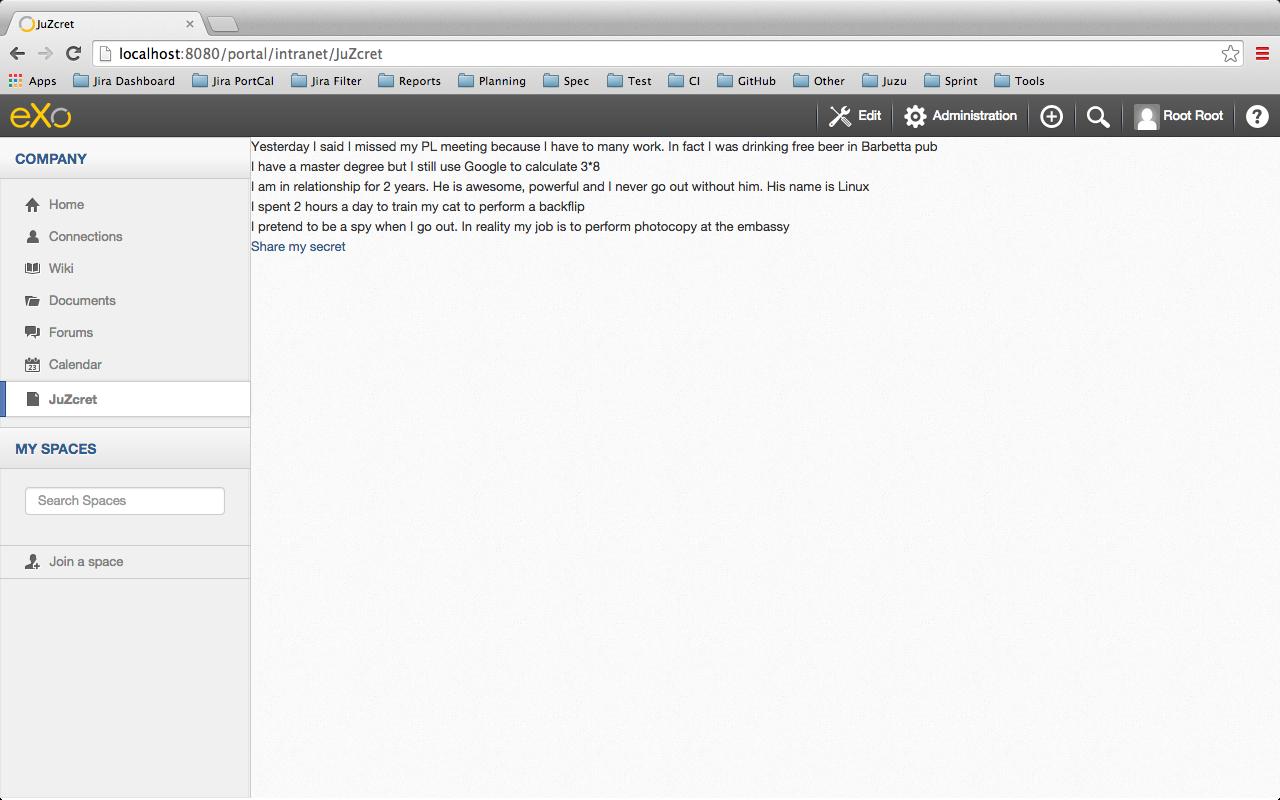
Note: We are assuming that you have followed steps 1 and 2 and have already created a JuZcret node in Platform. If not, follow step 1 to create the JuZcret node.
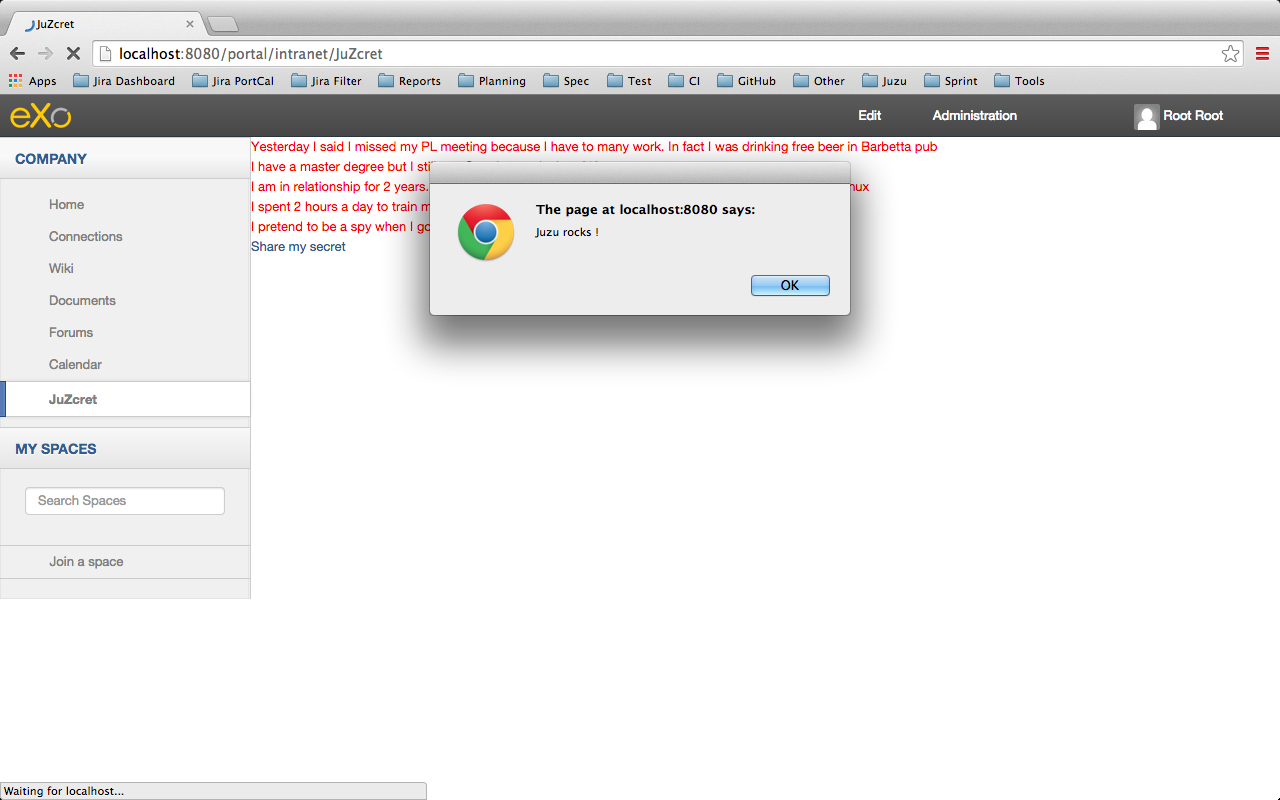
Let’s perform a quick test to see if the JRebel hot deployment is working, and test the integration of Less and jQuery also.
Modify with:
(function ($) {

	$(document).ready(function () {
		window.alert("Juzu rocks !");
	});

})($);
Modify with:
// Variables
//====================
@textColor: red;

// Common Style
//====================
.secret-wall-list {
	color: @textColor;
}
Compile:
$ mvn clean compile
When we get a Build Successful message, we will refresh the JuZcret page:
Note: After JRebel reloads our project, it may be possible that our portlet displays an error message instead of the expected screen. If this happens, we must recompile our project using mvn clean compile to refresh the web page. If it persists, we need to restart the server.
jQuery displays a pop-up when the DOM is ready, and then the CSS resulting from our Less file will change the text color for the secrets to red.
Now we are ready to implement a nice UI for our JuZcret application.
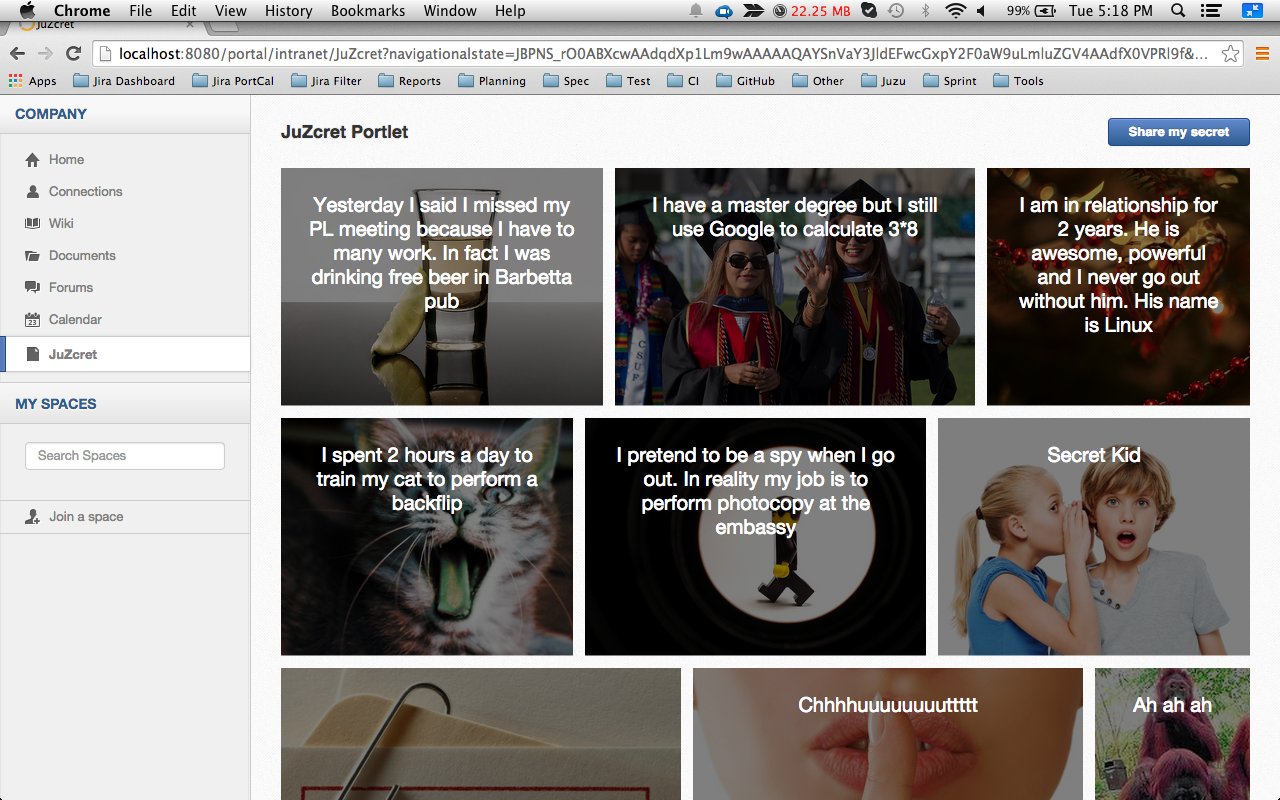
The secret wall
Open template and replace it with the new code below:
#{param name=secretsList/}

<div class="secret-wall-container">
	<div class="secret-wall-heading">
		<div class="row-fluid">
			<div class="span6">
				<h3 class="title">JuZcret Portlet</h3>
			</div>

			<div class="span6 text-right">
				<a class="btn btn-primary" href="@{JuZcretApplication.addSecretForm()}" role="button">Share my secret</a>
			</div>
		</div>
	</div>
	<ul class="secret-wall-list clearfix">
		<% secretsList.each { secret -> %>
			<li>
				<div class="secret-image" style="background-image: url('${secret.imageURL}')">
					<div class="secret-mesage">${secret.message}</div>
				</div>
			</li>
		<% } %>
	</ul>
</div>
Open the file and modify it as below:
// Variables
//====================
@heightSecretItem: 238px;
@secretItemGutter: 6px;

// Mixins
//====================

// Opacity
.opacity(@opacity) {
	opacity: @opacity;
	// IE8 filter
	@opacity-ie: (@opacity * 100);
	filter: ~"alpha(opacity=@{opacity-ie})";
}

// Common Style
//====================

// Secret Wall
.secret-wall-container {
	padding: 20px 30px;
	.btn-primary {
	padding-right: 20px;
	padding-left: 20px;
	}
}
.secret-wall-container, .secret-wall-container * {
	-webkit-box-sizing: border-box;
	-moz-box-sizing: border-box;
	box-sizing: border-box;
}
.secret-wall-heading {
	margin-bottom: 10px;
	.btn {
	margin-top: 6px;
  }
}
.secret-wall-list {
	margin: 0 -@secretItemGutter;
	> li {
	float: left;
	padding: @secretItemGutter;
	width: 100% / 3;
	.secret-image {
		background-repeat: no-repeat;
		background-size: cover;
		background-color: #000;
		position: relative;
		height: @heightSecretItem;
		width: 100%;
		display: block;
		&:before {
			background: none repeat scroll 0 0 rgba(0, 0, 0, 0.5);
			content: "";
			display: block;
			height: 100%;
			position: absolute;
			width: 100%;
		}
	}
	.secret-mesage {
		bottom: 65px;
		color: #fff;
		font-size: 20px;
		font-weight: normal;
		left: 25px;
		line-height: 24px;
		position: absolute;
		right: 25px;
		text-align: center;
		top: 25px;
	}
	&:nth-child(3n+3) {
		.popover{
			right: -1px;
		.arrow {
			left: auto;
			right: 34px;
		}
      }
    }
  }
}
Compile:
$ mvn clean compile
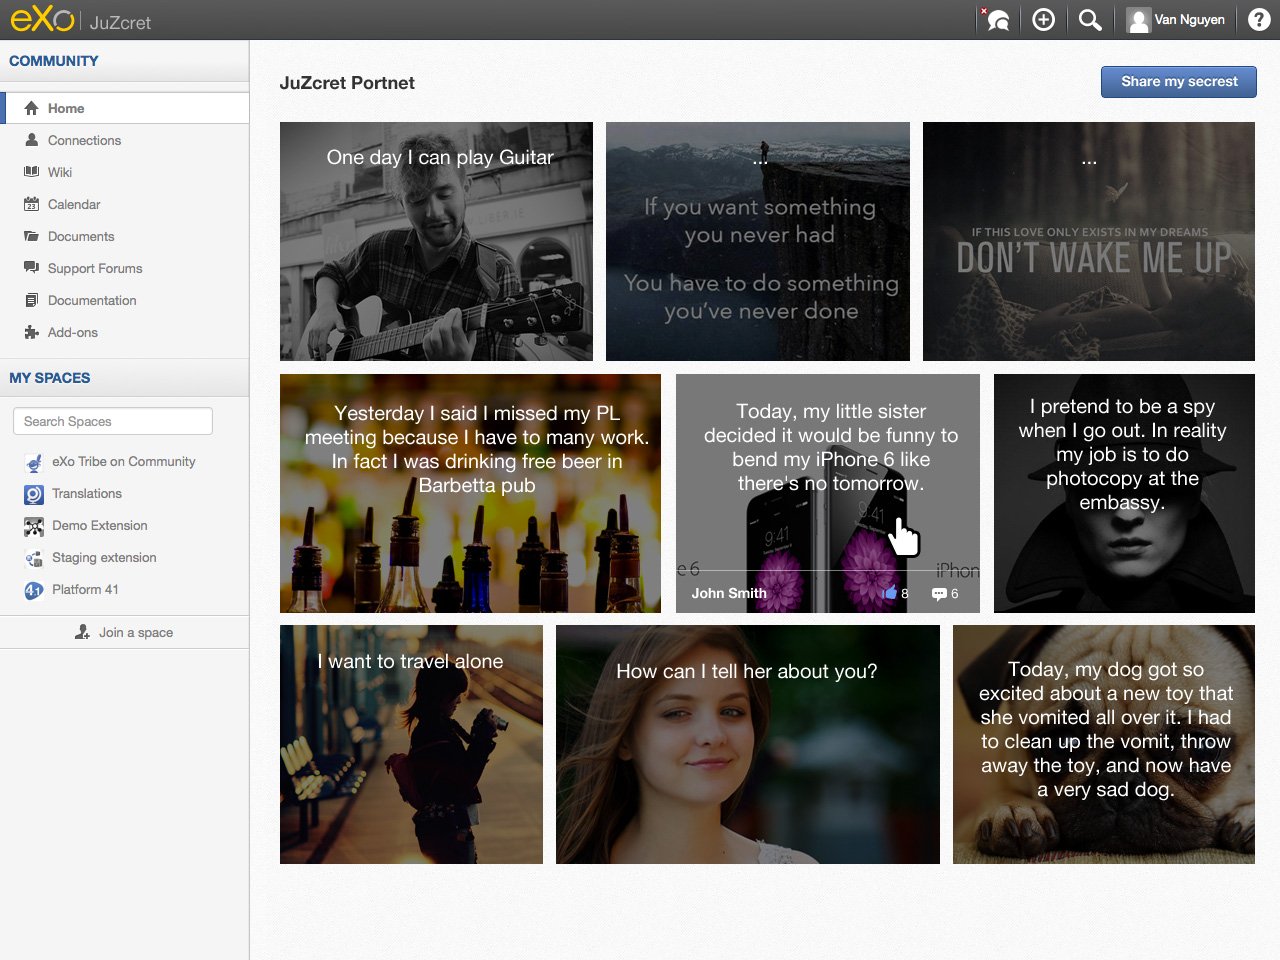
When we get a Build Successful message, we will refresh the JuZcret page and look at our new secret wall:
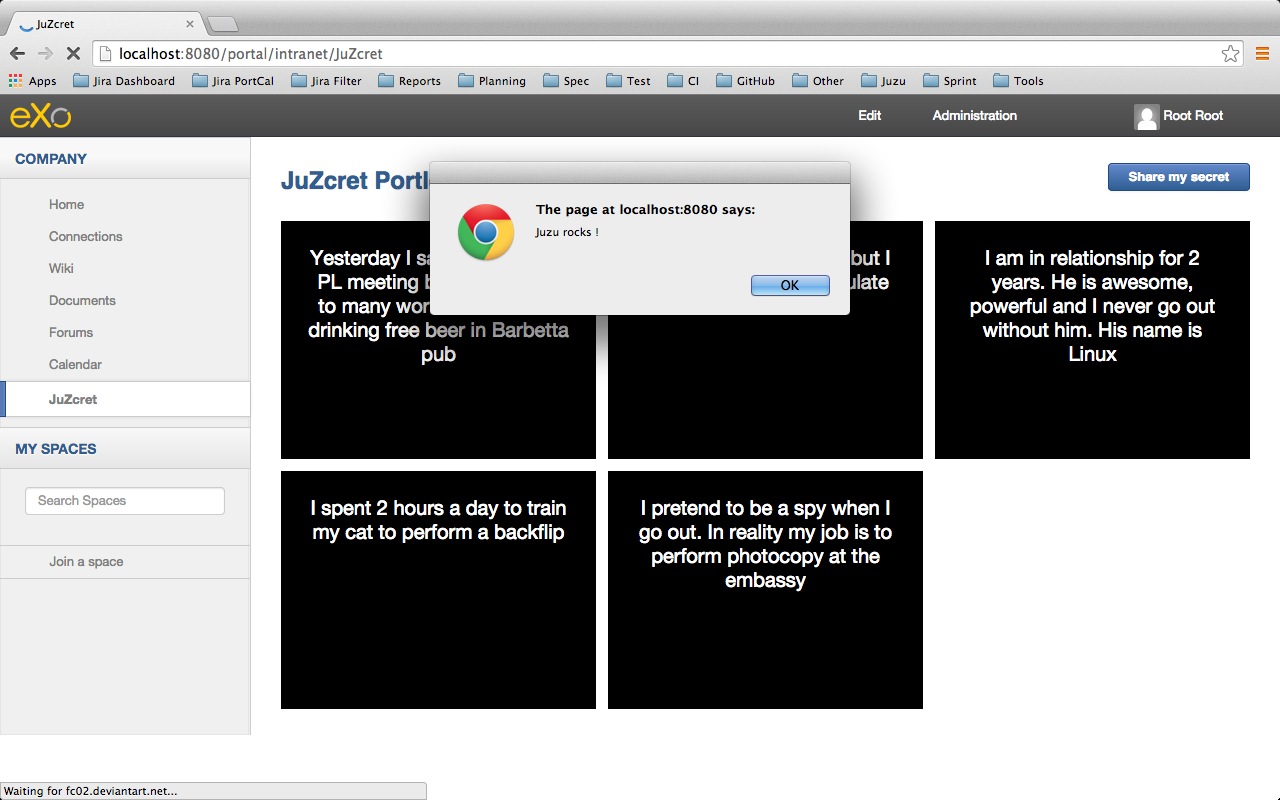
Notice that the title “JuZcret Portlet” in a <h3> tag is displayed in blue on the top left of our application even though we haven’t overridden the default <h3> tag in . This is displayed in blue because the default <h3> tag is overridden in , as you can see here. When you develop a Juzu portlet for Platform, you can reuse all classes declared in https://github.com/exoplatform/ux-guidelines without needing to declare them beforehand. These classes are available by default for all portlets in Platform.
You can see that we still have the “Juzu rocks” pop-up! Let’s modify the JavaScript to remove this pop-up and set the width of secret boxes randomly.
Open and modify it as below:
(function ($) {

  $(document).ready(function () {

        //Var to know the number of image in the line
        var counterImg = 0;
        //Var to know the place taken by previous image in the line
        var totalWidthLine = 0;

        function getRangeRandom(min, max) {
            return Math.ceil(Math.random() * (max - min) + min);
        }

        function randSecretBoxWidth() {
            var randBoxNum = getRangeRandom(23, 43);
            //Test if we are on th third image of the line
            if (counterImg >= 2) {
                //The third image of the line fill all the remaining place
                randBoxNum = 100 - totalWidthLine;
                //counter place taken by previous image in the line set to 0
                counterImg = 0;
                totalWidthLine = 0;
            }
            else {
                //Increase counter and the place taken by previous image in the line
                counterImg++;
                totalWidthLine += randBoxNum;
            }
            //Return the width of the secret box
            return randBoxNum;
        }

        //Get all secrets boxes
        $('.secret').each(function(idx, listItem) {
          //Set a random width
          listItem.style.width = randSecretBoxWidth() + "%";
        });
    });

})($);
Compile:
$ mvn clean compile
When we get a Build Successful message, we will refresh the JuZcret page and look at our new JuZcret wall:
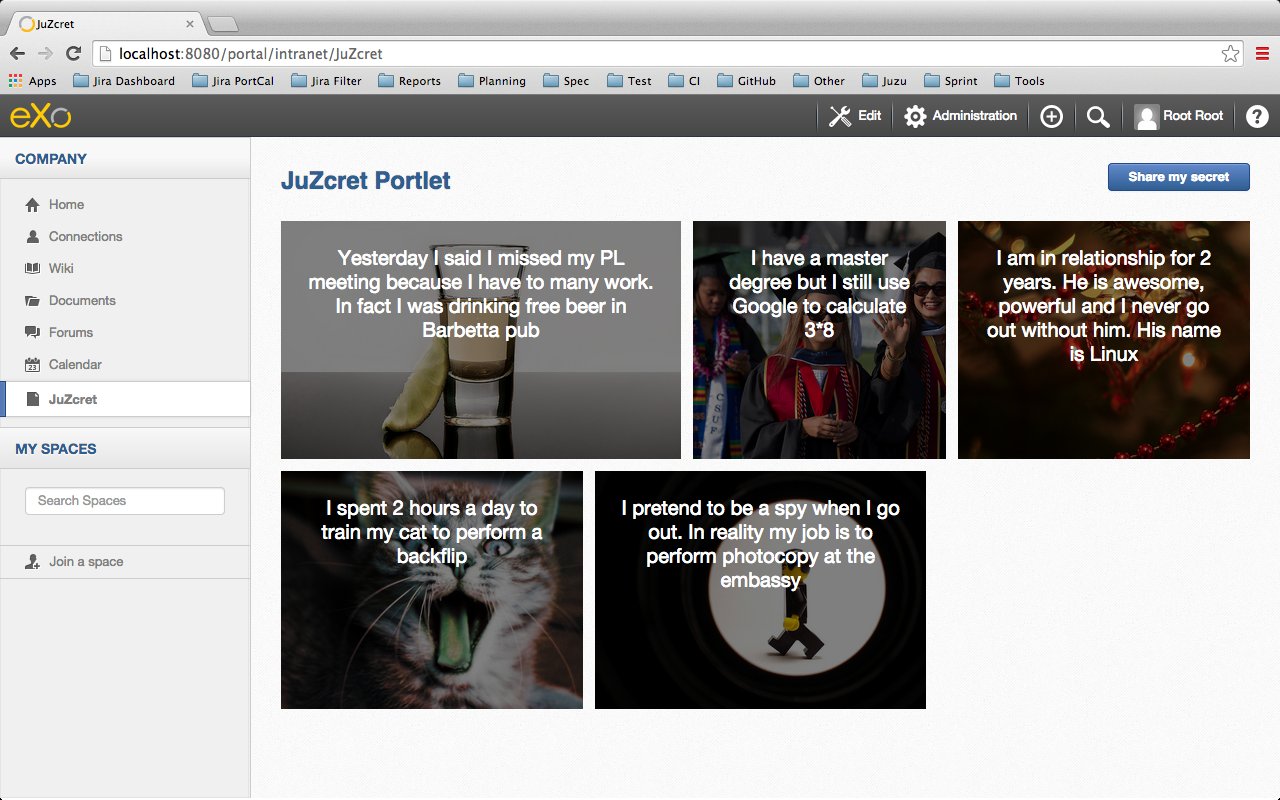
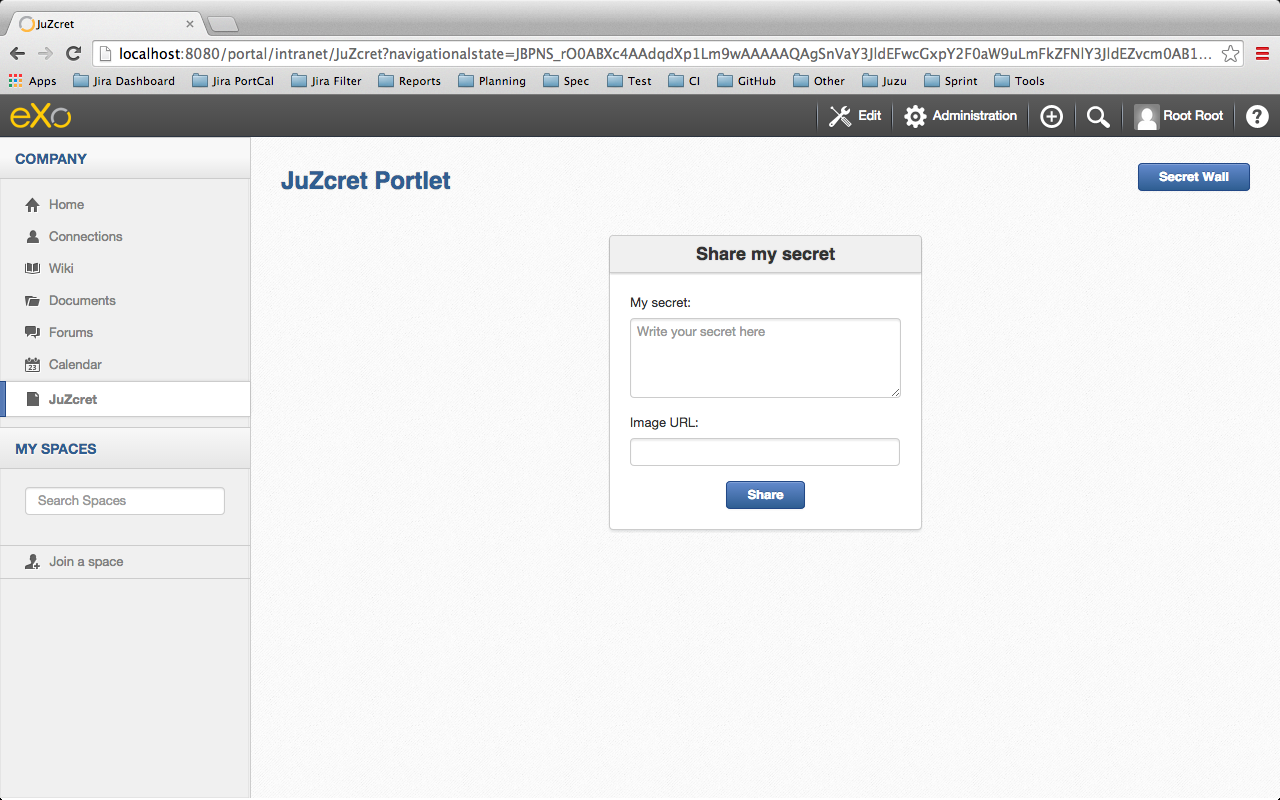
Adding secrets
We have to modify also the ugly add secret form. Open the template and replace it with the new code below:
<div class="secret-wall-container">
	<div class="secret-wall-heading">
		<div class="row-fluid">
			<div class="span6">
				<h3 class="title">JuZcret Portlet</h3>
			</div>
			<div class="span6 text-right">
				<a class="btn btn-primary" href="@{JuZcretApplication.index()}" role="button">Secret Wall</a>
			</div>
		</div>
	</div>
	<div class="text-center">
		<div class="uiBox share-secret-box">
			<h4 class="title">Share my secret</h4>
			<div class="uiContentBox">
				<form class="share-secret-form" action="@{JuZcretApplication.addSecret()}" method="POST" role="form">
					<div class="control-group">
						<label class="control-label" for="mySecret">My secret:</label>
						<div class="controls">
							<textarea id="mySecret" rows="3" name="msg" placeholder="Write your secret here"></textarea>
						</div>
					</div>
					<div class="control-group">
						<label class="control-label" for="secrImgUrl">Image URL:</label>
						<div class="controls">
							<input type="text" id="secrImgUrl" name="imgURL" placeholder="">
						</div>
					</div>
					<div class="control-group mgB0">
						<div class="controls text-center">
							<button type="submit" class="btn btn-primary">Share</button>
						</div>
					</div>
				</form>
			</div>
		</div>
	</div>
</div>
Notice that we are reusing default Platform UI components like uiBox and uiContentBox.
Open the file and add at the end:
// Add Secret

.share-secret-form {
	.form-title {
		margin: 0 0 10px;
		text-shadow: none;
	}
	textarea {
		min-width: 271px;
		max-width: 271px;
		max-height: 300px;
		margin-bottom: 10px;
		min-height: 80px;
	}
	textarea, input {
		margin-bottom: 5px;
	}
}

.share-secret-box {
	display: inline-block;
	text-align: left;
	margin-top: 20px;
	.title {
		text-align: center;
	}
	.btn {
		min-width: 78px;
	}
}
Compile:
$ mvn clean compile
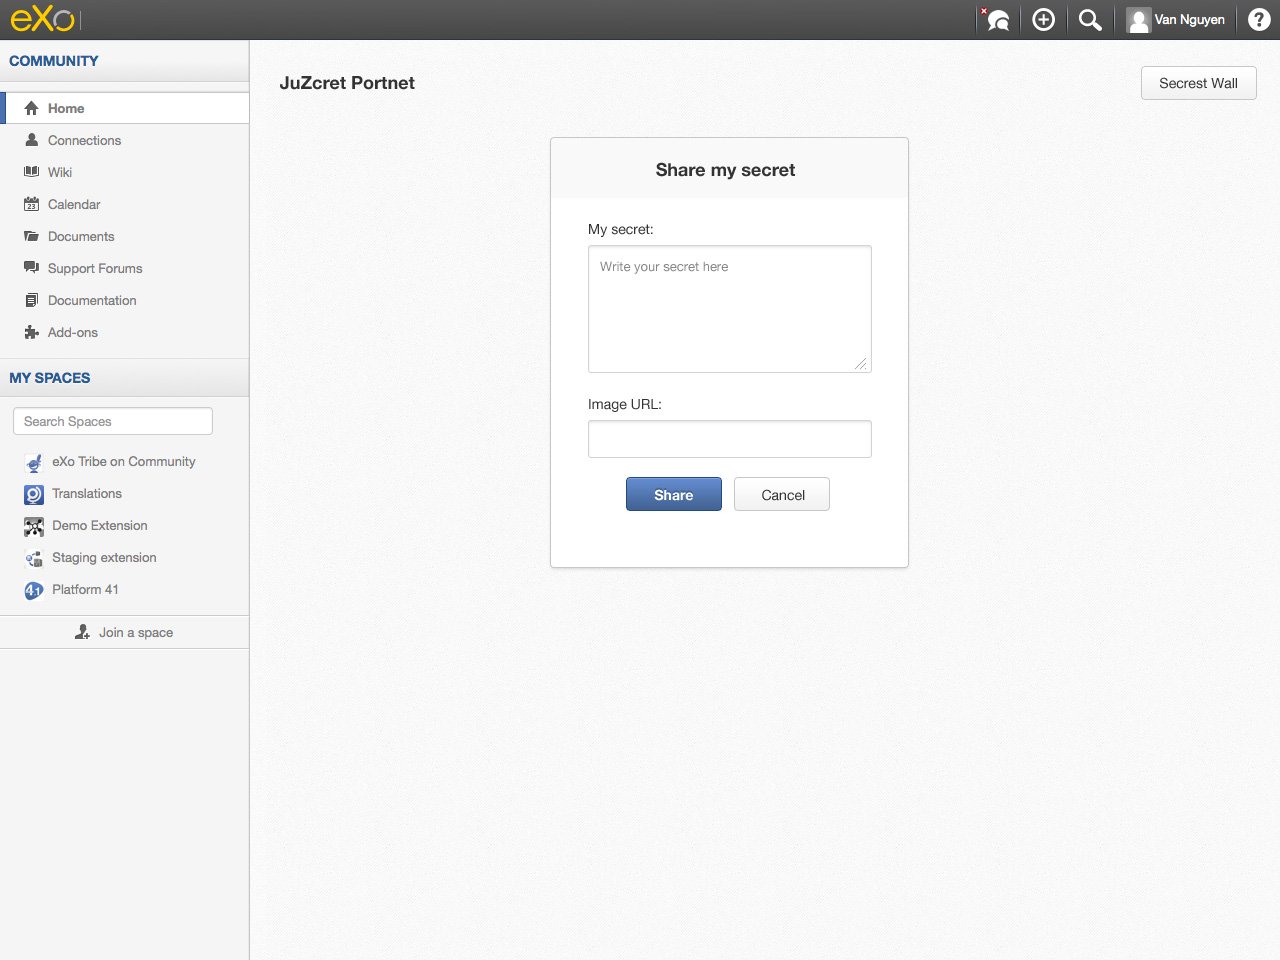
When we get a Build Successful message, we will refresh the JuZcret page. Click on the Share my secret button on the top right and take a look at our new add secret form:
That’s it! Play with the application and enjoy adding your personal secrets:
Here we are! As promised, we have a sexy JuZcret Portlet! And it’s not yet finished… in the next blog post, we will add a new social feature using Ajax.
The final source of step 3 is available for downloading from GitHub.
Previous and next steps:
– Learn how to develop great Juzu portlets for eXo Platform!
– Step 2: viewing and posting secrets
– Step 3: Building a sexy secret wall
– Step 4: adding Likes and Comments for Secret
– Step 5: Saving Secrets in the JCR
– Step 6: Let the whole world create new secrets
– Step 7: Finishing the job properly with unit test
Thanks a lot to the Design and UI teams for their contribution 😉
Join the eXo tribe by registering for the community and get updates, tutorials, support, and access to the Platform and add-on downloads!

Make the most out of eXo Platform 4
Register to the next webinar and get a complete overview of what you can do with eXo Platform 4. Reserve your seat now!
Brahim Jaouane
I am a Digital Marketing specialist specialized in SEO at eXo Platform. Passionate about new technologies and Digital Marketing. With 10 years' experience, I support companies in their digital communication strategies and implement the tools necessary for their success. My approach combines the use of different traffic acquisition levers and an optimization of the user experience to convert visitors into customers. After various digital experiences in communication agencies as well as in B2B company, I have a wide range of skills and I am able to manage the digital marketing strategy of small and medium-sized companies.