Deploying eXo Platform 4 to JBoss EAP 6.1 in Domain mode
The JBoss AS 7 / EAP 6, has introduced a new deployment mode named domain. This mode aims to ease the configuration and management of several JBoss instances. The difference between the classic standalone mode and domain mode is that the latter allows centralization of the configuration and deployment in one unique point.
So when do we need to use JBoss in domain mode?
We need to use it if we deal with multiple JBoss servers for one or multiple applications in our infrastructure. For example, if we are using eXo in cluster mode, we can use JBoss domain mode to ease the configuration and deployment, so that we have only one entry point for configuring and managing all JBoss servers.
example domain deployment:
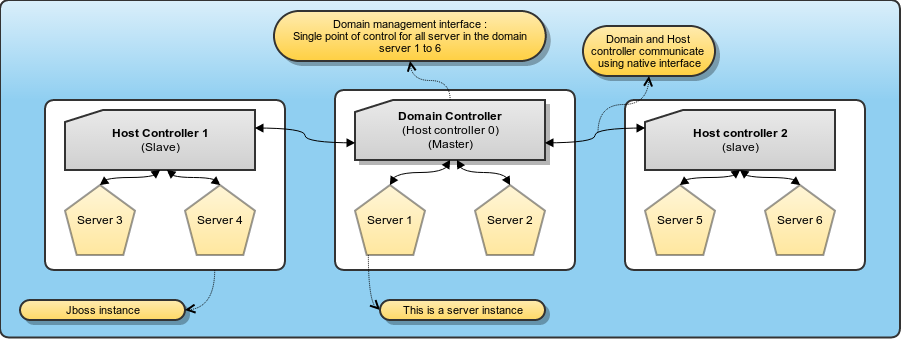
A domain mode architecture will contain:
- A domain controller: This is a light JVM JBoss server that will distribute the configuration and deployments to inject into each JBoss server instance. An application cannot be deployed/started on this JVM; it exposes a Web management interface to see/modify configurations and assign applications (EAR, WAR, modules) into each JBoss Server.
- A host controller per OS instance (VM or physical machine): This is a light JVM that will be deployed on each host (OS+Hardware) and acts like a bridge to allow the domain controller to manage JBoss servers instantiated in the local machine. The configuration of this JVM takes place in a local file named . The domain controller address and the JBoss server(s) to start locally are defined in this configuration file.
- A JBoss Server instance: Each host/machine can have one or more JBoss Servers, which need to be associated to the local host controller. The JBoss server instance cannot contain locally deployed applications or a configuration file. Everything has to be controlled using the domain controller UI, JBoss Cli, or XML files. Some “default configurations” can be provided for the configuration file, but the evolution/improvements on this configuration file have to be performed using the “Web management interface” or JBoss Cli, similar to IBM Websphere (which also provides both methods; the xml manual modifications are not supported by IBM. RedHat has copied this feature from IBM Websphere).
In fact, the standalone configuration file and list of applications deployed are managed and modified in a local folder inside the JBoss. In domain mode, the configuration (connectors, datasources, security-domain, ejb, system variables, etc.) is added in one file named . This file will be used to describe the configuration profiles and deployments added to each server group (Attention: The server group notion is a logical way of denoting that N servers have the same configuration entries and deployments. It is not the same as servers controlled by one host controller).
A complete explanation can be found in this documentation.
eXo Context
What the Standalone package contains:
- (folder with applications and modules)
- & co ( & ): For some JVM essential variables, such as profiles, xmx, xms, etc.
- : to configure JCR & IDM Datasources and
- GateIn external configuration folder
- extensions folder: acme, cmis, etc.
What is the difference with Domain mode packaging:
- : Has to be an archive not a folder
- & co: All system variables have to be added in
- GateIn external configuration folder: No change (This folder has to be copied in each host controller configuration folder)
- extensions folder: Provides a script that repackages the to add one or more extensions.
eXo in domain mode
Deployment to implementation
Follow these steps to get eXo Platform running in domain mode:
1 – Install eXo in Jboss EAP:
- Extract
- Merge the content with Jboss EAP: This will add files in and and create an extension folder in the root
- Extensions are installable with extension.[sh|bat]copy eXo_domain folder in JBOSS_HOME.
2 – Copy & in
Archive (download) contains a shell script to start/stop an eXo cluster in domain mode.
Edit the script to match your settings:
JBOSS_USER=
STARTUP_WAIT=5
SHUTDOWN_WAIT=5
JBOSS_HOME=
JBOSS_CONSOLE_LOG=$JBOSS_HOME/eXo_domain/log/console-stdout.log
JAVA_HOME=/usr/java/default
JBOSS_PIDFILE=$JBOSS_HOME/eXo_domain/tmp/jboss_dc.pid
JBOSS_CONFIG=eXo-domain.xml
HOST_CONFIG=eXo-host.xml
NOPAUSE=true
IP_ADDR=
JBOSS_SCRIPT="$JBOSS_HOME/bin/domain.sh -b $IP_ADDR -bmanagement $IP_ADDR host-config=$HOST_CONFIG -Djboss.domain.base.dir=$JBOSS_HOME/eXo_domain -Djboss.domain.master.address=$IP_ADDR"
3 – Edit
- Update the data sources section to meet your environment settings
- Update the system properties to match your needs
- Update any path you may need to customize and choose exo.profiles.
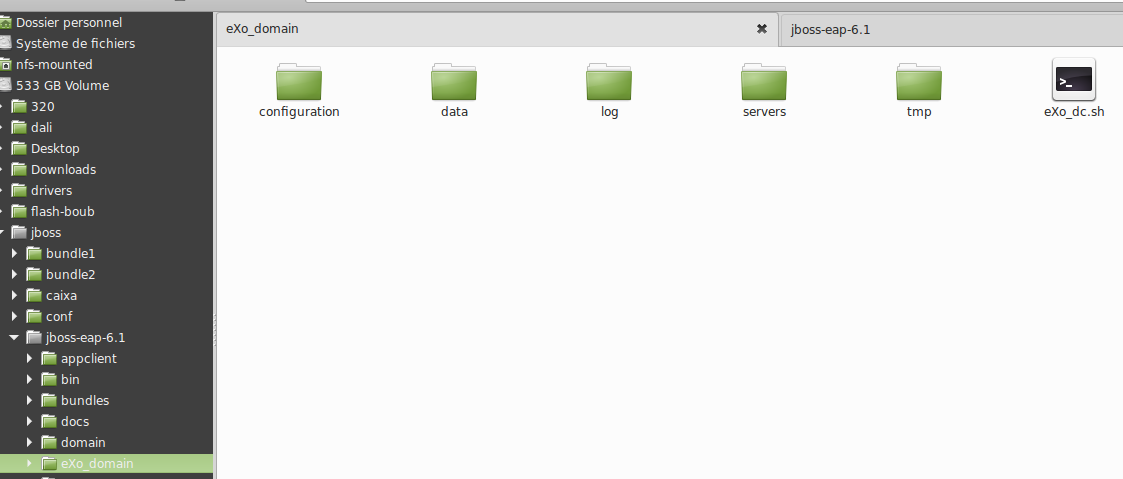
4 – Under
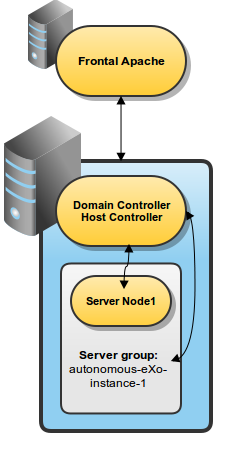
Create a directory named “autonomous-eXo-instance-1” to match the name used in .
This directory contains per instance configuration files (gatein configuration folder), instance log files, tmp and data folders.
5 – Add database driver as jboss module:
create a jboss module referencing your database driver. The following example is for Mysql.
<?xml version="1.0" encoding="UTF-8"?>
<module name="com.mysql">
</properties>
<resources>
<resource-root path="mysql-connector-java-5.1.26-bin.jar"/>
</resources>
<dependencies><module name="javax.api"/><module name="javax.transaction.api"/>
</dependencies>
</module>
6 – Start jboss:
7 – Access to Jboss Web console:
(default port is 9990)
(user and password are stored in and created by )
8 – Deploy :
is the main EAR delivered by eXo. It may contain a custom extension.
It contains all WAR, JAR and descriptors.
To deploy an EAR, two methods can be used:
method 1: Deploy using the WebConsole
Click on manage deployments and select your archive
Click on next then save.
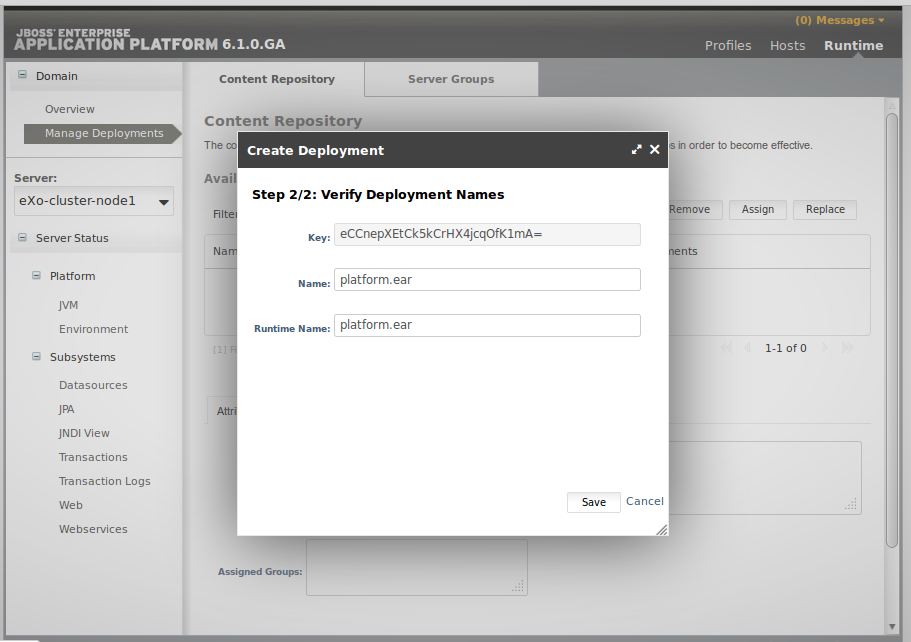
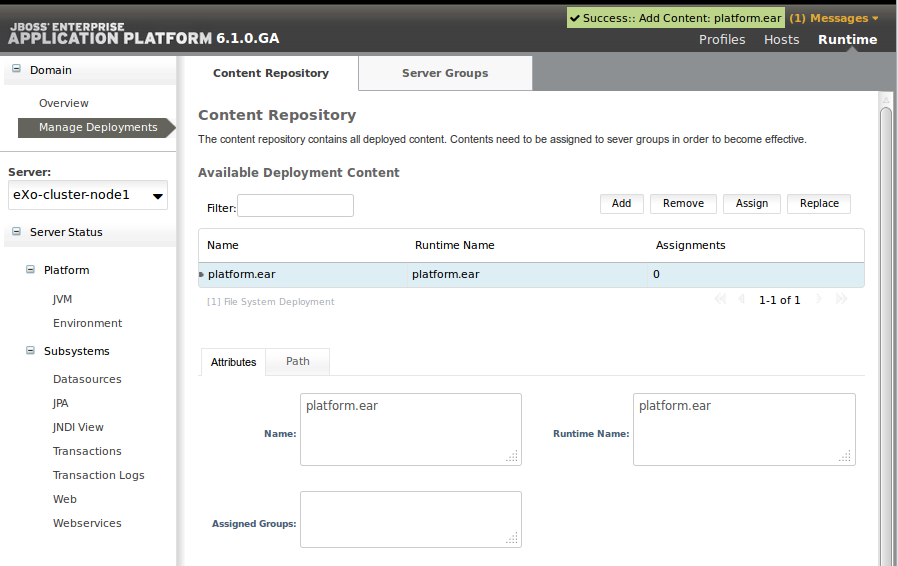
This results in a deployment called .
This needs to be associated with a server group:
is now associated to the server group (as a consequence it is associated to all its child servers).
Because is enabled for the server (look in ), the platform is automatically deployed.
These are the last lines of :
[Server:autonomous-eXo-instance-1] 00:26:11,979 INFO  [exo.kernel.container.RootContainer] (ServerService Thread Pool -- 42) The portal container 'portal' has been created successfully
[Server:autonomous-eXo-instance-1] 00:26:12,036 INFO  [org.jboss.as.server] (Controller Boot Thread) JBAS018559: Déploiement de "platform-4.0.6.ear" (runtime-name: "platform-4.0.6.ear")
[Server:autonomous-eXo-instance-1] 00:26:12,041 INFO  [org.jboss.as] (Controller Boot Thread) JBAS015874: JBoss EAP 6.1.1.GA (AS 7.2.1.Final-redhat-10) booted in 101717ms
To access the platform: use port 8080
method 2: Deploy platform.ear using the CLI
offers the same capabilities as the web console and is scriptable.
To deploy run the following command:
JBOSS_HOME/bin/jboss-cli.sh --connect --command=”deploy $PATH_TO_EAR --name=$NEW_DEPL_NAME --server-groups=$SERVER_GROUP_NAME”
where
: Path to the ear.
: Not mandatory; if not specified, the deployment name will match the ear filename.
: Target server group: eXo-cluster-Group in our example.
Next you can start and stop a given server ( and : Look in ).
BOSS_HOME/bin/jboss-cli.sh --connect --command=”/host=$JBOSS_HOSTNAME/server-config=$SERVER_NAME:start(blocking=true)”
where
: Defined in eXo-host.xml (<host name=”NAME” xmlns=”urn:jboss:domain:1.4″>) master in our example.
: Defined in eXo-host.xml (<server name=”NAME” …>)
: Means that the command will not exit until full completion of the task.
This procedure can be used to create the required instances by declaring and associating server groups with profiles, and hosts with servers.
Some modifications are required to run an eXo cluster in domain mode. These are mainly related to system properties.
A future post will describe how to perform a two nodes cluster installation in Jboss domain mode, and how to integrate modcluster for loadblancing.
Join the eXo tribe by registering for the community and get updates, tutorials, support, and access to the Platform and add-on downloads!

Make the most out of eXo Platform 4
Register to the next webinar and get a complete overview of what you can do with eXo Platform 4. Reserve your seat now!