Developing Juzu portlets – Step 4: adding Likes and Comments for Secret

Previous steps:
– Learn how to develop great Juzu portlets for eXo Platform!
– Step 2: viewing and posting secrets
– Step 3: Building a sexy secret wall
In the previous blog post, we implemented the UI of our JuZcret application. We are now able to look at Secret on the secret wall and share a new secret via the “add secret” form. But what would a social feature be without any user interaction? Nothing…
That’s why, during this step, we’ll add two very original social features to our JuZcret application: the “comment” feature and the “like” feature. Crazy! 😉
By implementing these new features we will learn, among other things, how to use Ajax with Juzu, interact with Portlet Container, and add an EDIT mode to our Portlet.
We are assuming that you have already implemented step 3. If not, you can still download the source code resulting from step 3 on Github in order to start this step.
Let’s start by improving the application models a little bit.
Models
Here we don’t need to use Juzu, we will just improve our current model. Let’s add the top of the tree, Model. This class contains common attributes for Secret and Comment:
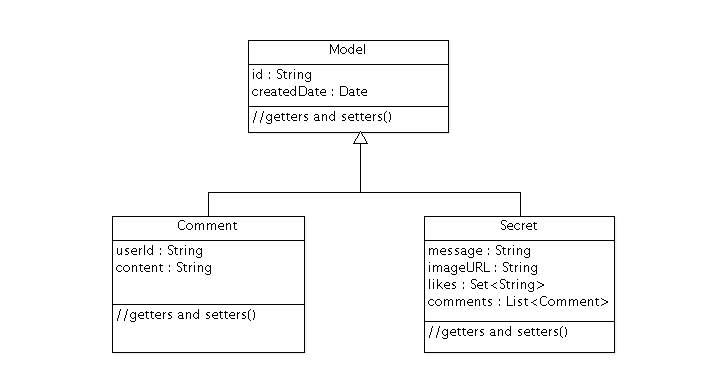
In the org.juzu.tutorial.models package, create a Model class as shown below:
package org.juzu.tutorial.models;

import java.io.Serializable;
import java.util.Date;

public class Model implements Serializable {
    private String id;
    private Date createdDate;

    public String getId() {
        return id;
    }

    public void setId(String id) {
        this.id = id;
    }

    public Date getCreatedDate() {
        return createdDate;
    }

    public void setCreatedDate(Date createdDate) {
        this.createdDate = createdDate;
    }
}
Then add a Comment class:
package org.juzu.tutorial.models;

public class Comment extends Model {
    private String userId;
    private String content;

    public String getUserId() {
        return userId;
    }

    public void setUserId(String userId) {
        this.userId = userId;
    }

    public String getContent() {
        return content;
    }

    public void setContent(String content) {
        this.content = content;
    }
}
We also need to improve Secret:
- Make Secret extend the Model class to inherit the parent attributes.
- A Secret object will contain several Comment relationships, and several Like relationships (consisting of a simple list of users):
package org.juzu.tutorial.models;

import java.util.HashSet;
import java.util.LinkedList;
import java.util.List;
import java.util.Set;

public class Secret extends Model {

    private String message;

    private String imageURL;

    private Set<String> likes;

    private List<Comment> comments;

    public Secret() {
        likes = new HashSet<String>();
        comments = new LinkedList<Comment>();
    }

    public Set<String> getLikes() {
        Set<String> lks = new HashSet<String>(likes);
        return lks;
    }

    public void setLikes(Set<String> likes) {
        this.likes = likes;
    }

    public List<Comment> getComments() {
        List<Comment> cms = new LinkedList<Comment>(comments);
        return cms;
    }

    public void setComments(List<Comment> comments) {
        this.comments = comments;
    }

    public String getMessage() {
        return message;
    }

    public void setMessage(String message) {
        this.message = message;
    }

    public String getImageURL() {
        return imageURL;
    }

    public void setImageURL(String imageURL) {
        this.imageURL = imageURL;
    }
}
That’s all we have to do! Our model is ready for the comment and like features. Now we need to improve the Secret service by providing an API to make it possible to add comments and like secrets.
Improve Secret Service
Our Secret service needs two more methods to manage the new functionalities: one to add a comment to Secret (the add Comment method) and another to like a secret (the add Like method).
Note: As in step 2, our data is still saved in memory for now.
First, declare these two methods in the Secret service interface:
import org.juzu.tutorial.models.Comment;
...
import java.util.Set;

...

public Comment addComment(String secretId, Comment comment);

public Set<String> addLike(String secretId, String userId);
Then implement these 2 methods in the and update the function:
import org.juzu.tutorial.models.Comment;
[...]
import java.util.*;
[...]

public void addSecret(String message, String imageUrl) {
    Secret secret = new Secret();
    secret.setId(UUID.randomUUID().toString());
    secret.setMessage(message);
    secret.setImageURL(imageUrl);
    secret.setCreatedDate(new Date());
    secretsList.add(secret);
  }

public Comment addComment(String secretId, Comment comment) {
        Secret secret = getSecret(secretId);
        if (secret != null) {
            comment.setId(UUID.randomUUID().toString());
            comment.setCreatedDate(new Date());

            List<Comment> comments = secret.getComments();
            comments.add(comment);
            secret.setComments(comments);
        }
        return comment;
    }

    public Set<String> addLike(String secretId, String userId) {
        Secret secret = getSecret(secretId);
        if (secret != null) {
            Set<String> likes = secret.getLikes();
            // You can like only one time
            if (!likes.contains(userId)) {
                likes.add(userId);
            }
            secret.setLikes(likes);
            return likes;
        }
        return null;
    }

    private Secret getSecret(String secretId) {
        Secret secret = null;
        for (Secret s : getSecrets()) {
            if (s.getId().equals(secretId)) {
                secret = s;
            }
        }
        return secret;
    }

    ...
Now we are done with the service layer!
This two methods are pretty simple and self-explanatory, so we don’t have to spend much time on them.
Note: In case you are in some doubt, I remind you that each step is available on a dedicated branch. To download the result of step 4 on Github, click here.
Now it’s time to go back to Juzu and improve the presentation layer.
Present like and comment
The comment and like actions will be managed using Ajax via the @Ajax Juzu annotation from the Juzu Ajax plugin. The Ajax plugin, like the Binding plugin, is already included in Juzu’s core, so there is no need to add new dependencies in our pom.
It’s important to know that the Juzu-Ajax plugin depends on jQuery. So it’s mandatory to declare jQuery, and we must do so in the previous step if we want to use this plugin.
Then you are ready to use @Ajax in our controller. So let’s add two new controller methods in JuZcretApplication.java:
import juzu.*;
import juzu.plugin.ajax.Ajax;
import juzu.request.SecurityContext;
import org.json.JSONArray;
import org.json.JSONObject;
import org.juzu.tutorial.models.Comment;
import org.juzu.tutorial.services.SecretService;

import javax.inject.Inject;
import java.security.Principal;
import java.util.Set;

...

  private static final String ANONYMOUS = "Anonymous";

  @Ajax
    @Resource
    public Response addComment(String secretId, @Mapped Comment comment, SecurityContext context) {
      comment.setUserId(getCurrentUser(context));
      Comment result = secretService.addComment(secretId, comment);
      if (result != null) {
        return Response.ok(new JSONObject(result).toString()).withMimeType("text/json");
      } else {
        return Response.status(503);
      }
    }

    @Ajax
    @Resource
    public Response addLike(String secretId, SecurityContext context) {
      Set<String> likes = secretService.addLike(secretId, getCurrentUser(context));
      if (likes != null) {
        return Response.ok(new JSONArray(likes).toString()).withMimeType("text/json");
      } else {
        return Response.status(503);
      }
    }

    private String getCurrentUser(SecurityContext context) {
        Principal user = context.getUserPrincipal();
        if (user == null) {
          return ANONYMOUS;
        } else {
          return user.getName();
        }
      }
The @Ajax annotation comes from the Juzu-Ajax plugin; it provides us with a convenient Ajax calling method: jzLoad, jzAjax. We’ll use this later in secret.js.
@Resource is a new type of Controller. Resource controllers operate pretty much the way a view controller does, except that they must produce the entire response sent to the client. That is a perfect method for implementing an Ajax request.
@Mapped allows us to map the request parameters to Bean types. Juzu automatically does the conversion between the primary types and the request parameters, but for a Bean, we need to declare the parameters with @Mapped. Consequently, the parameters of the “add secret” form will be automatically mapped to the attributes of the @Mapped Bean.
Juzu also automatically injects some contextual objects that you can use:
- SecurityContext (provides security info, such as the current logged in user)
- HttpContext
- RequestContext
- ApplicationContext
- UserContext
- ClientContext
You just need to declare the contextual objects in the method sign, as we do above for SecurityContext, and Juzu will inject them automatically at runtime.
You may have noticed that we sent a Json data response to our client by declaring the MimeType as text/json. Now we need to handle this response on the client side.
Template
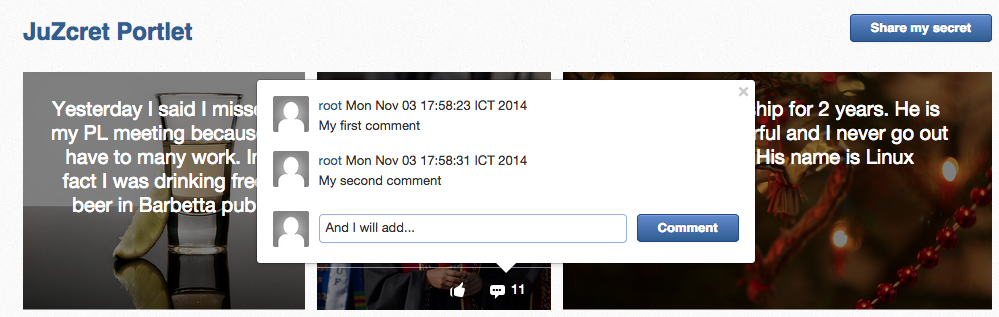
We need to add two new buttons to like a secret and comment a secret in the secretWall.gtmpl. Then, for the Comment feature, we also need to display a popover to show the list of current comments and add a new comment.
Replace the current content of <ul class=”secret-wall-list clearfix”> as follows:
[...]
<ul class="secret-wall-list clearfix">
<% secretsList.each { secret -> %>
<li class="secret" data-secretId="${secret.id}">
<div class="secret-image" style="background-image: url('${secret.imageURL}')">
<div class="secret-mesage">${secret.message}</div>
<div class="secret-action">
<a class="btn-like secr-toggle-link toggle-like-comment" href="#">
<i class="uiIconThumbUp uiIconWhite"></i><span class="numb"></span>
</a>
<a class="btn-popup-comment secr-toggle-link toggle-write-comment" href="#">
<i class="uiIconComment uiIconWhite"></i><span class="numb"></span>
</a>
</div>
<div class="popover popover-secret fade top">
<button class="closePopover close" type="button">×</button>
<div class="arrow"></div>
<div class="popover-content">
<div class="secr-comments-box">
<ul class="secr-comments-list">
<% secret.getComments().each { comment -> %>
<li><!--Add class .open-popover to display popover -->
<div class="media">
<a class="pull-left" href="https://localhost:8080/portal/intranet/profile/${comment.userId}">
<img src="https://localhost:8080/social-resources/skin/images/ShareImages/UserAvtDefault.png" alt="avatar">
</a>
<div class="media-body">
<div>
<a class="cm-user-name" href="https://localhost:8080/portal/intranet/profile/${comment.userId}">${comment.userId}</a>
<span class="cm-time">${comment.createdDate}</span>
</div>
<div class="cm-content">${comment.content}</div>
</div>
</div>
</li>
<% } %>
</ul>
</div>
<div class="secr-create-comment clearfix">
<button class="btn-comment btn btn-primary pull-right">Comment</button>
<div class="secr-write-comment ">
<div class="inner">
<div class="media">
<a href="#" class="pull-left">
<img src="https://localhost:8080/social-resources/skin/images/ShareImages/UserAvtDefault.png" alt="avatar">
</a>
<div class="media-body">
<textarea name="comment" class="secret-add-comment" placeholder="Add your comment"></textarea>
</div>
</div>
</div>
</div>
</div>
</div>
</div>
</div>
</li>
<% } %>
</ul>After that we need to improve our juzcret.less file to manage the new added class. Update the existing less file with these:
//Variables
//====================

[...]

@secretActionHeight: 43px;

//Mixins
//====================

[...]

//Border Radius CSS3
.border-radius(@border-radius) {
  -webkit-border-radius: @border-radius;
  -moz-border-radius: @border-radius;
  -ms-border-radius: @border-radius; //IE9 only
  border-radius: @border-radius;
}
//Transform CSS3
.transform(@transform) {
  -webkit-transform: @transform;
  -moz-transform: @transform;
  -ms-transform: @transform; //IE9 only
  transform: @transform;
}
//Transitions CSS3
.transition(@transition) {
  -webkit-transition: @transition;
  -o-transition: @transition;
  transition: @transition;
}
//Translate CSS
.translate(@x; @y) {
  -webkit-transform: translate(@x, @y);
  -ms-transform: translate(@x, @y); //IE9 only
  -o-transform: translate(@x, @y);
  transform: translate(@x, @y);
}

//Common Style
//====================

[...]

//After secret-wall-heading, remove the secret-wall-list section and replace by:
//After secret-wall-heading, remove the secret-wall-list section and replace by:
.secret-wall-list {
  margin: 0 -@secretItemGutter;
  > li {
    float: left;
    padding: @secretItemGutter;
    width: 100% / 3;
    .secret-image {
      background-repeat: no-repeat;
      background-size: cover;
      background-color: #000;
      position: relative;
      height: @heightSecretItem;
      width: 100%;
      display: block;
      &:before {
        background: none repeat scroll 0 0 rgba(0, 0, 0, 0.5);
        content: "";
        display: block;
        height: 100%;
        position: absolute;
        width: 100%;
      }
    }
    .secret-mesage {
      bottom: 65px;
      color: #fff;
      font-size: 20px;
      font-weight: normal;
      left: 25px;
      line-height: 24px;
      position: absolute;
      right: 25px;
      text-align: center;
      top: 25px;
    }
    .secret-action {
      border-top: 1px solid rgba(255, 255, 255, 0.5);
      bottom: 0;
      height: 0;
      left: 0;
      line-height: @secretActionHeight;
      padding: 0 25px;
      position: absolute;
      right: 0;
      text-align: right;
      overflow: hidden;
      .transition(all 200ms ease-out 0s);

      .secr-toggle-link {
        + .secr-toggle-link {
          margin-left: 15px;
        }
        > i {
          margin-right: 5px;
        }
        .numb {
          color: #fff;
          font-size: 13px;
        }
        .uiIconComment {
          margin-top: 2px;
        }
      }
    }
    .popover {
      max-width: 500px;
      top: auto;
      bottom: 46px;
      left: auto;
      right: -205px;
      width: 500px;
      margin: 0px;
    }
    .close {
      line-height: 16px;
      padding: 1px 5px;
      position: absolute;
      right: 0;
      top: 0;
    }
    .media {
      > .pull-left {
        > img {
          width: 36px;
          height: 36px;
          .border-radius(2px);
        }
      }
    }
    &:hover, &.open-popover {
      .secret-action {
        height: @secretActionHeight;
      }
    }
    &.open-popover {
      .popover-secret {
        .opacity(1);
        display: block;
      }
    }
    &:nth-child(3n+3) {
      .popover{
        right: -1px;
        .arrow {
          left: auto;
          right: 34px;
        }
      }
    }
  }
}
.secret-popup {
  width: 500;
  height: 280px;
  background: #fff;
  border: 1px solid rgba(0, 0, 0, 0.5);
  display: none;
  &.in {
    display: block;
  }
}
.popover-secret {
  .popover-content {
    padding: 15px;
  }
}
.secr-comments-box {
  .secr-viewall {
    font-size: 13px;
    margin-bottom: 15px;
  }
}
.secr-comments-list {
  margin-bottom: 20px;
  max-height: 150px;
  overflow: auto;
  > li {
    line-height: 18px;
    + li {
      margin-top: 20px;
    }
    .media {
      > .pull-left {
        display: block;
      }
    }
    .cm-user-name {
      font-weight: bold;
    }
    .cm-time {
      color: #999999;
      font-size: 12px;
      margin-left: 5px;
    }
  }
}
.secr-create-comment {
  .btn-primary {
    float: right;
    margin-left: 10px;
    margin-top: 3px;
  }
  .secr-write-comment {
    .fluid-colum {
      float: left;
      width: 100%;
      > .inner {
        margin-left: 46px;
      }
    }
    .media {
      > .media-body {
        margin-left: 46px;
        padding-top: 3px;
      }
    }
    textarea {
      height: 29px;
      resize: none;
      width: 100%;
      &:focus {
        box-shadow:none;
      }
    }
  }
}

[...]
Note: […] means sections already added in step 3. If you feel a little bit lost, look for the juzcret.less file directly on the github project.
Now we have two buttons for the comment and like features and a popover to display the list of comments.
Now that we have finished the UI part, we need to add some js handlers to manage these two features using Ajax.
Javascript Handler
Update the secret.js file by adding the snippet in charge of the like feature:
(function ($) {

    $(document).ready(function () {

        [...]

    });

    //Ajax for managing like function
    $(document).on('click.juzu.secret.addLike', '.btn-like', function () {
        var jLike = $(this);
        var jSecret = jLike.closest('.secret');
        var secretId = jSecret.attr('data-secretId');

        jLike.jzAjax('JuZcretApplication.addLike()', {
            data: {'secretId': secretId},
            success: function (data) {
                var jLikeIcon = jSecret.find('.btn-like');
                jLikeIcon.find('.numb').text($(data).size());
            }
        });
        return false;
    });

})($);
This snippet registers an event on our Like button. The interesting line to notice here is
jLike.jzAjax('JuZcretApplication.addLike()', [...]);The jzAjax and jzLoad functions are jQuery plugins provided by the Juzu Ajax plugin. They replace the standard Ajax and Load jQuery functions. They accept the same arguments but the URL is replaced by the controller method.
All we need to do is provide the controller method, like , and Juzu takes care to find the expected URL, and performs the Ajax request (using jQuery).
Similarly, we also have another three JS listeners for the comment feature. Add them just after the snippet which we just added above:
   //Open the popover for displaying and adding comments
    $(document).on('click.juzu.secret.openPopover', '.btn-popup-comment', function () {
        var jComment = $(this);
        var jSecret = jComment.closest('.secret');
        jSecret.addClass('open-popover');
    });

    //Close the popover for displaying and adding comments
    $(document).on('click.juzu.secret.closePopover', '.closePopover', function () {
        var jComment = $(this);
        var jSecret = jComment.closest('.secret');
        jSecret.removeClass('open-popover');
    });

    //Ajax for managing comment function
    $(document).on('click.juzu.secret.addComment', '.btn-comment', function () {
        var jComment = $(this);
        var jSecret = jComment.closest('.secret');
        var secretId = jSecret.attr('data-secretId');

        jComment.jzAjax('JuZcretApplication.addComment()', {
            data: {'secretId': secretId, 'content': jSecret.find('.secret-add-comment').val()},
            success: function (data) {
                if (typeof(data) == 'string') {
                    //error response
                    alert(data);
                } else {
                    //update html
                    var cList = "";
                    var cCounter = 0;
                    $(data).each(function (idx, elem) {
                        if (elem.content) {
                            cList +=
                                "<div class='media'>" +
                                "<a class='pull-left' href='https://localhost:8080/portal/intranet/profile/" + elem.userId + "'>" +
                                "<img src='https://localhost:8080/social-resources/skin/images/ShareImages/UserAvtDefault.png' alt='avatar'>" +
                                "</a>" +
                                "<div class='media-body'>" +
                                "<div>" +
                                "<a class='cm-user-name' href='https://localhost:8080/portal/intranet/profile/" + elem.userId + "'>" + elem.userId + "</a> " +
                                "<span class='cm-time'>" + elem.createdDate + "</span>" +
                                "</div>" +
                                "<div class='cm-content'>" + elem.content + "</div>" +
                                "</div>" +
                                "</div>";
                            cCounter++;
                        }
                    });
                    var html = jSecret.find('.secr-comments-list').html();
                    jSecret.find('.secr-comments-list').html(html + cList);
                    var jCommentIcon = jSecret.find('.btn-popup-comment');
                    var jCommentNumb = jCommentIcon.find('.numb').text();
                    jCommentIcon.find('.numb').text(jCommentNumb+cCounter);
                }
            }
        });
        return false;
    });
One major difference in this second handler is that we handle error response. Why? To prevent a user from submitting an empty comment.
This is why our Juzu controller should be aware of invalid data that a user submitted. Let’s move to the data validation and error handling provided by Juzu.
Adding validation
Juzu provides controller handler parameter validation via the Bean Validation framework. To use it, we need to add the juzu-validation plugin in our :
<dependency>
  <groupId>org.juzu</groupId>
  <artifactId>juzu-plugins-validation</artifactId>
  <version>1.0.0-cr1</version>
</dependency>
And now, all we need to do is add an annotation to the model attributes. Update the Comment class as shown below:
package org.juzu.tutorial.models;

import javax.validation.constraints.NotNull;
import javax.validation.constraints.Pattern;

public class Comment extends Model {

  private String userId;
  @Pattern(regexp = "^.+$", message = "Comment content must not be empty")
  @NotNull(message = "Comment content is required")
  private String            content;

  [...]
}
Thanks to the @Pattern and @NotNull annotations, the validation framework will validate the parameter and throw a validation error if needed.
We need to also declare our intention to perform this validation in the controller. In our case, we want to validate any new comment coming from a user. This process is managed by the addComment Resource in JuZcretApplication, where we need to add the @Valid annotation to the Comment parameter:
import javax.validation.Valid;

[...]

  @Ajax
  @Resource
  public Response addComment(String secretId, @Mapped @Valid Comment comment, SecurityContext context) {
  [...]
  }
Now if a user tries to enter an invalid comment, the validation framework will throw an error. Our job is not totally finished…We also need to properly cache this error.
Juzu provides two solutions for handling errors:
- Use the request lifecycle.
- Use the error handler.
In our case, we will use the request lifecycle that allows us to handle the error in the controller.
What we need is to analyze the Response and check to see if the type is a Validation Error. If it is, we simply get the error message and update the response to send it properly to the client.
To do this we need our controller, JuZcretApplication, to implement the interface RequestLifeCycle and override the endRequest method:
import juzu.plugin.validation.ValidationError;
import juzu.request.RequestContext;
import juzu.request.RequestLifeCycle;
[...]
import javax.validation.ConstraintViolation;

public class JuZcretApplication implements RequestLifeCycle {

      @Override
      public void endRequest(RequestContext context) {
          Response response = context.getResponse();
          if (response instanceof ValidationError) {
              ValidationError error = (ValidationError)response;
              Set<ConstraintViolation<Object>> violations = error.getViolations();

              String msg = violations.iterator().next().getMessage();
              response = Response.ok(msg).withMimeType("text/html");
              context.setResponse(response);
          }
      }

      @Override
      public void beginRequest(RequestContext context) {
      }
}
On the client side, we have already implemented our JS handler to display the error message:
     ...

      success: function(data) {
        if (typeof(data) == 'string') {
          //error response
          alert(data);
        } else {
             ...
        }
Our JuZcret app now provides a pretty good feature for the end user:
Note: If you implement this step just after following the previous steps, you just have to compile your project, paste the new created war in eXo Platform, and start the server. Then access your JuZcret page and take a look at the result. If the result is not correct, configure your project to use JRebel, compile the code, and deploy it in eXo Platform as explained in step 1.
What is missing, so far, is an administrator to manage our application. An administrator must have the availability to configure the portlet. For instance, he or she may want to disable the comment feature.
To do this, what could be better than adding a portlet edit mode?
Portlet Edit Mode
Juzu portlet is JSR286 compliant portlet. To provide an edit mode, we need to tell the portlet container that our portlet support should show an edit mode. That’s why we need to modify our portlet.xml as shown below:
<portlet>
  <portlet-name>JuzcretApplication</portlet-name>
   ...
   <supports>
       <mime-type>text/html</mime-type>
       <portlet-mode>edit</portlet-mode>
     </supports>
...
</portlet>
Now the JuZcret portlet has two modes: edit and view mode. We need to create a new template for the edit mode. In the templates package, add a new file, editMode.gtmpl, to display a checkbox to enable the user to comment on secrets, or not:
#{param name=enableComment/}
<form action="@{JuZcretApplication.enableComment()}" method="POST" role="form">
    <h5>Configuration</h5>
    <input type="checkbox" name="enableComment" <%=enableComment ? "checked" : "" %>/>Enable Comment
    <button type="submit">Save</button>
</form>
Our JuZcret application configuration will rely on the portlet preference mechanism.
Juzu’s framework provide a juzu-portlet plugin which helps to bind the portlet preference to our IOC container and allows the user to inject and use PortletPreferences in our controller to store the configuration data of our portlet.
To use this plugin, we need to add juzu-plugins-portlet and portlet-api dependency in the pom.xml:
<dependency>
	<groupId>javax.portlet</groupId>
	<artifactId>portlet-api</artifactId>
	<version>2.0</version>
	<scope>provided</scope>
</dependency>
<dependency>
	<groupId>org.juzu</groupId>
	<artifactId>juzu-plugins-portlet</artifactId>
	<version>1.0.0-cr1</version>
</dependency>
Now we can inject in our JuZcretApplication controller PortletPreferences using the @Inject annotation. We use it in a new action controller method, named enableComment, which manages the submission of the edit form:
[...]
import juzu.bridge.portlet.JuzuPortlet;
[...]
import javax.portlet.PortletMode;
import javax.portlet.PortletPreferences;
import javax.portlet.ReadOnlyException;
import javax.portlet.ValidatorException;
import java.io.IOException;
[...]

public class JuZcretApplication  implements RequestLifeCycle {

    @Inject
    PortletPreferences prefs;

    public static final String ENABLE_COMMENT = "enableComment";

    @Action
    public Response.View enableComment(String enableComment) throws ReadOnlyException, ValidatorException, IOException {
        if ("on".equals(enableComment)) {
            enableComment = "true";
        }
        prefs.setValue(ENABLE_COMMENT, enableComment);
        prefs.store();
        return JuZcretApplication_.index().with(JuzuPortlet.PORTLET_MODE, PortletMode.VIEW);
    }
After saving the portlet preference, notice that we redirect the portlet to View mode by responding with a Juzu property, the JuzuPortlet.PORTLET_MODE property type with the value PortletMode.VIEW.
Now JuZcret can be configured to disable the comment feature. This means that we have to adapt our secretWall.gtmpl template to display or not display the form for submitting comment by using the enableComment parameter:
#{param name=enableComment/}

  […]

  <% if (enableComment) { %>
      <div class="secret-action">
      […]
      </div>
  <% } %>

  […]
From a security perspective, hiding the social toolbar on the bottom is not enough to prevent a user from commenting, but for the sake of simplicity, we have decided that this solution is acceptable for this tutorial. So when you have disabled comments, it is no longer possible to like or comment on a secret. Social features are deactivated.
The last step is to inject the new editMode.gtmpl template to the controller and modify the index View controller to adapt the display in accordance with the current Portlet mode:
 @Inject
  @Path("editMode.gtmpl")
  org.juzu.tutorial.templates.editMode editMode;

  @View
  public Response.Content index(RequestContext context) {
    boolean enableComment = Boolean.parseBoolean(prefs.getValue(ENABLE_COMMENT, "false"));

    if (PortletMode.EDIT.equals(context.getProperty(JuzuPortlet.PORTLET_MODE))) {
      return editMode.with().enableComment(enableComment).ok();
    } else {
      return secretWall.with().enableComment(enableComment)
.secretsList(secretService.getSecrets()).ok();
    }
   }
To find out the current Portlet mode, we use the RequestContext object, automatically injected by Juzu, that allows us to check the property JuzuPortlet.PORTLET_MODE.
Recompile your application with
$ mvn clean install
Then stop the eXo Platform, copy/paste the new created war in the webapp folder, and restart the eXo Platform.
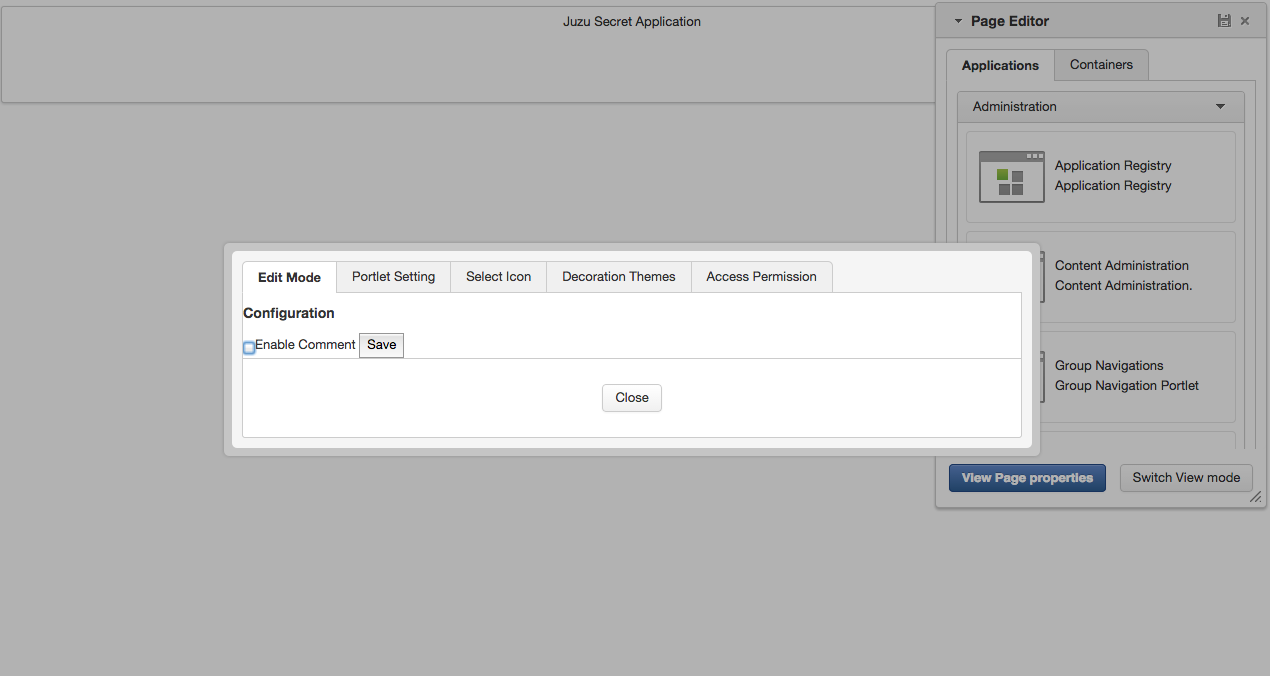
Go to the JuZcret page and click on Edit → Page → Edit Layout. Then mouse over the “Juzu Secret Application” and click on the “Edit Portlet” icon.
Here you can disable comments:
After unchecking “enable comment,” save and close the edit mode. You cannot add a new comment via the secret wall:

We are at the end of step 4 with a nice social application, but our JuZcret application is still missing something important before it will be ready for production: data is not persistent yet. To fix this, come back to this blog next week to read step 5.
The final source of step 4 is available for downloading on Github.
Previous and next steps:
– Learn how to develop great Juzu portlets for eXo Platform!
– Step 2: viewing and posting secrets
– Step 3: Building a sexy secret wall
– Step 4: adding Likes and Comments for Secret
– Step 5: Saving Secrets in the JCR
– Step 6: Let the whole world create new secrets
– Step 7: Finishing the job properly with unit test
Join the eXo tribe by registering for the community and get updates, tutorials, support, and access to the Platform and add-on downloads!

Make the most out of eXo Platform 4
Register to the next webinar and get a complete overview of what you can do with eXo Platform 4. Reserve your seat now!
Brahim Jaouane
I am a Digital Marketing specialist specialized in SEO at eXo Platform. Passionate about new technologies and Digital Marketing. With 10 years' experience, I support companies in their digital communication strategies and implement the tools necessary for their success. My approach combines the use of different traffic acquisition levers and an optimization of the user experience to convert visitors into customers. After various digital experiences in communication agencies as well as in B2B company, I have a wide range of skills and I am able to manage the digital marketing strategy of small and medium-sized companies.