How We Reduced our Community Maintenance to 6 Minutes!
eXo Platform backup basics
Getting in the habit of regularly backing up your eXo Platform instance is of great importance to the sustainability of your data. The backup and restore documentation page explains how to do an effective backup of your instance.
If we take an example of a typical eXo Platform installation, the steps toward a backup would be the following:
1) Stop eXo Platform;
2) Backup the directory EXO_DATA_DIR;
3) Do an SQL database dump;
4) Restart eXo Platform.
This procedure has the advantage of being easy to carry out regardless of the deployment architecture. Still, it does depend on the volume of the data you are dealing with. The increase in the time required for your backup and restore operation would then look similar to this:
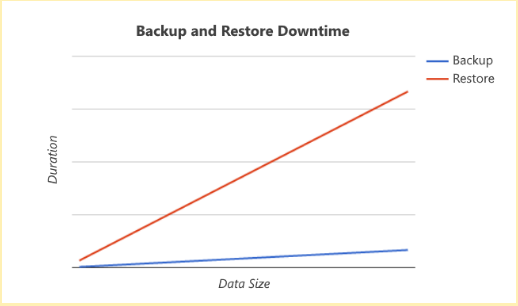
Depending on your site uptime commitments, doing backups with higher downtimes due to a large amount of data can become problematic.
So what to do when the volume of my data increases?
Because each installation is different, there is no one universal way to improve your backup downtime. An eXo Platform expert could be helpful here in that he can evaluate your current situation and recommend the best approach.
Having said that, let us take our eXo Tribe community site—which runs on eXo Platform—as a case study explaining how we solved this downtime problem. This community site allows anyone interested in eXo Platform to find some useful resources and discussions about it. In addition to that, eXo Platform employees use it to collaborate internally through private spaces, but also because we believe in the importance of thoroughly eating one’s own dog food.
The growth in the number of registered users (around 90,000 as of today) results in a constant increase in the volume of the data that needs to be backed up. This equates to an average backup time of 3 hours and a restore that takes over one day. Delays like these are simply incompatible with our service commitments. This called for a reassessment of our backup strategy.
The (oversimplified) architecture at hand is the following:
- Mono Linux-based server infrastructure
- MySQL database
- Disk data
Choosing our backup strategy
Each one of the database solutions supported by eXo Platform has its own documentation addressing backups:
- MySQL : http://dev.mysql.com/doc/refman/5.7/en/backup-and-recovery.html
- PostreSQL : https://www.postgresql.org/docs/9.1/static/backup.html
- Oracle : http://docs.oracle.com/database/121/BRADV/toc.htm
- SQLServer : https://msdn.microsoft.com/en-us/library/ms187510.aspx
The method of choice would then depend on the architecture and priorities at hand. In the case of MySQL, the following table should help provide an idea on the possibilities available:
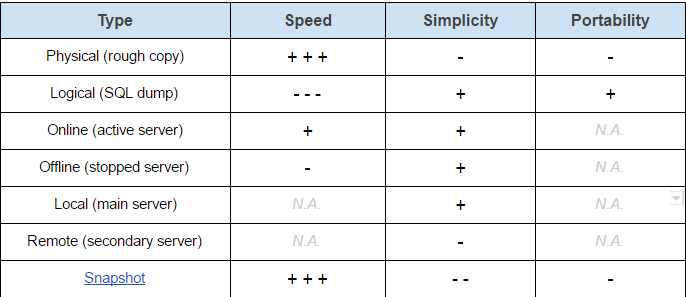
For the eXo Tribe site, our priority was to reduce backup and restore downtime (i.e. speed) so the Physical/Online/Snapshot combination was the ideal one.
The snapshot method allows capturing an image of a file system taken at an instant T while simultaneously authorizing its modification through write operations. This meant that we would be able to do our backup according to the following steps:
1) Stop eXo Platform
2) Take a snapshot of eXo Platform data and SQL database
3) Restart eXo Platform
4) Copy and save data from the snapshot while eXo Platform is running
5) Delete the snapshot
The actual implementation
1. Snapshots:
Since at eXo Platform, LVM (Logical Volume Manager) is already used in all of our servers to manage disk volumes, it only made sense to use it for managing the snapshots.
The lvscan command lets us display the logical volumes in a given system:
# lvscan
...
  ACTIVE            '/dev/vg/lvsrv' [1.64 TiB] inherit
...
In our case, we would need to take a snapshot of the /dev/vg/lvsrv volume. Its creation would be instantaneous but we would need to reserve disk space that accounts for all the write operations that will take place during its existence. If no such space is found to be available, LVM will destroy the snapshot in order to avoid penalizing the main volume.
The pvscan command allows us to check for available disk space:
# pvscan
  PV /dev/sda5   VG vg   lvm2 [2.00 TiB / 300.00 GiB free]
  Total: 1 [2.00 TiB] / in use: 1 [2.00 TiB] / in no VG: 0 [0   ]
So we have 300Gb worth of free space on our volume. We will then reserve an empirical size of 200Gb which should be enough considering the activity taking place during the time our data will be copied.
# sudo lvcreate -s -L 200G -n lvsrv-snapshot /dev/vg/lvsrv
  Logical volume "srv-snapshot" created
If we display the list of volumes again, we will notice the /dev/vg/srv-snapshot snapshot volume:
# lvscan
  ACTIVE   Original '/dev/vg/lvsrv' [1.64 TiB] inherit
  ACTIVE   Snapshot '/dev/vg/lvsrv-snapshot' [200.00 GiB] inherit
It can be treated as a typical LVM volume and will therefore give us access to the data of the lvsrv volume at the time of the snapshot creation. We will use it in read-only mode in order to make sure that the data won’t be touched:
# mkdir /mnt/srv-snapshot
# mount -o ro /dev/vg/lvsrv-snapshot /mnt/srv-snapshot
Pour vérifier à tout moment la consommation de l’espace réservé, nous utiliserons la commande lvs :
To verify the consumption of reserved disk space at any given moment, we can use the lvs command:
# lvs
  LV             VG   Attr      LSize   Pool Origin Data%  Move Log Copy%  Convert
  lvsrv          vg   owi-aos--   1.64t
  lvsrv-snapshot vg   swi-aos-- 200.00g      lvsrv    2.39
2.39% of our reserved 200Gb are used, this allows us to backup our data with no risk of having our snapshot deleted by LVM.
2. Snapshots and MySQL:
Before creating the snapshot, we have to make sure that MySQL has persisted all of its memory data on the disk. Proceeding in this way allows us to avoid a restart of the database and loading of our data from the disk.
We have to also make sure that no write operations will take place at the moment of the snapshot’s creation (warm backup). We can do this by following these instructions:
# Disk write and lock
FLUSH TABLES WITH READ LOCK;
# Unlock
UNLOCK TABLES;
One important thing is that the session that has served in creating the lock must be kept open during the creation of the snapshot, otherwise the lock will be deleted. In the context of an automatic backup, the use of a named pipe provides a solution for this:
# Prepare SQL instructions
cat << EOF > ${LOCK_CMD}
SET AUTOCOMMIT=false;
FLUSH TABLES WITH READ LOCK;
EOF

cat << EOF > ${UNLOCK_CMD}
UNLOCK TABLES;
EXIT;
EOF

# Create named pipe
mkfifo ${PIPE_PATH}

# Create connection to MySQL
# It will remain active during the creation of the snapshot
# to avoid deletion of the lock
cat ${PIPE_PATH} | mysql &

# Lock the tables
cat ${LOCK_CMD} > ${PIPE_PATH}

# Create the snapshot
…

# Unlock the tables and close the session
cat ${UNLOCK_CMD} > ${PIPE_PATH}
3. Restarting eXo Platform and copying the data:
Once the snapshot is created, the service can be restarted and the data can be copied. The steps are as follows:
1) Copying the MySQL data directory
2) Copying eXo Platform data
3) Unmounting the snapshot
4) Deleting the snapshot
Voilà! The backup is now finished. With the data copy operation now taking place in the background and the application being started, our backup downtime is now significantly reduced to just the few minutes it takes to restart the service—a time that is not affected by the size of our data. In the case of the eXo Tribe site, that time is about 6 minutes long.
To make things better, the upcoming 4.4 version of eXo Platform will include some restart time improvements which will further reduce this downtime. So stay tuned for that!

Brahim Jaouane
I am a Digital Marketing specialist specialized in SEO at eXo Platform. Passionate about new technologies and Digital Marketing. With 10 years' experience, I support companies in their digital communication strategies and implement the tools necessary for their success. My approach combines the use of different traffic acquisition levers and an optimization of the user experience to convert visitors into customers. After various digital experiences in communication agencies as well as in B2B company, I have a wide range of skills and I am able to manage the digital marketing strategy of small and medium-sized companies.