Building an auto image slideshow using AJAX & DOM Object with eXo DriverConnector API

AJAX allows a gadget to be updated asynchronously by exchanging small amounts of data with the server behind the scenes. Moreover, with the support of HTML DOM Object, the gadget’s content can be created dynamically based on AJAX’s response data. This section shows you how to leverage these utilities to customize your gadget.
1/ Create a basic file and configure your gadget’s name as auto-slideshow as follows:
<project xmlns="https://maven.apache.org/POM/4.0.0" xmlns:xsi="https://www.w3.org/2001/XMLSchemainstance"
xsi:schemaLocation="https://maven.apache.org/POM/4.0.0 https://maven.apache.org/maven-v4_0_0.xsd">
    <modelVersion>4.0.0</modelVersion>
    <groupId>sample</groupId>
    <artifactId>gadget</artifactId>
    <packaging>war</packaging>
    <version>1.0</version>
    <name>Auto Slideshow Gadget sample</name>
    <build>
        <finalName>auto-slideshow</finalName>
    </build>
</project>
2/ Add this file to the directory of your project:
<?xml version="1.0" encoding="UTF-8"?>
<web-app version="3.0" metadata-complete="true"
xmlns="https://java.sun.com/xml/ns/javaee" xmlns:xsi="https://www.w3.org/2001/XMLSchema-instance"
xsi:schemaLocation="https://java.sun.com/xml/ns/javaee https://java.sun.com/xml/ns/javaee/web-app_3_0.xsd">
    <display-name>auto-slideshow</display-name>
</web-app>
3/ Now, create a simple UI for your gadget with its style:
<!--Defining style for gadget-->
  <style type="text/css">
    img {
        width: 240px;
    }
    #slideshow {
        margin: 10px auto 10px;
        position: relative;
        width: 240px;
        height: 200px;
        padding: 10px;
        box-shadow: 0 0 20px rgba(0,0,0,0.4);
    }
    #slideshow > div {
        position: absolute;
        top: 10px;
        left: 10px;
        right: 10px;
        bottom: 10px;
    }
  </style>

  <!--Gadget's main body which will be added by HTML DOM Object later-->
  <div id="slideshow">
  </div>
4/ Create the following JavaScript function using AJAX to call the DriverConnector API to get all the public images of the root user (see here for more details). Notice the function will be created in the following steps.
function getImages() {
//This function uses AJAX to send GET request to server's DriverConnector API and receive XML response
jQuery.ajax({
type: "GET",
url: "https://localhost:8080/portal/rest/wcmDriver/getFoldersAndFiles?driverName=Collaboration¤tFolder=Users/r___/ro___/roo___/root/Private/Pictures¤tPortal=intranet&repositoryName=repository&workspaceName=collaboration&filterBy=Image",
contentType: "application/xml; charset=utf-8",
dataType: "xml",
success: function (data, status, jqXHR) {
var strResults=new XMLSerializer().serializeToString(data.documentElement);
//build dynamic html content for "slideshow" div tag
traverseXMLDoc(strResults, "slideshow");
},
//error report
error: function (jqXHR, status) {
// error handler
alert("Cannot retrieve data!");
}
});
}5/ Create the function with two input parameters as follows:
function traverseXMLDoc(xmlDoc, idOfContainerDomElement){
    //This function traverses through the whole XML response returned from server

        var $xmlDocObjChildren, $contentDiv;
        $contentDiv = $('#' + idOfContainerDomElement);
        if ($contentDiv.length === 0) {
            throw new Error('There are no DOM elements with this id: "' + idOfContainerDomElement + '"');
        }
        //Information of each image object is contained in "File" tag
        $xmlDocObjChildren = $(xmlDoc).find("File");
        $xmlDocObjChildren.each(function(index, Element) {
        var $currentObject = $(this),
            childElementCount = Element.childElementCount,
            //Image's url is contained in "url" attribute
            currentNodeType = $currentObject.attr('url');

        //Adding dynamic content into gadget's body
        $contentDiv.append('<div><img src="'+currentNodeType+'"></div>');
        });
    }
6/ Now, add some image effects to your gadget:
<script type="text/javascript">
//Creating gagdet's effects
    $("#slideshow > div:gt(0)").hide();
    setInterval(function() {
      $('#slideshow > div:first')
        .fadeOut(1000)
        .next()
        .fadeIn(1000)
        .end()
        .appendTo('#slideshow');
    },  3000);
 </script>
7/ Finally, include all your created contents in the file under to get this script:
<?xml version="1.0" encoding="UTF-8" ?>
<Module>
<ModulePrefs title="Memories!" width="240" height="200"/>
<Content type="html">
<![CDATA[
<!--Including JQuery library-->
<script src="https://code.jquery.com/jquery-2.1.3.js"></script>
<!--Defining style for gadget-->
<style type="text/css">
img {
width: 240px;
}
#slideshow {
margin: 10px auto 10px;
position: relative;
width: 240px;
height: 200px;
padding: 10px;
box-shadow: 0 0 20px rgba(0,0,0,0.4);
}
#slideshow > div {
position: absolute;
top: 10px;
left: 10px;
right: 10px;
bottom: 10px;
}
</style>
<!--Gadget's main body which will be added by HTML DOM Object later-->
<div id="slideshow">
</div>
<script type="text/javascript">
getImages();
function traverseXMLDoc(xmlDoc, idOfContainerDomElement){
//This function traverses through the whole XML response returned from server
var $xmlDocObjChildren, $contentDiv;
$contentDiv = $('#' + idOfContainerDomElement);
if ($contentDiv.length === 0) {
throw new Error('There are no DOM elements with this id: "' + idOfContainerDomElement + '"');
}
//Information of each image object is contained in "File" tag
$xmlDocObjChildren = $(xmlDoc).find("File");
$xmlDocObjChildren.each(function(index, Element) {
var $currentObject = $(this),
childElementCount = Element.childElementCount,
//Image's url is contained in "url" attribute
currentNodeType = $currentObject.attr('url');
//Adding dynamic content into gadget's body
$contentDiv.append('<div><img src="'+currentNodeType+'"></div>');
});
}
function getImages() {
//This function uses AJAX to send GET request to server's DriverConnector API and receive XML response
jQuery.ajax({
type: "GET",
url: "https://localhost:8080/portal/rest/wcmDriver/getFoldersAndFiles?driverName=Collaboration¤tFolder=Users/r___/ro___/roo___/root/Private/Pictures¤tPortal=intranet&repositoryName=repository&workspaceName=collaboration&filterBy=Image",
contentType: "application/xml; charset=utf-8",
dataType: "xml",
success: function (data, status, jqXHR) {
var strResults=new XMLSerializer().serializeToString(data.documentElement);
//build dynamic html content for "slideshow" div tag
traverseXMLDoc(strResults, "slideshow");
},
//error report
error: function (jqXHR, status) {
// error handler
alert("Cannot retrieve data!");
}
});
}
//Creating gagdet's effects
$("#slideshow > div:gt(0)").hide();
setInterval(function() {
$('#slideshow > div:first')
.fadeOut(1000)
.next()
.fadeIn(1000)
.end()
.appendTo('#slideshow');
}, 3000);
</script>
]]>
</Content>
</Module>Notice that you can follow this to create CSS and JavaScript resources in separate files to share with other gadgets. In this guide, we keep it simple by including one file only.
8/ Add the following content to the file under the directory:
<gadgets
xmlns:xsi="https://www.w3.org/2001/XMLSchema-instance"
xsi:schemaLocation="https://www.gatein.org/xml/ns/gatein_objects_1_0 https://www.gatein.org/xml/ns/gadgets_1_0"
xmlns="https://www.gatein.org/xml/ns/gadgets_1_0">
    <gadget name="AutoSlideshowGadget">
        <path>/gadgets/AutoSlideshowGadget/AutoSlideshowGadget.xml</path>
    </gadget>
</gadgets>
9/ Create the target war with the Maven command:
10/ Add the context name auto-slideshow of the gadget war to as in step 6 of Create a very simple gadget.
11/ Restart the server, then deploy it in the application server by copying the generated web archive , from the target folder into the deployment folder where you unpacked the eXo Platform installation.
12/ Go to the Applications menu and select the Gadget button. The new gadget will be listed:
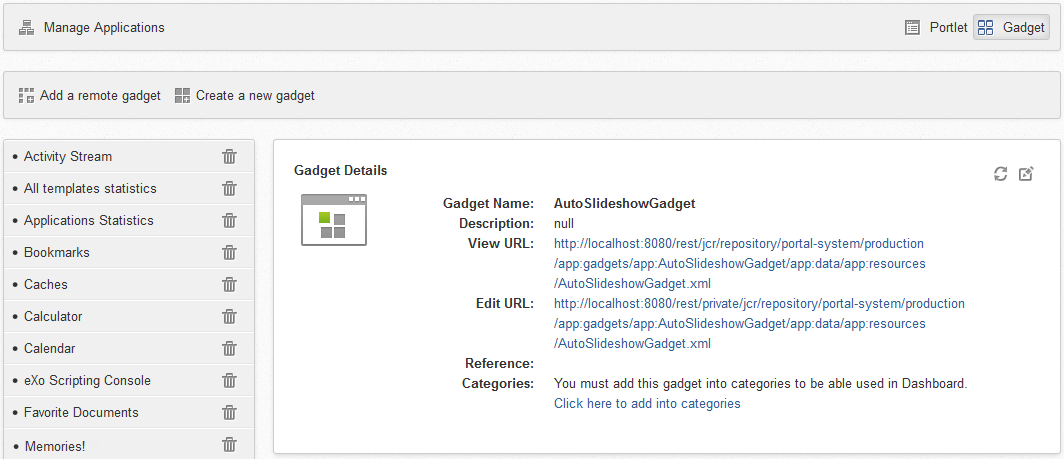
Add this gadget into a specific category to bring it into use.
13/ Before using this gadget, you need to log in as root user. Then you can upload images into the folder under the folder.
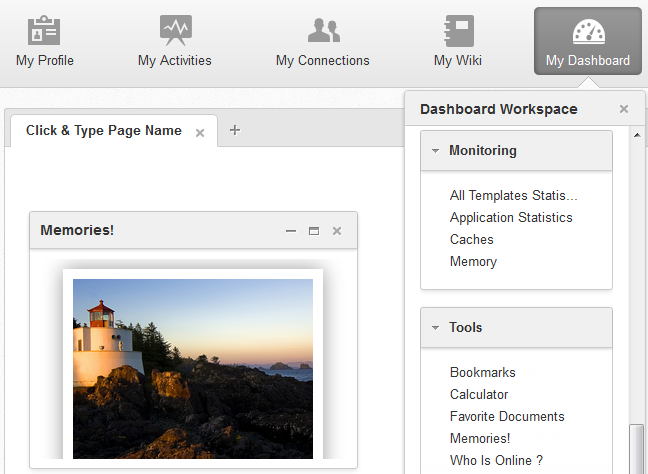
14/ Go to the Dashboard to insert the gadget into the page. Open the Dashboard Workspace by clicking the Add Gadgets link and choose the auto slideshow gadget named “Memories!” The result is as below:
The source code for this demonstration is available on GitHub, so you can download and test it.
(this article was originally posted on my blog: Lan Nguyen ~ Writing is sharing)
Join the eXo tribe by registering for the community and get updates, tutorials, support, and access to the Platform and add-on downloads!

Make the most out of eXo Platform 4
Register to the next weekly live demo session and get a complete overview of what you can do with eXo Platform 4. Reserve your seat now!