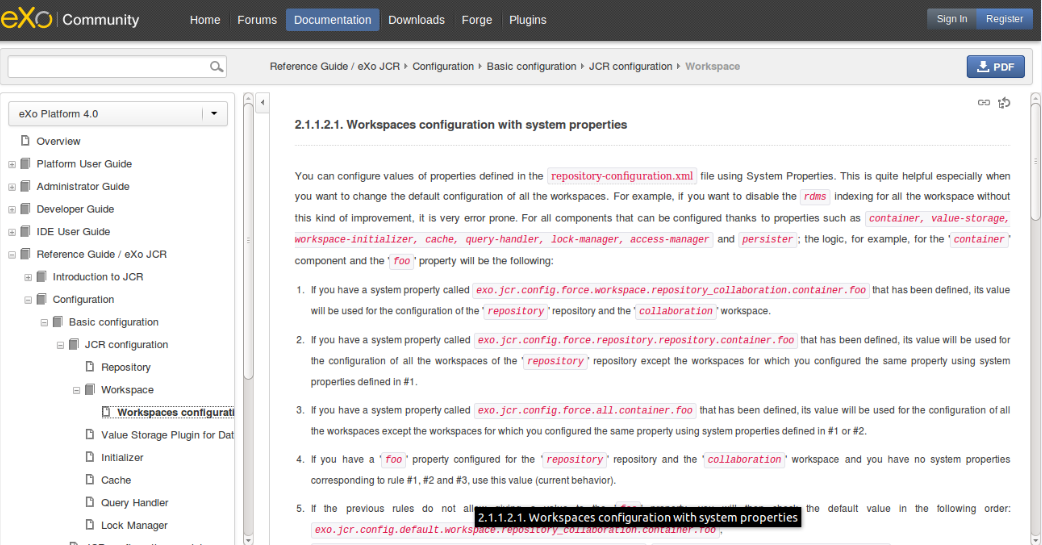
How we customized Eclipse Infocenter for the new eXo documentation website
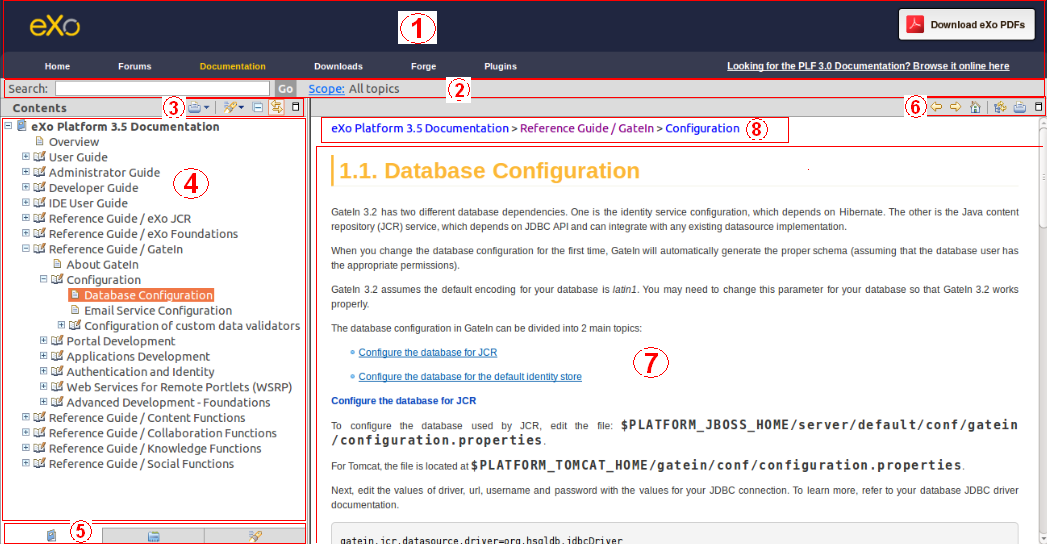
Eclipse offers plugin developers the ability to add help documentation for their plugins locally or online. Opening that help will give you a nice window with searchable help, something like this:
with different areas:
- Banner
- Searching area
- Table of content toolbar
- Items tree
- View tabs
- Content toolbar
- Content area
- Breadcrumbs
Item tree displays list of documentations. When you select an item, the content and breadcrumbs of the selected item will be displayed respectively on the right area. We can find a tutorial provided on Eclipse Help guiding you how to deploy the infocenter as a Web Archive here. eXo Platform has succeeded in creating an infocenter package named infocenter-webapp-${version}.war deployable to server that you can download from eXo Platform repository. Documentations Website of eXo Platform http://docs.exoplatform.com/ uses this package to deploy documentation of Platform 4.0 and Platform 3.5. This post represents how to customize the default look and feel and behavior provided by Eclipse Help Infocenter as you desire.
Customize Eclipse infocenter webapp
By extracting infocenter-webapp-${version}.war, you will find a jar package org.eclipse.help.webapp_${version}.jar under this path infocenter-webapp/WEB-INF/plugins which contains a bundle of editable files and compiled java classes. All cool stuff will be done by customizing jsp, stylesheet and javascript files in advanced folder in this package.
Global layout
Infocenter uses Framesets and Frames to separate areas on whole page (searching area, reading area, tree panel, etc.). Each frame has a dedicated name. The global layout of the website page is represented in detail on the following schema:
which:
- BannerFrame: link to banner file. It allows you to change the banner of website with your company logo, navigation menu, etc.
- SearchFrame: here we call the searching area that includes search input, search button, link to set scope of search action, etc.
- NavFrame: It’s the left part that includes a toolbar with a series of small buttons (Print selected topic, Search topics, Collapse all, Link with contents, and Maximize), a tree of items to navigate, and a toolbar at the bottom with three tabs allowing you to display appropriate content (Contents, Index, Search Results).
- ContentFrame: It’s the right part that includes a toolbar with another series of small buttons (Go Back, Go Forward, Home, Show in TOC, Print Page, and Maximize) and an area to display breadcrumbs and content of selected topic.
All these components can be customized directly in files in org.eclipse.help.webapp_${version}.jar/advanced folder. We will indicate which file matches which part in the following sections, and the customization will depend on your design. From now, all files that we mention can be found in the advanced folder of org.eclipse.help.webapp_${version}.jar package.
The banner
The entry point in which a whole page is rendered is index.jsp file. It declares our three main frames, as in the schema above. Each frame has an attribute named src. Put your banner file in the advanced folder, and then you can point src attribute of BannerFrame to your banner file. E.g.: src=”advanced/banner.html”
Searching area
If you want to customize the look and feel of a search form (search input, search button, scope link, etc.), you can do it via searchScoped.jsp file.
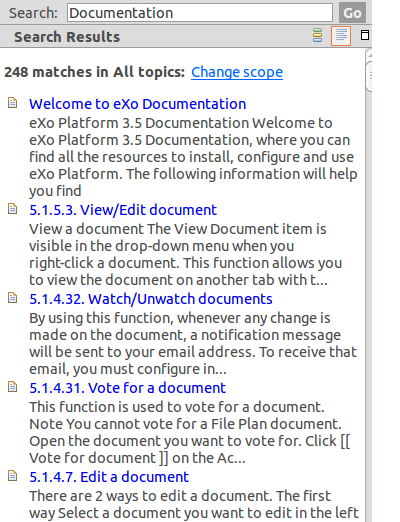
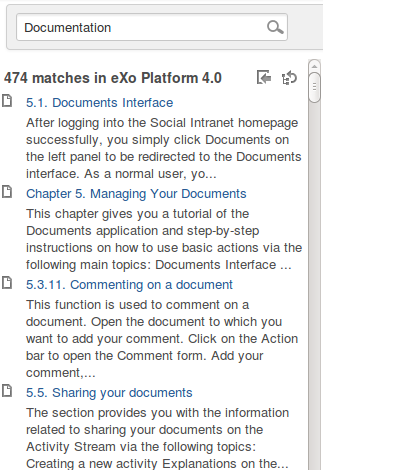
When you click on a search button to do a search action, js code in searchScoped.jsp file will be called (entry point is doSearch() function). Based on input text and selected scope, a query will be created and passed to java code to handle. The tree panel will be switched to view “Search Result,” and the rendering and switch tabs are managed in tabs.jsp and nav.jsp. Search results are rendered by searchView.jsp and use style sheet from searchList.css. When you click on Scope link on searching area, a small window that appears allows you to manage the scope of your search action. The default scope is “All topics.” You can customize its look and feel and behavior via workingSetManager.jsp and workingSet.jsp. Here is the result after we did some customizations of css and html of search form and search result panel:
Before:
After:
NOTE: You can modify style sheet of components in css files (searchLisht.css, breadcrumbs.css, tocTree.css, etc.) or css embedded in header of jsp files, or you can also reorganize them to grouping all style sheets to one common place. It’s easier to maintain and improve later.
Toolbars
We have two toolbars on the left and right panels, respectively. Although they are on two different frames, they use some common files to be rendered and to behave. There are three necessary files for each toolbar: the toolbar on the left (tocToolbar.jsp, toolbar.jsp and navActions.js), the toolbar on the right (contentToolbar.jsp, toolbar.jsp and contentActions.js). tocToolbar.jsp and contentToolbar.jsp provide a list of buttons with basic information (name, icon, param, state). toolbar.jsp file is responsible to take these lists and render them. Two js files contain javascript code to handle click events on each button (Show in TOC, Print, Previous, Next, Home, Collapse All, Search Topics). Only the maximize function used to collapse frames calls the toogleFrame(title) function in help.jsp. The last item to note is that the toolbar on the left is linked from view.jsp, and the one on the right is linked from content.jsp. This is useful if you want to remove these toolbars.
Tree panel
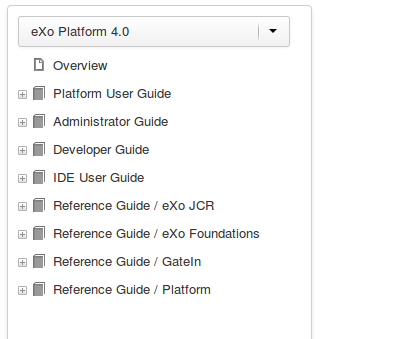
The entry point for the items tree is tocView.jsp file, and the style sheets are in tocTree.css. The table of contents in the tree panel is constructed and updated each time the page is loaded. It’s generated top-down from root to leaf node by functions in helptreechildren.js file. All events triggered on the tree panel will be handled by helptree.js and tocTree.js files. By using these files for the Documentations Website of eXo Platform, we made some changes for the tree panel; we added a select box allowing you to choose which book to display. When a book is selected, the tree panel will be updated to display chapters and sections of that book, whereas the former behavior of the tree panel was to display all books, chapters, and sections each time a whole page was loaded.
Reading area
The breadcrumbs and the content displayed on the reading area are rendered by java code. Even if Eclipse Help is “open-source,” it’s still hard to customize java files, recompile and package them into a new org.help.eclipse.webapp.jar. What we can do for customization is to inject javascript code into the header of content.jsp file, which is the entry point to render the reading area. For example, javascript supports calling method after a whole page was loaded so that we can manipulate elements on the reading area after the page is finished loading. We moved the default breadcrumbs from the reading area to the searching area and created a new look and feel for it via breadcrumbs.css file.
Before:
After:
We customized Eclipse Infocenter to make a new look and feel for Documentations Website of eXo Platform, and the results are great! You are entirely able to create fantastic stuff for your website.
