Integrating a CMIS repository with Zoho using gadgets in GateIn
1. Introduction
Content Management Interoperability Services (CMIS) is a standard for improving interoperability between Enterprise Content Management systems. It’s a new standard to make Document Management more interoperable.
A year and half ago, I already wrote a web service in java to edit documents, stored in the JCR, with Zoho. As CMIS arrive, it seems a good idea to rewrite this one with this standard and using groovy. Last time, I used a greasemonkey script to integrate it in eXo ECM, but this time, I’m going to create a gadget for that. Thanks to GateIn Gadget Dashboard, I’ll be able to follow multiple repository in one page and edit their files.
Requirements for this project
- Browse the CMIS repository
- If file can be edited with Zoho, offer this possibility
- Work in the main browsers
- Work with all the public CMIS demo servers available
What you need to know before starting
- Basic knowledge of the gadget API. If you don’t have a look at the Gadget Developer Guide
- Basic knowledge of javascript and jQuery
- Basic knowledge of what is Atom, REST and CMIS
2. Accessing to files of a CMIS servers
CMIS servers make available 2 types of API: SOAP and Atom. From javascript, it’s easier to use the Atom API. But all the browsers don’t handle namespaces the same way, so it makes it harder to parse response. We are going to use JQuery because it makes things easier than using the native javascript functions, but I guess it’s possible to do the same with YUI, Dojo or other…
Parsing Atom in Javascript
To get a namespaced node with jQuery, you can do:
//this doesn't work because the : is used by the selector syntax of JQuery
var vendor = $(xmlNode).find("cmis:vendorName").text();
//this work in IE and Firefox but not in Webkit (Chrome and safari)
var vendor = $(xmlNode).find("cmis\\:vendorName").text();
//This is going to work on IE, Webkit (Chrome and safari) and Firefox.
var vendor = $(xmlNode).find("[nodeName=cmis:vendorName]").text();
So with this, I created a simple CMIS response parser in javascript: jquery.cmis.js (jsDoc). It can parse a Service, a Feed or an Entry.
To get the workspaces from a service:
//We parse the response sent by the CMIS service
var workspaces = CMIS.parse(XMLDocument);
//We take the first workspace
var current_workspace = workspaces[0];
// show the vendor of the first workspace
alert(current_workspace.getVendorName());
// Get the url pointing to the root directory listing
var root_feed = current_workspace.collections["root"];
To list a feed’s entries:
//We parse the response sent by the CMIS service
var feed = CMIS.parse(XMLDocument);
feed.getEntries().each(function(i, entry) {
  // return if the entry is a folder
  if (entry.isFolder()) {
    // title of the folder
    entry.title;
    // get the link to browse the directory
    entry.getLinks("down");
  } else {
    // title of the document
    entry.title;
    //URL of to get the content of the document
    entry.getContentUrl();
  }
}
Loading the feed from the gadget
So now that we know how to parse the response of a CMIS server. We can start building our gadget. Most (all?) the CMIS repository are using BasicAuth as authentication/authorization mechanism, so if our CMIS server is on the same domain name we could directly send a request to it. But as we want to be able to integrate CMIS server from all over the internet, we need to use a proxy (remember the same origin policy of our browsers).I’d love to see CMIS repositories to use oAuth authorization mechanism, but as it’s not the case for now, we need to write a simple proxy in Groovy and JAX-RS to do the authentication for us:
import javax.ws.rs.FormParam
import javax.ws.rs.Path
import javax.ws.rs.POST

@Path("proxy")
public class Proxy {
  @POST
  @Path("basic_auth")
  public String basic_auth(@FormParam("url") String url, @FormParam("login") String login,
                                         @FormParam("password") String password) {
    return get(url, login, password);
  }

  public static String get(String url, String login, String password) {
    // Basic Auth send login and password encoded in Base 64 in the header
    def encoded = "$login:$password".getBytes().encodeBase64().toString()
    def c = new URL(url).openConnection()
    c.setRequestProperty("Authorization", "Basic $encoded")
    return c.content.text
  }
}
So to get a URL authenticated you can just call a url like this:
http://myserver.com/rest/proxy/basic_auth?url=http%3A%2F%2Fcmis.demo.nuxeo.org%2Fnuxeo%2Fsite%2Fcmis%2Fchildren%2F4fb1b8a1-6dfd-4da4-95b0-4ef41c27b920&login=Administrator&password=Administrator
From our gadget, to get the response of the CMIS server using our proxy, we are going to do:
var params = {},
prefs = new gadgets.Prefs();

postdata = {
  url: "http://cmis.exoplatform.org/rest/cmisatom",
  login: prefs.getString("login"),
  password: prefs.getString("password")
};
// our proxy need a POST
params[gadgets.io.RequestParameters.METHOD] = gadgets.io.MethodType.POST;
// We want the response as a DOM Document
params[gadgets.io.RequestParameters.CONTENT_TYPE] = gadgets.io.ContentType.DOM;
// We encode our parameters
params[gadgets.io.RequestParameters.POST_DATA] = gadgets.io.encodeValues(postdata);

// And finally we send our request
gadgets.io.makeRequest('http://cmis.exoplatform.org/rest/proxy/basic_auth', function(res) {
  if (res.rc == 200) {
    var response = CMIS.parse(res.data);
    // We can do now what we want with the response...
  } else {
    alert("Error: " + res.data);
  }
}, params);
We can now just use our response object to list the files on our repository.
3. Editing the files with Zoho
Now that we have successfully accessed to our files, we would like to edit them with Zoho editor (API documentation). We have to POST the file to their server, and they return the URL to edit it. When the user will save the document, the zoho server will do a POST on a callback URL (defined on our first POST) containing the document.
You will need to get your zoho API key.
So, here is how it’s going to work:
- The gadget is going to call our service
- The service will download the file from the CMIS server
- The service will generate an ID for the document. We are going to use the URL on the CMIS server and the login/password to access it. To avoid sending the login and password to zoho, we could have store it in the JCR but it add an extra step that we are not going to show on this tutorial.
- The service will POST everything to the Zoho API corresponding to the right editor (Doc, spredsheet, presentation)
- The service will parse the response and return the url of the editor
- The gadget will redirect the user to the editor
- When the user save the document, Zoho will do a POST on our service to save it
- The service is going to push the document back on the CMIS server
It looks like a lot of things to do, but with groovy and JAX-RS it’s quite simple.
The gadget is going to call our edit service with the URL of the file and the credential needed in parameter:
    @POST
    @Path("edit")
    public String edit(@FormParam("url") String url,
                       @FormParam("filename") String filename,
                       @FormParam("login") String login,
                       @FormParam("password") String password) {

      //We prepare the request
      def client = new HttpClient()
      def ext = getExtension(filename)
      def postMethod = new PostMethod(getZohoURL(ext))

      //Get the content of the file we want to edit and continue to construct the request for the Zoho server
      def src = new ByteArrayPartSource(filename, get(url, login, password))
      Part[] parts = [
              new FilePart("content", src), //content of the file we want to open
              new StringPart("filename", filename), //    filename of the document with extension
              new StringPart("saveurl", callbackURL), //The Web URL should be a service that fetches the content of the updated document and saves it to the user specified location.
              new StringPart("id", getId(url, login, password)), //unique id that will be submitted while saving the document (for reference)
              new StringPart("format", ext) // the format in which document should be saved on remote server
      ];

      postMethod.setRequestEntity(new MultipartRequestEntity(parts, postMethod.getParams()))

      try {
        // We send the request
        def statusCode = client.executeMethod(postMethod)

        // We transform the response into a hashmap
        def resp = parseResponse(postMethod.getResponseBodyAsString())

        //if the status is not 200 (OK) or there was a problem in the opening of the file we throw an exception
        if (statusCode != 200 || resp["RESULT"] == "FALSE") {
          throw new WebApplicationException(Response.status(Response.Status.INTERNAL_SERVER_ERROR).entity(resp["WARNING"]).type("text/plain").build())
        }
        //Everything went fine, so we return the URL to edit the file
        return resp["URL"]
      } finally {
        postMethod.releaseConnection()
      }
    }

    /**
     * from the extension of the file, find which endpoint calling
     */
    private String getZohoURL(String extension) throws IOException {
      def url;
      if (extension == null) {
        throw new WebApplicationException(Response.Status.UNSUPPORTED_MEDIA_TYPE)
      }
      if (extension in ["doc", "rtf", "odt", "sxw", "html", "txt"])
        url = "http://export.writer.zoho.com/remotedoc.im"
      else if (extension in ["xls", "sxc", "csv"])
        url = "http://sheet.zoho.com/remotedoc.im"
      else if (extension in ["ppt", "pps"])
        url = "http://show.zoho.com/remotedoc.im"
      else
        throw new WebApplicationException(Response.Status.UNSUPPORTED_MEDIA_TYPE)
      url = url + "?apikey=" + apiKey + "&output=url"
      return url;
    }
Now that we have sent the file to zoho, we need to save it back on the CMIS server. Zoho will call the following method:
    @POST
    @Path("save")
    @Consumes(["multipart/*"])
    public String save(Iterator<FileItem> items) {
      def stream
      def id

      // We loop over all the POST parameters to find the one that are interesting for us.
      while (items.hasNext()) {
        FileItem item = items.next();

        if (item.getFieldName().equalsIgnoreCase("content")) {
          stream = item.getInputStream()
        }
        if (item.getFieldName().equalsIgnoreCase("id")) {
          id = new String(item.get());
        }
      }

      // We are preparing the request to send to the CMIS server
      // This time, we are going to send a PUT to update the content stream
      def client = new HttpClient()
      def putMethod = new PutMethod(getUrl(id))
      try {
        putMethod.setRequestBody(stream)
        putMethod.setRequestHeader("Authorization", "Basic " + getCredential(id))
        putMethod.setRequestHeader("Content-Type", "application/octet-stream")

        def statusCode = client.executeMethod(putMethod)

        // if everything went fine, we return a message that will be shown to the user
        if (statusCode >= 200 && statusCode < 300)
          return "Saved"
        // If it did not go well, we send an error, and the user will be notified that something went wrong while trying
        // to save his document
        throw new WebApplicationException(statusCode)
      } finally {
        putMethod.releaseConnection()
      }
    }
We have now everything to be able to browse a CMIS repository and edit the files with Zoho. Have a look at the code of the final gadget and feel free to remix it. You can also view the demo on the xCMIS demo server. To deploy it in GateIn Beta5, read How to activate groovy REST services in GateIn Beta5.
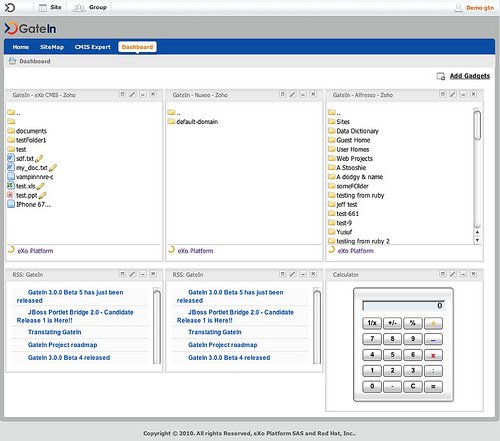
4. Download and link to online demo
- The code of this example (Download)
- Demo with xCMIS, Alfresco and Nuxeo
- jquery.cmis.js(Download)
- xCMIS
Brahim Jaouane
I am a Digital Marketing specialist specialized in SEO at eXo Platform. Passionate about new technologies and Digital Marketing. With 10 years' experience, I support companies in their digital communication strategies and implement the tools necessary for their success. My approach combines the use of different traffic acquisition levers and an optimization of the user experience to convert visitors into customers. After various digital experiences in communication agencies as well as in B2B company, I have a wide range of skills and I am able to manage the digital marketing strategy of small and medium-sized companies.