Portlet Development in eXo Platform with JSF and RichFaces (Part 2/3)
eXo Platform comes with powerful content management features and a large set of portlets to use these features. However, you may want to use these content management capabilities in your own portlets.
This second tutorial will teach you how to use the eXo Content Management API and portlets to create a sample store application. The first part, about JSF/RichFaces integration, is available here.
Our sample application will display a list of products with related pictures. Each product will be composed of a name, a description, a price, a thumbnail, and some pictures. The thumbnail and the related pictures will be retrieved from the eXo Content Management system.
The page will display the product’s thumbnail and the product’s characteristics. The related pictures will be available as links. A Content Detail portlet will be used to display each related picture.
The source code for this tutorial is available here.
Adding contents
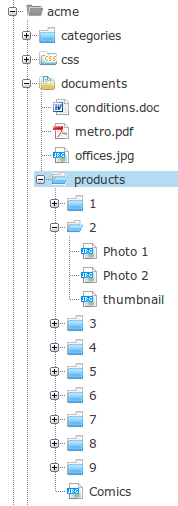
In order for us to retrieve the contents easily, they should be organized correctly. Within the root folder (let’s say ), a folder will be created for each product, named with the product’s ID. All product-related contents will be stored in the corresponding folder. The thumbnail will also be stored in the product’s folder, but with the special name ‘thumbnail’ in order to distinguish it from the other pictures.
So, the content tree will look like this:
Instead of creating all the contents by hand, you can download this JCR export. To use it:
- Go to the Content Explorer;
- Select the Sites Management drive;
- Go to acme > documents;
- Click on the System tab;
- Click on the Import Node button;
- Select the export file for the Upload File field;
- Click on Import.
Important: To ensure that all contents are in published state, you may need to republish them.
Adding eXo dependencies
The first step is to add the eXo dependencies that will be used in our portlet. Edit your pom.xml file and add these lines:
<dependency>
    <groupId>org.exoplatform.ecms</groupId>
    <artifactId>exo-ecms-core-publication</artifactId>
    <version>2.3.4</version>
    <scope>provided</scope>
</dependency>
<dependency>
    <groupId>org.exoplatform.ecms</groupId>
    <artifactId>exo-ecms-core-services</artifactId>
    <version>2.3.4</version>
    <scope>provided</scope>
</dependency>
<dependency>
    <groupId>org.exoplatform.ecms</groupId>
    <artifactId>exo-ecms-core-webui</artifactId>
    <version>2.3.4</version>
    <scope>provided</scope>
</dependency>
Using the eXo Content Management API
In order to manage data displayed on our page, we need a managed bean:
(See the code here)
This bean instantiates two services: one for the products (ProductService) and one for the contents (ContentService), which is initialized with the root folder in the content management system that houses the contents used in the store (retrieved from a portlet preference).
The bean exposes only one kind of data: the products, via the getProducts method. This method calls the ProductService object to retrieve all the products. The ProductService class simply returns sample products:
public class ProductServiceImpl implements ProductService {
    @Override
    public List getProducts() {
        List products = new ArrayList();
        products.add(new Product(1, "Ironman", "Ironman", 12));
        products.add(new Product(2, "Wolverine", "Wolverine", 15.5));
        products.add(new Product(3, "Spiderman", "Spiderman", 13));
        products.add(new Product(4, "Thor", "Thor", 10));
        products.add(new Product(5, "Hulk", "Hulk", 11));
        products.add(new Product(6, "Captain America", "Captain America", 15));
        products.add(new Product(7, "Human Torch", "Human Torch", 11));
        products.add(new Product(8, "Magneto", "Magneto", 17));
        products.add(new Product(9, "Dardevil", "Dardevil", 16.5));
        return products;
    }
}
Then the managed bean calls the ContentService object to retrieve the contents relating to the products. This is the most interesting part as it deals with eXo Platform’s content management features.
eXo Platform provides an API to interact with all content management capabilities (contents, taxonomy, links, publication, SEO, …). In our sample application we will use the WCMComposer API, which allows us to work with contents.
eXo Platform’s Content Management feature provides a utility method to easily instantiate a service:
WCMComposer wcmComposer = WCMCoreUtils.getService(WCMComposer.class);
This service is used in the two methods of ContentService: and .
The method returns the path of the thumbnail of the product if it exists:
@Override
public String getProductThumbnailPath(int productId) {
    String thumbnailPath = null;

    // get wcmcomposer service
    WCMComposer wcmComposer = WCMCoreUtils.getService(WCMComposer.class);

    HashMap filters = new HashMap();
    //filters.put(WCMComposer.FILTER_LANGUAGE, Util.getPortalRequestContext().getLocale().getLanguage());
    filters.put(WCMComposer.FILTER_MODE, Utils.getCurrentMode());
    // take the last published version
    filters.put(WCMComposer.FILTER_VERSION, null);

    try {
        Node productThumbnailNode = wcmComposer.getContent(workspace, path + productId + "/thumbnail", filters,
        WCMCoreUtils.getUserSessionProvider());
        if (productThumbnailNode != null) {
            thumbnailPath = path + productId + "/thumbnail";
        }
    } catch (Exception e) {
        e.printStackTrace();
        thumbnailPath = null;
    }

    return thumbnailPath;
}
The WCMComposer API’s method is used here. It allows us to retrieve content based on its path. Some filters can be added to select the right content base (for instance, based on its language, its version or its publication state).
The method returns all the contents related to a product:
@Override
public List getProductPictures(int productId) {
    List pictures = null;

    // get wcmcomposer service
    WCMComposer wcmComposer = WCMCoreUtils.getService(WCMComposer.class);

    HashMap filters = new HashMap();
    // content of the currently selected language
    //filters.put(WCMComposer.FILTER_LANGUAGE, Util.getPortalRequestContext().getLocale().getLanguage());
    // live or edit mode (will respectively get draft or published content)
    filters.put(WCMComposer.FILTER_MODE, Utils.getCurrentMode());
    filters.put(WCMComposer.FILTER_VERSION, WCMComposer.BASE_VERSION);
    // order clauses
    filters.put(WCMComposer.FILTER_ORDER_BY, "exo:dateModified");
    filters.put(WCMComposer.FILTER_ORDER_TYPE, "ASC");

    try {
        // service call to retrieve the contents
        List picturesNodes = wcmComposer.getContents(workspace, path + productId, filters,
        WCMCoreUtils.getUserSessionProvider());
        pictures = new ArrayList();
        for (Node pictureNode : picturesNodes) {
            // exclude thumbnail
            if (!pictureNode.getProperty("exo:name").getString().equals("thumbnail")) {

                // In live mode, the last published version is a frozenNode, so
                // we need to get the node referenced by this frozen to get the real path
                String picturePath = null;
                if (pictureNode.isNodeType("nt:frozenNode")) {
                    String uuid = pictureNode.getProperty("jcr:frozenUuid").getString();
                    Node originalNode = pictureNode.getSession().getNodeByUUID(uuid);
                    picturePath = originalNode.getPath();
                } else {
                    picturePath = pictureNode.getPath();
                }

                Picture picture = new Picture(pictureNode.getProperty("exo:name").getString(), picturePath, pictureNode.getProperty("exo:title").getString());
                pictures.add(picture);
            }
        }
    } catch (Exception e) {
        e.printStackTrace();
        pictures = null;
    }

    return pictures;
}
We now use the method, which is equivalent to but for multiple contents.
One really interesting point is that, by using this API, you can benefit from all the eXo Platform content management features. For example, by calling the method with the filter set to and the filter set to the current mode (live or edit), only the link of the published pictures will be visible in live mode, whereas the link of the pictures in draft state will be visible in edit mode.
As you can see, the node’s type is checked to distinguish the frozenNode case:
if (pictureNode.isNodeType("nt:frozenNode"))In fact, a frozenNode is a published version of an original node. A frozenNode references the original node (in our case, the picture node) through its property. So we need to get this property to retrieve the original node and get its path.
The last part is to edit our JSF pages to display all the products. For this, a RichFaces data grid () is used:
<rich:dataGrid value="#{comicsStoreBean.products}" var="product" columns="3" elements="6" width="600px" border="0">
    <rich:panel bodyClass="pbody">
        <f:facet name="header">
            <h:outputText value="#{product.name}"></h:outputText>
        </f:facet>
        <h:panelGrid id="product" columns="2" columnClasses="productThumbnailColumn, productDetailColumn">
                <h:panelGroup>
                        <h:panelGroup rendered="#{not empty product.thumbnailPath}">
                                <img src="/rest/jcr/repository/collaboration#{product.thumbnailPath}" width="80px"></img>
                        </h:panelGroup>
                </h:panelGroup>
                <h:panelGrid columns="2">
                     <h:outputText value="Description:" styleClass="label"></h:outputText>
                     <h:outputText value="#{product.description}"/>
                     <h:outputText value="Price:" styleClass="label"></h:outputText>
                     <h:outputText value="#{product.price} €"/>
                     <h:outputText value="Photos:" styleClass="label"></h:outputText>
                     <ui:repeat value="#{product.pictures}" var="picture" varStatus="status">
                        <h:outputLink onclick="window.location = window.location.pathname + '?content-id=/repository/collaboration#{picture.path}'; return false;" value="#">
                                <h:outputText value="#{picture.title}"></h:outputText>
                        </h:outputLink>
                        #{status.last ? '' : ' | '}
                     </ui:repeat>
                </h:panelGrid>
        </h:panelGrid>
        <div class="buyButtonDiv">
                <h:commandButton value="Buy" styleClass="buyButton"></h:commandButton>
        </div>
    </rich:panel>
    <f:facet name="footer">
        <rich:dataScroller/>
    </f:facet>
</rich:dataGrid>
The property lists all links to the product’s pictures. The link simply goes to the same page (because a Content Detail portlet will be added to this page) and passes the content-id parameter with the path of the content to display. The Content Detail will just look at this parameter and display the targeted content.
Adding Content Detail in the page
In order to display the products’ pictures we need to add a Content Detail portlet to the page:
- Edit the page ( in the top bar);
- In the portlet catalog, open the Contents category;
- Drag and drop a Content Detail portlet onto the page, under the first portlet;
- Edit the portlet;
- Select the default content for the Content Path field (products/Comics);
- Scroll down the preferences screen and click on the Advanced link;
- Choose Enabled for the Contextual Content field;
- Leave the other field as default (by content-id);
- Click on Save;
- Click on Close;
- Click on the Save icon (upper right) to save the modifications made to the page.
Our store is ready!
Let’s play with it!
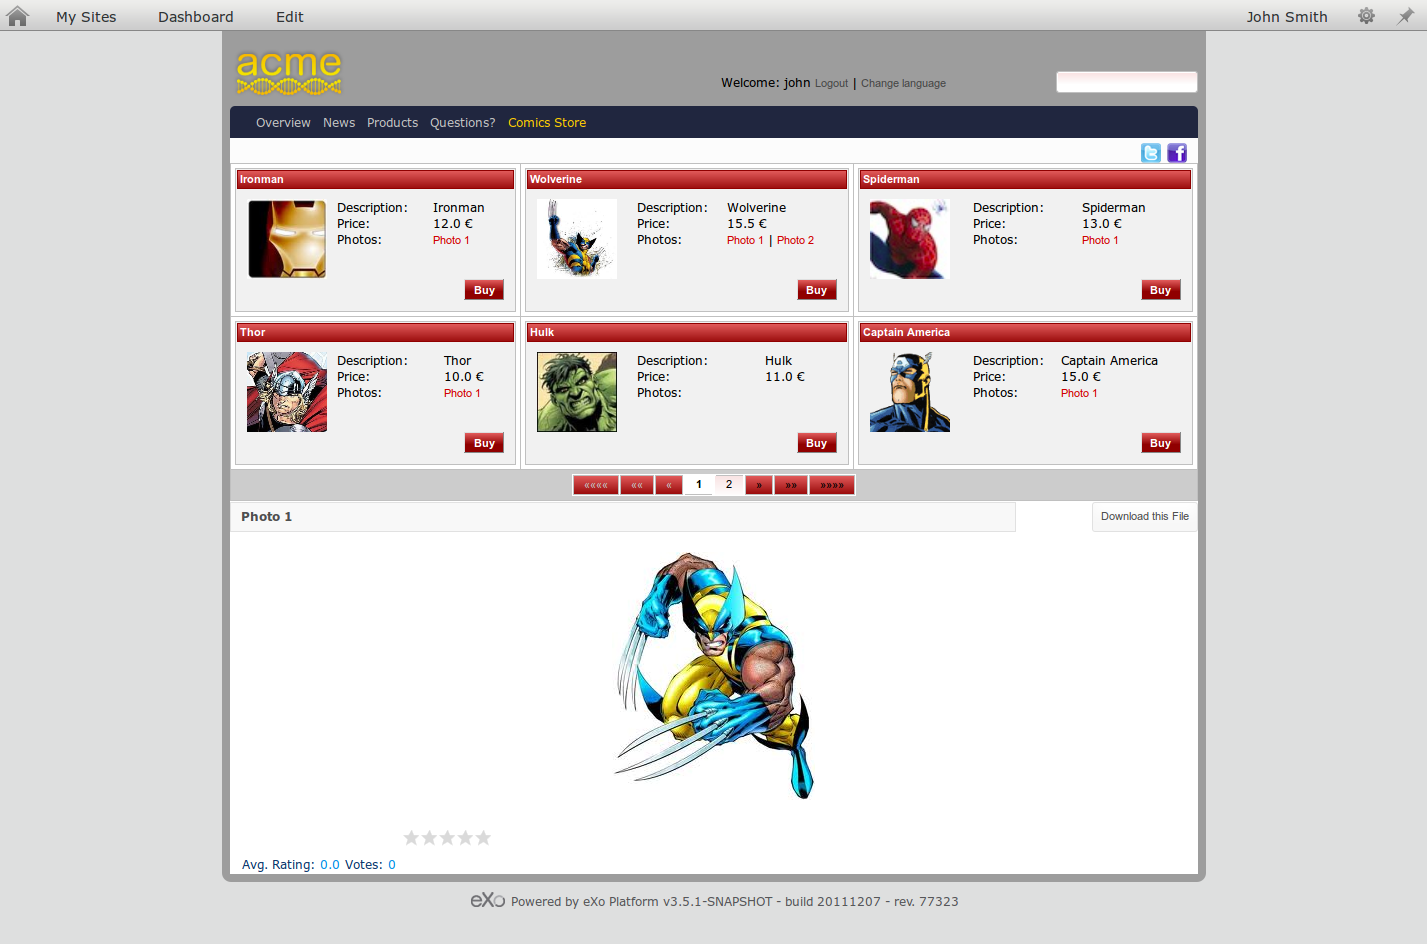
Click on a picture link (for instance, the Photo 1 of Wolverine):
The picture is displayed below.
Let’s now add a new picture. To do so:
- Go to the Content Explorer;
- Go to the Iron Man folder ();
- Click on the Upload Files button;
- Select your file;
- Click on Save.
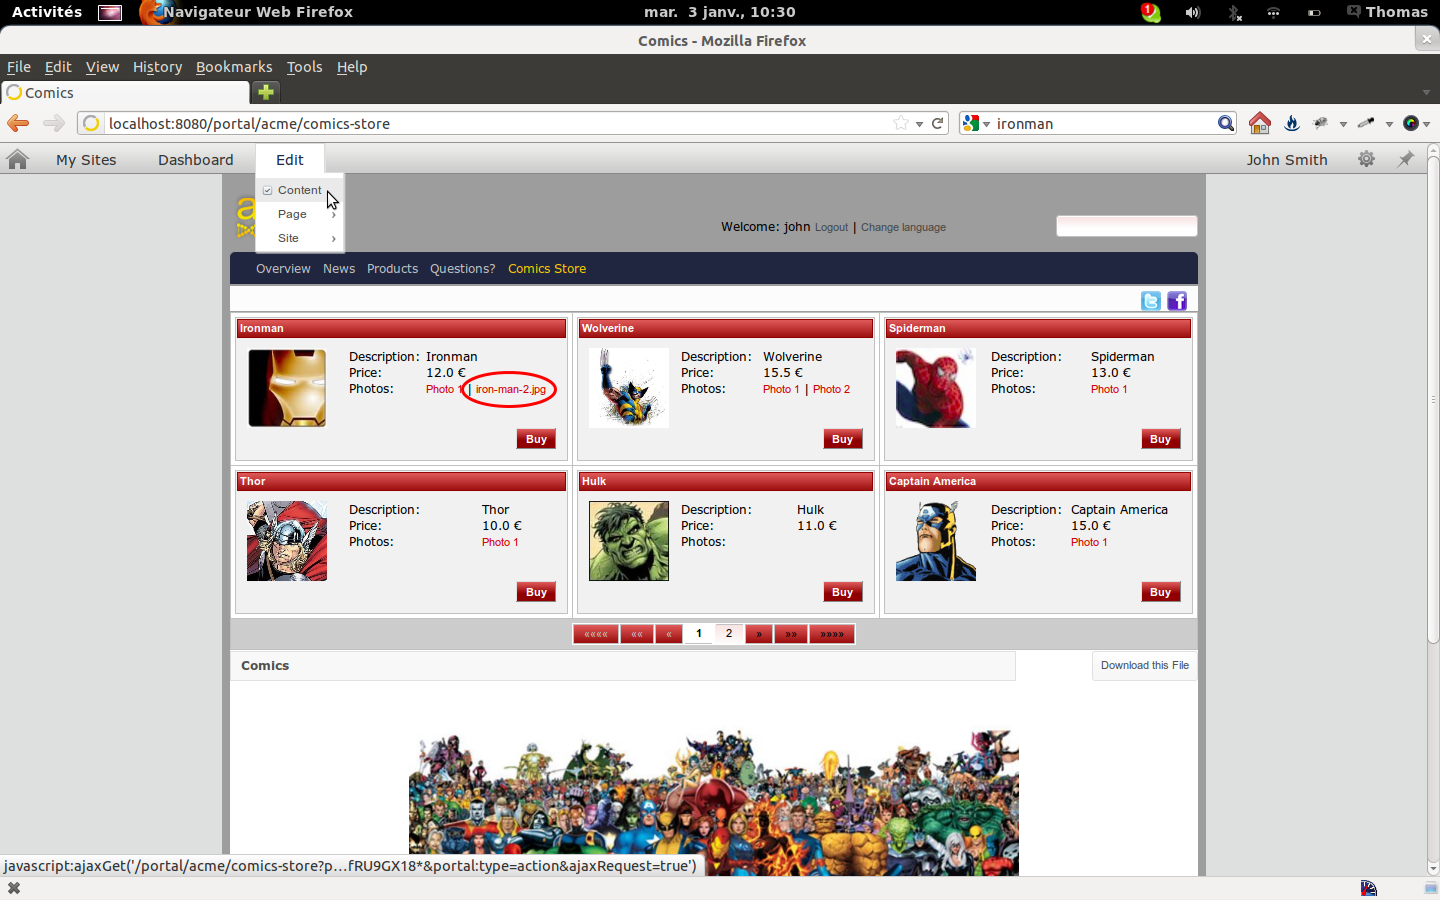
The picture is now uploaded. Leave it in draft state and go back to the Comics store page. As you can see, your new picture does not appear in the Iron Man’s pictures yet.
Now switch to edit mode by clicking on .
The picture link now appears and you can click it to display the new picture. It’s up to you now to publish it to make it available in live mode.
This tutorial has shown you how to use the eXo Content Management API to benefit from all the eXo Content Management features inside your own portlets.
Don’t hesitate to take a look at the documentation to discover all the available APIs. Enjoy!


