- Grégory Picavet
- September 28, 2016
Getting started with ReactJS and eXo Platform portlet development
This article is a repost from Grégory Picavet’s own blog. Grégory is the tech lead on collaborative portal projects for a French Ministry, and a web development passionate.

Content
In this article, I would like to share some information about the eXo Platform portal and ReactJS. You’ll learn how to set up a simple ReactJS and node.js development stack, build a standalone app, and package it all to a portlet. If you’re looking to develop React.js applications on the Exo Platform, you should consider hiring Node.js developers with experience in both technologies. Learn how to Create Figma to React with this comprehensive tutorial.
To efficiently manage JS library dependencies, we will use node.js development services and npm. We’ll then use Maven to build and package the portlet.
1. node.js stack and standalone application
- As I said before, the stack is based on node.js. First, install it on your system. It will come with npm, which you can use to install the JS dependencies (this works like Maven).
- Create a directory named “react-portlet” and generate an initial package.json file:
<pre class="lang:default decode:true ">npm init</pre> - Next, install the React and Moment libraries to deal with the date format later:
<pre class="lang:default decode:true ">npm install --save react@15.3.1 react-dom@15.3.1 moment</pre> - Install the Babel transpilers as a dev dependency:
<pre class="lang:default decode:true ">npm install --save-dev babel-loader babel-core babel-preset-es2015 babel-preset-react</pre> - We will need the webpack library to gather all the JS modules into a bundle file and do some “hot rebuilding.” We’ll also install the express HTTP server to quickly test our app in standalone mode.
<pre class="lang:default decode:true ">npm install –save-dev webpack express</pre> - The project structure has to be Maven-compliant (keep in mind that we have to build a portlet!):
					<pre class="show-plain-default:true lang:default decode:true ">/
├─src
│  ├─main
│  │  ├─java
│  │  ├─js
│  │  ├─webapp
│  │      ├─css
│  │      ├─META-INF
│  │      ├─WEB-INF
│  ├─static
├─package.json
├─pom.xml</pre> - Now we can create the first React component, “Activities,” to fetch the user’s activities from the server and transform them into HTML. To use the modularity of React, we will also create a child component to render a single activity. First, create the “Activities.jsx” file in /src/main/js:
<pre class="lang:js decode:true ">import React from 'react';
import ReactDOM from 'react-dom';
import {Activity} from './Activity.jsx';
class Activities extends React.Component {
constructor(props) {
super(props);
this.state = {activities:[]};
}
componentDidMount() {
fetch("/rest/v1/social/activities?limit="+this.props.limit+"&expand=identity",
{credentials: 'include'})
.then((res) => {
return res.json();
})
.then((json) => {
this.setState(json);
})
}
render() {
var list = this.state.activities.map( (act) => {
return <Activity key={act.id} {...act} />
});
return <ul>{list}</ul>;
}
}
ReactDOM.render(<Activities limit="10"/>, document.getElementById('app'));</pre>
<pre class="lang:js decode:true ">import React from 'react';
var moment = require('moment');
export class Activity extends React.Component {
constructor(props) {
super(props);
}
render() {
var titleHtml = {__html:this.props.title};
return (
<li>
<img src={this.props.identity.profile.avatar===null ? "/eXoSkin/skin/images/system/UserAvtDefault.png":this.props.identity.profile.avatar} />
<div className="block">
<div className="header">
<strong>{this.props.identity.profile.fullname}</strong>
<br/>
Posted : <span>{moment(new Date(this.props.createDate)).fromNow()}</span>
</div>
<div dangerouslySetInnerHTML={titleHtml}/>
</div>
</li>);
}
}</pre> - Now we create index.html in /src/static and declare the React mount tag as a simple div:
<pre class="lang:xhtml decode:true "><!doctype html>
<html>
<head>
<meta charset="UTF-8">
<link rel="stylesheet" href="/css/main.css">
</head>
<body>
<div id="app" class="container"></div>
<script src="js/bundle.js"></script>
</body>
</html></pre> - To generate the bundle, we create a “/src/main/js/index.js” file that will import the root component of our app (which is Activities here):
<pre class="lang:js decode:true ">import Activities from './Activities.jsx';</pre>
					<pre class="lang:js decode:true ">var path = require('path');
var webpack = require('webpack');

module.exports = {
  devtool : 'cheap-module-source-map',
  entry: './src/main/js/index.js',
  output: { path: path.join(__dirname, 'target/react-portlet/js'),
	    filename: 'bundle.js'},

  module: {
    loaders: [
      {
        test: /.jsx?$/,
        loader: 'babel-loader',
        exclude: /node_modules/,
        query: {
          presets: ['es2015', 'react']
        }
      }
    ]
  },

  plugins:[
  new webpack.DefinePlugin({
    'process.env':{
      'NODE_ENV': JSON.stringify(process.env.NODE_ENV)
    }
  })]
};</pre> - Before we run the app, our static files need to be copied to the target directory as well. This can be done with scripts in “/package.json”:
<pre class="lang:js decode:true ">"scripts": {
"copy": "cp -R src/static/* target/static & cp -R src/main/webapp/css target/static"
}</pre>
<pre class="lang:default decode:true ">npm run copy</pre> - Next, we create the express HTTP server in the /server.js file.
- The express server will manage our standalone mode and serve static files (CSS, JS, HTML) and proxy API requests to static files.
					<pre class="lang:js decode:true ">var express    = require('express');        // call express
var app        = express();                 // define our app using express
var port       = 3000;  			      // set our port

// REGISTER STATIC FILES -------------------------------
app.use(express.static(__dirname+"/target/static/"));
app.use(express.static(__dirname+"/target/react-portlet/"));

// ROUTES FOR OUR API
// =============================================================================
var router = express.Router();              // get an instance of the express Router

router.get('/v1/social/activities', function(req, res) {
    res.set('content-type','application/json; charset=utf8')
    res.sendFile(__dirname+"/target/static/api/activities.json");
});

router.get('/avatar.png', function(req, res) {
    res.sendFile(__dirname+"/target/static/avatar.png");
});

// REGISTER OUR ROUTES -------------------------------
app.use('/rest/api', router);

// START THE SERVER
// =============================================================================
app.listen(port);</pre> - Before starting the server, we also want to start webpack in “watch mode” to be able to build again on any change. Add a “watch” script with the following commands in /package.json:
<pre class="lang:js decode:true ">"scripts": {
...
"watch": "npm run copy && node node_modules/webpack/bin/webpack.js --progress --colors --watch -d"
}</pre>
<pre class="lang:default decode:true ">npm run watch</pre>
					<pre class="show-plain-default:true lang:default decode:true ">Hash: 0aed17830ca00bbed3fd
Version: webpack 1.13.2
Time: 4640ms
        Asset     Size  Chunks             Chunk Names
    bundle.js  1.22 MB       0  [emitted]  main
bundle.js.map  1.43 MB       0  [emitted]  main
+ 278 hidden modules</pre> - Now start the server:
<pre class="lang:default decode:true ">npm start</pre> 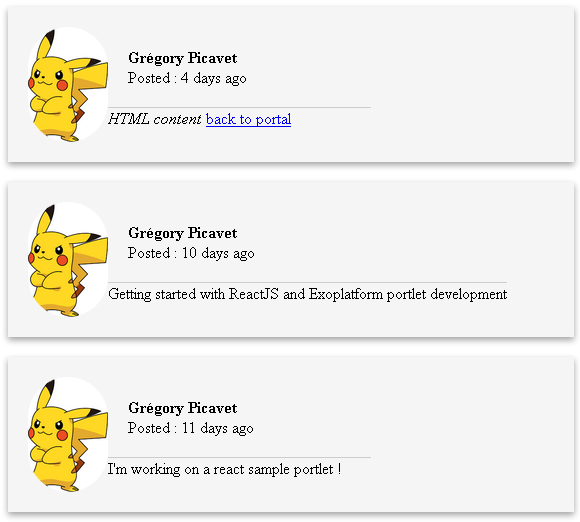
- When you’re ready for release, you can add the following script in /package.json:
<pre class="lang:js decode:true ">"scripts": {
...
"release": "export NODE_ENV=production && webpack -p"
}</pre>
					<pre class="show-plain-default:true lang:default decode:true ">Hash: 958d20ab7b77c17c6474
Version: webpack 1.13.2
Time: 8955ms
        Asset       Size  Chunks             Chunk Names
    bundle.js     418 kB       0  [emitted]  main
bundle.js.map  219 bytes       0  [emitted]  main
+ 278 hidden modules</pre> 
FREE WHITE PAPER
for the Enterprise
FREE WHITE PAPER
for the Enterprise
2. Portlet Integration
- To get started, you can pick some resources from the sample available at https://github.com/exo-samples/docs-samples/tree/4.3.x/portlet/js. It’s a simple javax.portlet that forwards to an index.jsp (the view part of the portlet).
- Modify index.jsp and only declare an HTML fragment with the “app” mount point:
<pre class="lang:xhtml decode:true "><div class='react-portlet'>
<div id="app" class="container"></div>
</div></pre> - Open webapp/WEB-INF/gatein-resources.xml to declare both the bunderle.js, as a JS module, and the main.css stylesheet:
<pre class="lang:xhtml decode:true "><portlet>
<name>reactsample</name>
<module>
<script>
<path>/js/bundle.js</path>
</script>
</module>
</portlet>
<portlet-skin>
<application-name>react-portlet</application-name>
<portlet-name>reactsample</portlet-name>
<skin-name>Default</skin-name>
<css-path>/css/main.css</css-path>
</portlet-skin></pre> There are two main module styles in JavaScript: AMD and CommonJS. When transpiling ES2015 to ES5, Babel replaces imports with the CommonJS style. Because Exo uses AMD modules, it will automatically adapt them. However, some libraries require manual adaptation. This would be the case with React if we had to load it separately from bundle.js. When you need to hire ReactJS developers, ensuring they understand module styles and library adaptations is crucial.
- Now we get to the the build part. When we build the portlet, it would be interesting to 1) install JS dependencies and 2) do a webpack release. The Maven exec plugin will do the job. In “/pom.xml”:
<pre class="lang:xhtml decode:true "><plugins>
<plugin>
<groupId>org.codehaus.mojo</groupId>
<artifactId>exec-maven-plugin</artifactId>
<version>1.5.0</version>
<executions>
<execution>
<id>npm install</id>
<phase>generate-resources</phase>
<goals>
<goal>exec</goal>
</goals>
<configuration>
<executable>npm</executable>
<arguments>
<argument>install</argument>
</arguments>
</configuration>
</execution>
<execution>
<id>npm release</id>
<phase>generate-resources</phase>
<goals>
<goal>exec</goal>
</goals>
<configuration>
<executable>npm</executable>
<arguments>
<argument>run</argument>
<argument>${webpack.release}</argument>
</arguments>
</configuration>
</execution>
</executions>
</plugin>
</plugins></pre>Then simply type:<pre class="lang:default decode:true ">mvn clean install</pre>
<pre class="lang:default decode:true ">mvn clean install -Pproduction</pre> Incompatibility with the GateIn minifier
- You’ll quickly notice that the non-minified version of React can’t deal with the GateIn minifier (uses the Google Closure minifier)!
- Actually, the only way to disable the GateIn minifier is to run eXo in dev mode, which is not great. But there’s weird thing: When you minify your bundle with “webpack -p,” the GateIn minifier works! So the simplest solution is to use the minified version of our bundle.js with eXo’s normal mode and use the non-minified version in eXo’s dev mode! There is some bad news though: You will lose the source mapping because of the double minification.
- Another solution is to disable the minifier on some libs and build and supply the minified and map files. Actually, you can override the UIPortalApplication.gtmpl script in the portal module, filter the JS paths, and remove the “-min” when you need to but it’s tricky. It would be great if eXo and GateIn could come up with a parameter for module definition!
- I’ve heard about webjars, and they’re probably a more elegant way to do all this. I’ll have to look at them in the future.
Deploying
- You must have an exo account and JDK 8 installed.
- Then download the latest community edition of eXo (4.3+), unzip it, and launch the start_eXo script.
- Simply copy the target/react-portlet.war in the webapps directory and wait for deployment.
- Log into eXo and create a “test” site.
- Go to the site, edit the page layout, and add the portlet.
- You should see something very similar to standalone mode, but it should be dynamic (for this, you must have created some activities before).
A note on the docker
- Sorry—it doesn’t work in an eXo container unless you start it in debug mode. I’ll have to look into this.
Sharing common modules
- When you’re developing several portlets, it’s okay to reuse some libs (like React). You may already know that GateIn allows you to share modules.
- Before we edit webpack.config.js, we have to tell webpack to gather the React, ReactDOM, and moment libs in another bundle, which we’ll call the “vendor” bundle:
					<pre class="lang:js decode:true ">entry: {
  bundle:'./src/main/js/index.js',
  'vendor-bundle': [
    'react',
    'react-dom',
    'moment'
  ]
}
...
plugins:[
 ...
  new webpack.optimize.CommonsChunkPlugin({
    name: 'vendor-bundle',
    filename: 'vendor-bundle.js',
    minChunks: Infinity
  })
]</pre> - After rebuilding, you’ll see the new size of your bundle!
					<pre class="show-plain-default:true lang:default decode:true ">Hash: 837db454da54d24ded16
Version: webpack 1.13.2
Time: 6187ms
               Asset     Size  Chunks             Chunk Names
           bundle.js  7.13 kB       0  [emitted]  bundle
    vendor-bundle.js  1.21 MB       1  [emitted]  vendor-bundle
       bundle.js.map  3.69 kB       0  [emitted]  bundle
vendor-bundle.js.map  1.44 MB       1  [emitted]  vendor-bundle
   [0] multi vendor-bundle 52 bytes {1} [built]
+ 278 hidden modules</pre> - Set vendor-bundle.js as a shared module. To keep things simple, we set it in our portlet. Otherwise, you could package it into another war:
<pre class="lang:xhtml decode:true "><module>
<name>vendor</name>
<script>
<path>/js/vendor-bundle.js</path>
</script>
</module>
<portlet>
<name>reactsample</name>
<module>
<script>
<path>/js/bundle.js</path>
</script>
<depends>
<module>vendor</module>
</depends>
</module>
</portlet></pre> - Now when you look at the reactsample.js resource downloaded by the portlet, it will depend on the shared module:
					<pre class="lang:js decode:true ">define('PORTLET/react-portlet/reactsample', ["SHARED/vendor"], function(vendor) {
  ...</pre>
Conclusion
- We learned how to set up a standalone JS app based on React and built with a node.js/npm/ES2015/Babel/webpack stack. There’s a lot of choices here, and you could replace some of elements of the stack, e.g., bower instead of npm, typescript instead of ES2015, browserify instead of webpack. Each has some pros and cons that you should be aware of when you are choosing.
- We learned how to simply integrate npm and Maven to build a portlet on top of a standalone app.
- Unfortunately, the eXo GateIn minifier hates your React code. Even if there’s a workaround, GateIn should really permit lib exclusions from the minifier.
- Last words: On a real project, you’ll have to deal with unit testing. For the record, we’re currently using Mocha to write tests, Phantomjs as a runtime platform, and Istanbul as a coverage tool. To manage complex build tasks, you should use a lib like Gulp or Grunt.
Thanks again to Grégory Picavet for this great post. Make sure to check his original article and his blog for new articles.
discover all the features and benefits

Related posts
- All
- eXo
- Digital workplace
- Employee engagement
- Open source
- Future of work
- Internal communication
- Collaboration
- News
- intranet
- workplace
- Knowledge management
- Employee experience
- Employee productivity
- onboarding
- Employee recognition
- Change management
- Cartoon
- Digital transformation
- Infographic
- Remote work
- Industry trends
- Product News
- Thought leadership
- Tips & Tricks
- Tutorial
- Uncategorized


Leave a Reply
( Your e-mail address will not be published)
There’s definately a lot to learn about this topic.
I really like all of the points you’ve made.
Hi there! This is my first visit to your blog!
We are a team of volunteers and starting a new initiative in a community
in the same niche. Your blog provided us useful information to work on. You have done a
extraordinary job!
Feel free to visit my web page – porn
Greate article. Keep writing such kind of info
on your page. Im really impressed by your blog.
Hi there, You’ve done an incredible job. I’ll definitely digg
it and personally suggest to my friends. I’m sure they’ll be benefited from this website.
Aw, this was an exceptionally nice post. Spending some time and actual effort to generate
a top notch article… but what can I say… I hesitate a lot and never seem to get nearly anything done.
It’s actually very difficult in this active life to listen news on TV, therefore I only use world wide web for
that reason, and take the hottest news.
Nice post. I was checking constantly this weblog and I am inspired! Extremely helpful information specifically the ultimate part 🙂
I take care of such information a lot. I used to be seeking this certain info for a long time.
Thank you and best of luck.
We are a group of volunteers and opening a new scheme in our community.
Your site provided us with valuable information to work on. You have done a formidable job and our whole community will be thankful to you.