- Brahim Jaouane
- June 16, 2015
How to Compose an eXo Platform Docker
This guest post is extracted from an original article by Eric Taïeb Walch.Eric Taïeb Walch.
Content
1. Introduction
This post explains how to build a dockerized eXo Platform following Docker’s core principle of “one task, one container.”
In this example, eXo platform will use MySql as the database to make it more production ready.
Also, eXo’s JCR data as well as MySql data will be stored in separate and dedicated Docker Data containers.
To link these containers, we will use the newly released docker-compose tool.
The final docker composition will look like this:
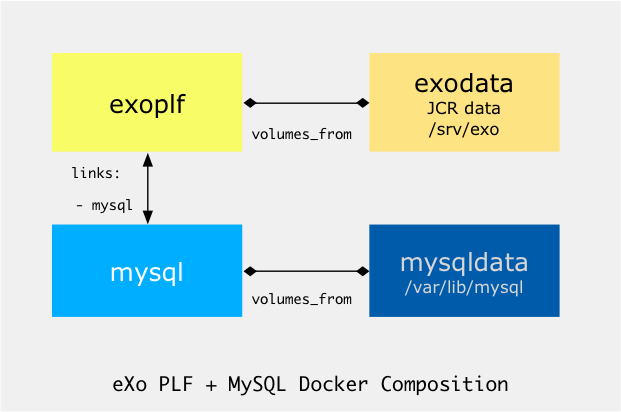
2. Container Descriptions
We will need 4 containers:
- mysql
- using the official mysql/mysql-server:latest image
- mysqldata
- will expose volume /var/lib/mysql
- exoplf
- using a tweaked exo platform image, supporting server.xml customization and custom jcr data volume
- exodata
- will expose volume /srv/exo where eXo’s JCR data will be stored
3. Container Docker Files
Let’s describe these containers.
Mysql
We will pull the official mysql/mysql-server:latest available on DockerHub Registry here: https://registry.hub.docker.com/_/mysql/
It supports the initial creation of the database and user through Environment variables.
					MYSQL_DATABASE: exo
MYSQL_USER: exo
MYSQL_PASSWORD: changeme
MYSQL_ROOT_PASSWORD: changeme
You can change any of these, but note that you will need to adjust the server.xml file in the exo-plf container (described later).
This container will mount /var/lib/mysql from the mysql-data container.
Mysql Data
This container will store the Mysql data directory. It is very simple and its Dockerfile looks like this:
					FROM busybox:latest
MAINTAINER Eric Taïeb Walch <teknologist@gmail.com>
RUN mkdir -p /var/lib/mysql && chmod -R 777 /var/lib/mysql
VOLUME /var/lib/mysql
The important line here is:
VOLUME /var/lib/mysql
It makes the /var/lib/mysql directory mountable by other containers.
DockerHub image is teknologist/mysql-docker-data, available at the DockerHub Registry here: https://registry.hub.docker.com/u/teknologist/mysql-docker-data/
GitHub repo: https://github.com/teknologist/mysql-docker-data
eXo Data
As above, this image will be used to spawn a container that holds /srv/exo directory.
This directory contains all the persistent data for eXo’s JCR files.
Again, it is very simple and its Dockerfile looks like this:
					FROM busybox:latest
MAINTAINER Eric Taïeb Walch <teknologist@gmail.com>
RUN mkdir -p /srv/exo
RUN chmod 777 -R /srv/exo
VOLUME /srv/exo
DockerHub image is teknologist/exo-data.
It is available at the DockerHub Registry: https://registry.hub.docker.com/u/teknologist/exo-data/
The GitHub repo: https://github.com/teknologist/docker-data
eXo Platform
This image is a fork of eXo’s original image.
Changes are:
- Upgraded to PLF 4.2.0-RC1
- Added MySQL JDBC Connector to lib/directory
- Added server.xml to switch default HSQL database to MySQL
- Added environment variables to setup mysql connection properties
The github repo for this Docker image is available here: https://github.com/teknologist/ubuntu-jdk7-exo
As you can see, the server.xml refers to a mysql database host named mysql.
This is important, as this is how containers are linked using docker-compose.
Short story:
If you name a container mysql and link it in the docker-compose.yml file, then docker-compose will set an entry in the host’s file named mysql pointing at the IP of the container.
This makes linking container trivial.
The Docker image is teknologist/ubuntu-jdk7-exo-mysql and is available at the DockerHub Registry here: https://registry.hub.docker.com/u/teknologist/ubuntu-jdk7-exo-mysql/
4. Docker composing these containers together
This is where the magic happens. By writing a simple 25 lines of docker-compose.ym, we will spawn an entire eXo platform infrastructure in minutes.
First of all, you need to have a recent docker version installed (1.3 or higher) for docker-compose to work.
As of this writing, I am using Docker version 1.6.2, build 7c8fca2.
You can find how to install a docker here: https://docs.docker.com/installation/
The next step is installing docker-compose.
On supported platforms (GNU/Linux, OSX, etc.), this is as simple as entering the following commands:
					curl -L https://github.com/docker/compose/releases/download/1.2.0/docker-compose-`uname -s`-`uname -m` > /usr/local/bin/docker-compose
chmod +x /usr/local/bin/docker-compose
See https://docs.docker.com/compose/install/ for more information.
Once your docker + docker-compose environment is ready, create a directory, exo-compose, for example. In that directory, create a file called docker-compose.yml with the following content:
					exodata:
  restart: on-failure:5
  image: teknologist/exo-data
mysqldata:
  restart: on-failure:5
  image: teknologist/mysql-docker-data
mysql:
  restart: on-failure:5
  image: mysql/mysql-server:latest
  environment:
    MYSQL_DATABASE: exo
    MYSQL_USER: exo
    MYSQL_PASSWORD: changeme
    MYSQL_ROOT_PASSWORD: changeme
  volumes_from:
  - mysqldata
exoplf:
  restart: on-failure:5
  ports:
  - 8080:8080/tcp
  image: teknologist/ubuntu-jdk7-exo-mysql
  environment:
    MYSQL_DATABASE: exo
    MYSQL_USER: exo
    MYSQL_PASSWORD: changeme
  links:
  - mysql
  volumes_from:
  - exodata
Beware: This is a yaml file, so indentation is crucial. Gist available here.
As you can see, three things are important here and let you link everything together:
volumes_from
This directive instructs each container to mount the volumes from the respective data container.
					links:
 - mysql
This is the main compose directive that links exo platform to mysql. With this directive, docker-compose:
- creates a network connection between the exo and mysql containers
- creates an entry named mysql in eXo container’s /etc/hosts file pointing to the mysql container IP
If you look back at the server.xml file, this is how the mysql host in the jdbc connection string gets resolved.
You can find full docker-compose documentation here: https://docs.docker.com/compose/
Last but not least, both mysql and exoplf services’ MYSQL_ environment variables:
					MYSQL_DATABASE: exo
MYSQL_USER: exo
MYSQL_PASSWORD: changeme
MYSQL_ROOT_PASSWORD: changeme
NOTE: MYSQL_ROOT_PASSWORD is only needed in mysql service.
NOTE: I have updated the exoplf image to support MYSQL_ environment variables. It is now trivial to setup custom MySQL connection details. Just set the MYSQL_ environment variables correctly on both exoplf and mysql services in docker-compose.yml – Content has been updated in this post to reflect this.
Now you are ready to spawn the infrastructure. In the directory where you created the docker-compose.yml file, launch: docker-compose up
					eric@morpheus:~/exo-compose$ docker-compose up
Creating exocompose_mysqldata_1...
Creating exocompose_exodata_1...
Creating exocompose_mysql_1...
Creating exocompose_exoplf_1...
Attaching to exocompose_mysql_1, exocompose_exoplf_1
mysql_1  | Running mysql_install_db
mysql_1  | 2015-06-08 12:07:00 0 [Warning] TIMESTAMP with implicit DEFAULT value is deprecated. Please use --explicit_defaults_for_timestamp server option (see documentation for more details).
mysql_1  | 2015-06-08 12:07:00 0 [Note] /usr/sbin/mysqld (mysqld 5.6.25) starting as process 22 ...
exoplf_1 | 2015-06-08 12:07:01,891 | INFO  | The APR based Apache Tomcat Native library which allows optimal performance in production environments was not found on the java.library.path: /usr/java/packages/lib/amd64:/usr/lib64:/lib64:/lib:/usr/lib [o.a.catalina.core.AprLifecycleListener<main>]
exoplf_1 | 2015-06-08 12:07:02,334 | INFO  | Initializing ProtocolHandler ["http-nio-0.0.0.0-8080"] [o.apache.coyote.http11.Http11NioProtocol<main>]
exoplf_1 | 2015-06-08 12:07:02,384 | INFO  | Using a shared selector for servlet write/read [o.apache.tomcat.util.net.NioSelectorPool<main>]
exoplf_1 | 2015-06-08 12:07:02,386 | INFO  | Initializing ProtocolHandler ["ajp-bio-0.0.0.0-8009"] [org.apache.coyote.ajp.AjpProtocol<main>]
exoplf_1 | 2015-06-08 12:07:02,405 | INFO  | Initialization processed in 1216 ms [org.apache.catalina.startup.Catalina<main>]
NOTE: If you want to run your services in the background, you can pass the -d flag (for daemon mode) to docker-compose up and then use docker-compose ps to see what is currently running. Of course, each docker container supports classic docker commands, so you could check exoplf’s logs via a docker logs commands.
I like to start the first time without -d so I can see what is going on in the initial containers set-up.
NOTE: Now the thing is that docker-compose starts containers fast and the initial startup of mysql creates the database and user, so at immediate startup exo’s container will show an error connecting to the database. You can ignore that because, while exo continues its start-up process, the database will become available. This happens only the first time, as the databases need to be created.
Depending on your docker’s host performance, after some time you’ll see:
					exoplf_1 | 2015-06-08 12:09:11,830 | INFO  | Starting ProtocolHandler ["http-nio-0.0.0.0-8080"] [o.apache.coyote.http11.Http11NioProtocol<main>]
exoplf_1 | 2015-06-08 12:09:11,835 | INFO  | Starting ProtocolHandler ["ajp-bio-0.0.0.0-8009"] [org.apache.coyote.ajp.AjpProtocol<main>]
exoplf_1 | 2015-06-08 12:09:11,838 | INFO  | Server startup in 129433 ms [org.apache.catalina.startup.Catalina<main>]
You can connect to your docker’s host port 8080 (provided you didn’t change it in the docker-compose ports directive) and you’ll be greeted with the initial eXo setup page:
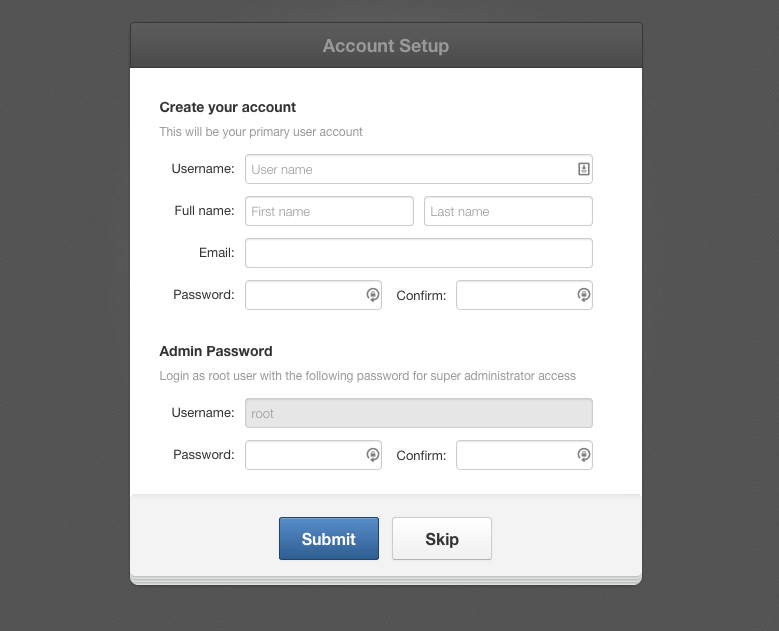
Complete the rest of the set-up wizard and you are set.
5. Operating your eXo/Mysql Docker composition
You can stop and start your infrastructure as you wish. Persistence data is kept in the data containers so there is no loss of data/configuration.
Stopping your existing infrastructure
If you started in foreground, hit [CTRL]-C.
If you started in background, enter: docker-compose stop
					eric@morpheus:~/exo-compose$ docker-compose stop
Stopping exocompose_exoplf_1...
Stopping exocompose_mysql_1...
Note: You don’t see anything related to the data containers, as they don’t really run. They just provide volumes.
Starting your existing infrastructure
Again, enter: docker-compose start
					eric@morpheus:~/exo-compose$ docker-compose start
Starting exocompose_mysqldata_1...
Starting exocompose_exodata_1...
Starting exocompose_mysql_1...
Starting exocompose_exoplf_1...
To see what is currently running in your compose infrastructure
Enter: docker-compose ps
					eric@morpheus:~/exo-compose$ docker-compose ps
         Name                       Command               State            Ports
-----------------------------------------------------------------------------------------
exocompose_exodata_1     /bin/sh                          Exit 0
exocompose_exoplf_1      /bin/sh -c ${EXO_APP_DIR}/ ...   Up       0.0.0.0:8080->8080/tcp
exocompose_mysql_1       /entrypoint.sh mysqld            Up       3306/tcp
exocompose_mysqldata_1   /bin/sh                          Exit 0
Again, you see the data containers are not in running state and that is normal.
Also note: mysql port 3306 is not exposed outside the container. Docker-compose does all the tunnelling for you.
To see your container's logs
If you want to tail exoplf’s log, type: docker logs exocompose_exoplf_1
					eric@morpheus:~/exo-compose$ docker logs exocompose_exoplf_1
2015-06-08 12:22:12,758 | INFO  | The APR based Apache Tomcat Native library which allows optimal performance in production environments was not found on the java.library.path: /usr/java/packages/lib/amd64:/usr/lib64:/lib64:/lib:/usr/lib [o.a.catalina.core.AprLifecycleListener<main>]
2015-06-08 12:22:13,129 | INFO  | Initializing ProtocolHandler ["http-nio-0.0.0.0-8080"] [o.apache.coyote.http11.Http11NioProtocol<main>]
2015-06-08 12:22:13,177 | INFO  | Using a shared selector for servlet write/read [o.apache.tomcat.util.net.NioSelectorPool<main>]
2015-06-08 12:22:13,179 | INFO  | Initializing ProtocolHandler ["ajp-bio-0.0.0.0-8009"] [org.apache.coyote.ajp.AjpProtocol<main>]
2015-06-08 12:22:13,198 | INFO  | Initialization processed in 1274 ms [org.apache.catalina.startup.Catalina<main>]
2015-06-08 12:22:13,517 | INFO  | Starting service Catalina [org.apache.catalina.core.StandardService<main>]
2015-06-08 12:22:13,517 | INFO  | Starting Servlet Engine: Apache Tomcat/7.0.55 [org.apache.catalina.core.StandardEngine<main>]
2015-06-08 12:22:13,543 | INFO  | Deploying web application archive /opt/exo/platform-community-4.2.0-RC1/webapps/forum-gadgets.war [org.apache.catalina.startup.HostConfig<localhost-startStop-5>]
2015-06-08 12:22:13,543 | INFO  | Deploying web application archive /opt/exo/platform-community-4.2.0-RC1/webapps/wiki.war [org.apache.catalina.startup.HostConfig<localhost-startStop-9>]
2015-06-08 12:22:13,543 | INFO  | Deploying web application archive /opt/exo/platform-community-4.2.0-RC1/webapps/eXoPlatformResources.war [org.apache.catalina.startup.HostConfig<localhost-startStop-10>]
Again, each of these containers support all docker commands.
6. Final thoughts
As you can see, docker-compose makes building docker-based infrastructures very easy.
Other tools, such as Google’s Kubernetes, are very promising too. They not only let you compose but also scale (through minions—no, I didn’t invent that).
Another very promising tool I have used to explore docker composition on CoreOS is Rancher.
It looks like we are increasingly moving from VM-based cloud infrastructure to highly dense container-based ones. Think lower overhead (if not zero). Also think green!
eXo Platform 6 Free Datasheet
Download the eXo Platform 6 Datasheet and
discover all the features and benefits
discover all the features and benefits
- Tags: eXo
Rate this post

I am a Digital Marketing specialist specialized in SEO at eXo Platform.
Passionate about new technologies and Digital Marketing.
With 10 years' experience, I support companies in their digital communication strategies and implement the tools necessary for their success.
My approach combines the use of different traffic acquisition levers and an optimization of the user experience to convert visitors into customers.
After various digital experiences in communication agencies as well as in B2B company, I have a wide range of skills and I am able to manage the digital marketing strategy of small and medium-sized companies.
Related posts
- All
- eXo
- Digital workplace
- Employee engagement
- Open source
- Future of work
- Internal communication
- Collaboration
- News
- intranet
- workplace
- Knowledge management
- Employee experience
- Employee productivity
- onboarding
- Employee recognition
- Change management
- Cartoon
- Digital transformation
- Infographic
- Remote work
- Industry trends
- Product News
- Thought leadership
- Tips & Tricks
- Tutorial
- Uncategorized

Leave a Reply
( Your e-mail address will not be published)
Connexion
0 Comments
Commentaires en ligne
Afficher tous les commentaires