- Eric Taïeb Walch
- April 17, 2014
Apache 2 or Nginx as a highly secure (PFS) SSL encrypting reverse proxy for eXo Platform 4.0

Content
The goals of the reverse proxy are:
- Securing the eXo platform by hiding it behind the proxy
- Offloading SSL encryption to the proxy and supporting Perfect Forward Secrecy
- Using advanced modules such as:
- caching modules
- security modules:
- mod_security on apache or naxsi web application firewall on Nginx
- Google’s mod pagespeed, etc.
- Google SPDY 3.1 (only stable on Nginx at the moment).
Using advanced modules is beyond the scope of this topic but might be included in a future post.
All the instructions below are valid for any web server—for instance, Hudson/Jenkins install, and Atlassian web apps such as Jira, Fisheye, Bamboo, etc. It should also work with your own web app running on any platform. It is pure http proxying. If you are looking for a proxy, you can also go to proxy-store for that.
For the sake of simplicity we’ll use the eXo Platform installed in directory EXO_PLATFORM running on default port 8080.
More information on this great enterprise social portal platform can be found here: https://www.exoplatform.com
At the time of this writing the latest community release is 4.0.5 available in 12 languages.
Let’s move on to the main event of the evening!
Getting Started
Requirements:
- Basic knowledge of GNU/Linux (Debian especially as instructions will be given for Debian-based distributions but may be easily applicable for RedHat/CentOS using the yum package manager)
- Being familiar with Apache or Nginx configuration directives
- eXo platform installed and running on Tomcat (using public platform distribution) listening on port 8080
- Debian server(s) installed and running.
Preliminary Steps
Installing required components/servers:
 Enough with the words. Let's see what it looks like:
Installing the Reverse Proxy
On Debian/Ubuntu install the proxy:
For Nginx:
sudo apt-key add nginx_signing.key
					deb http://nginx.org/packages/debian/ codename nginx
deb-src http://nginx.org/packages/debian/ codename nginx
					deb http://nginx.org/packages/ubuntu/ codename nginx
deb-src http://nginx.org/packages/ubuntu/ codename nginx
					apt-get update
apt-get install nginx
For Apache 2:
					sudo apt-get install apache2
sudo apt-get install libapache2-mod-proxy-html
					sudo a2enmod proxy_http
sudo a2enmod ssl
Configuring the Virtual Host for eXo’s Frontend
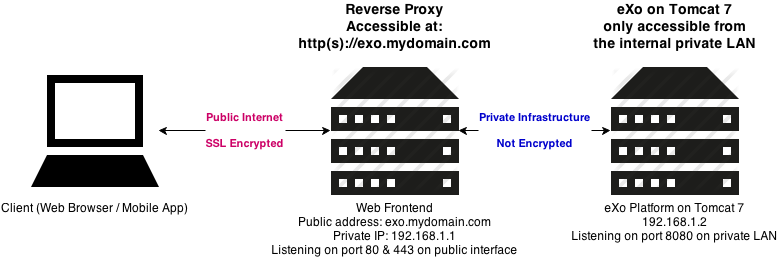
https://exo.mydomain.com
We’ll also assume you have a certificate and private key for SSL encryption located at /etc/ssl/certs/exo.mydomain.com.crt and /etc/ssl/private/exo.mydomain.com.key
Last but not least, as shown on the diagram above, we’ll assume that the proxy server’s IP address is 192.168.1.1 and that the eXo platform server’s IP address is 192.168.1.2.
Please adapt to your infrastructure’s hostname (exo.mydomain.com) and IP addresses if need be.
On Nginx:
/etc/nginx/conf.d
					server {
    listen 443 default ssl;
    keepalive_timeout 70;
    server_name exo.mydomain.com;

# beginning of ssl config

    ssl_certificate /etc/ssl/certs/exo.mydomain.com.crt;
    ssl_certificate_key /etc/ssl/private/exo.mydomain.com.key;

# enable session resumption to improve https performance
# http://vincent.bernat.im/en/blog/2011-ssl-session-reuse-rfc5077.html
ssl_session_cache shared:SSL:50m;
ssl_session_timeout 5m;

# Diffie-Hellman parameter for DHE ciphersuites, recommended 2048 bits
ssl_dhparam /etc/nginx/ssl/dhparam.pem;

# enables server-side protection from BEAST attacks
# http://blog.ivanristic.com/2013/09/is-beast-still-a-threat.html
ssl_prefer_server_ciphers on;
# disable SSLv3(enabled by default since nginx 0.8.19) since it's less secure then TLS http://en.wikipedia.org/wiki/Secure_Sockets_Layer#SSL_3.0
ssl_protocols TLSv1 TLSv1.1 TLSv1.2;
# ciphers chosen for forward secrecy and compatibility
# http://blog.ivanristic.com/2013/08/configuring-apache-nginx-and-openssl-for-forward-secrecy.html
ssl_ciphers 'ECDHE-RSA-AES128-GCM-SHA256:ECDHE-ECDSA-AES128-GCM-SHA256:ECDHE-RSA-AES256-GCM-SHA384:ECDHE-ECDSA-AES256-GCM-SHA384:kEDH+AESGCM:ECDHE-RSA-AES128-SHA256:ECDHE-ECDSA-AES128-SHA256:ECDHE-RSA-AES128-SHA:ECDHE-ECDSA-AES128-SHA:ECDHE-RSA-AES256-SHA384:ECDHE-ECDSA-AES256-SHA384:ECDHE-RSA-AES256-SHA:ECDHE-ECDSA-AES256-SHA:DHE-RSA-AES128-SHA256:DHE-RSA-AES128-SHA:DHE-RSA-AES256-SHA256:DHE-DSS-AES256-SHA:AES128-GCM-SHA256:AES256-GCM-SHA384:ECDHE-RSA-RC4-SHA:ECDHE-ECDSA-RC4-SHA:RC4-SHA:HIGH:!aNULL:!eNULL:!EXPORT:!DES:!3DES:!MD5:!PSK';

# enable ocsp stapling (mechanism by which a site can convey certificate revocation information to visitors in a privacy-preserving, scalable manner)
# http://blog.mozilla.org/security/2013/07/29/ocsp- stapling-in-firefox/
ssl_stapling on;
ssl_stapling_verify on;
resolver 8.8.4.4 8.8.8.8 valid=300s;
resolver_timeout 10s;

# config to enable HSTS(HTTP Strict Transport Security) https://developer.mozilla.org/en-US/docs/Security/HTTP_Strict_Transport_Security
# to avoid ssl stripping https://en.wikipedia.org/wiki/SSL_stripping#SSL_stripping
add_header Strict-Transport-Security "max-age=31536000; includeSubdomains;";

#end of ssl config

	root /var/www;

	access_log /var/log/nginx/exo.mydomain.com-access_log;
	error_log /var/log/nginx/exo.mydomain.com-error_log;

	location / {
    try_files $uri $uri @exo;
	}

	location @exo {
	    proxy_pass http://192.168.1.2:8080;
    	proxy_set_header X-Real-IP $remote_addr;
    	proxy_set_header X-Forwarded-For $proxy_add_x_forwarded_for;
    	proxy_set_header Host $http_host;
    	proxy_set_header X-Forwarded-Proto https;

    	# By default we dont want redirect it
    	proxy_redirect off;

    	# Cache
    	proxy_buffering off;
    	proxy_cache off;

    	client_max_body_size 10m;
	}
}
The directive try_files specifies that Nginx will try to locate the requested resource in its document root (/var/www/ in this example). If it fails to find it, it will proxy the request to the @exo backend. This is quite useful as it allows you to place static files in /var/www and they will be served.
The directive client_max_body_size 10m; sets the maximum HTTP post size (i.e. maximum file size upload among others).
You can also play with caching using the following directive (refer to Nginx documentation here http://wiki.nginx.org/ReverseProxyCachingExample):
proxy_cache
This setup is the most secure SSL setup configuration (see Forward Secrecy below) as it avoids the weak ciphers and prefers the best ones (it might be too secure for old browsers such as Internet Explorer 6, although you should not be using Internet Explorer 6 anyway).
CREDITS: https://gist.github.com/plentz/6737338
More on Perfect Forward secrecy can be found here: https://en.wikipedia.org/wiki/Forward_secrecy
You need to generate a Diffie-Hellman certificate with this command (this will take some time depending on the performance of your server):
					cd /etc/ssl/certs
sudo openssl dhparam -out dhparam.pem 2048
NOTE: You can also enable Google’s SPDY protocol if your Nginx build supports it (the packages installed from the sources above have SPDY 3.1, 1.5.12, and it works perfectly). You can check by running Nginx-V to see the compile time options. If you see SPDY, then your Nginx build is SPDY enabled.
To enable it in your eXo’s virtual host, just add SPDY after the SSL directive. The configuration line (2nd line) above should look like this:
					listen 443 default ssl spdy;
8
Google’s SPDY 3.1 protocol speeds up pages’ loading time considerably. More information can be found here: https://code.google.com/p/mod-spdy/
This module is bundled in Nginx’s latest mainline release (1.5.12 on April 2014). On Ubuntu you can add the following official Nginx Mainline PPA: https://launchpad.net/~nginx/+archive/development
On Apache:
					<VirtualHost *:443>
    SSLEngine on
    SSLCertificateFile /etc/ssl/certs/exo.mydomain.com.crt
    SSLCertificateKeyFile /etc/ssl/private/exo.mydomain.com.key

    SSLProtocol all -SSLv2 -SSLv3
    SSLHonorCipherOrder on
    SSLCipherSuite "EECDH+ECDSA+AESGCM EECDH+aRSA+AESGCM
    EECDH+ECDSA+SHA384 EECDH+ECDSA+SHA256 EEDH+aRSA+SHA384
    EECDH+aRSA+SHA256 EECDH+aRSA+RC4
    EECDH EDH+aRSA RC4 !aNULL !eNULL !LOW !3DES !MD5 !EXP !PSK !SRP !DSS"

    ServerAdmin admin@mydomain.com
    ServerName exo.mydomain.com
    ProxyPassReverse / http://192.168.1.2:8080/
    ProxyPass / http://192.168.1.2:8080/
    ProxyPreserveHost on
    ProxyRequests Off
    Header always append Access-Control-Allow-Origin: "mydomain.com"
</VirtualHost>
IMPORTANT NOTE: if you host other NAME-BASED virtual hosts (multiple vhosts on one single IP address) it is advised to set eXo’s virtual host as the default one as non TLS/SNI web clients will only see the default virtual host.
On Nginx this is supplied by the ‘default’ keyword in the following line:
listen 443 default ssl;
listen 443 default ssl spdy;
FREE WHITE PAPER
for the Enterprise
FREE WHITE PAPER
for the Enterprise
Activate the Virtual Host
For Nginx:
For Apache:
sudo a2ensite exo.mydomain.com
Configuring eXo’s Tomcat Connector for Reverse Proxy Operations
					<Connector address="0.0.0.0" port="8080" protocol="org.apache.coyote.http11.Http11NioProtocol"
enableLookups="false"
maxThreads="150" minSpareThreads="25" maxSpareThreads="75"
maxHttpHeaderSize="8192"
acceptCount="100"
connectionTimeout="20000" disableUploadTimeout="true"
URIEncoding="UTF-8"
proxyName="exo.mydomain.com" proxyPort="443" scheme="https" />
proxyName="exo.mydomain.com" proxyPort="443" scheme="https"
Increasing Maximum Open Files
As this configuration is optimized for speed, the SPDY feature can lead to a vast amount of open files on Tomcat 7.
Therefore, depending on your GNU/Linux setup, you might need to increase the maximum open files.
On Debian this is done in two steps:
System wide:
Edit /etc/sysctl.conf and add/modify this entry (you may increase/decrease the values):
fs.file-max = 70000
Then for the user running the eXo platform:
Edit /etc/security/limits.conf and add (in the example below user Exo is running Tomcat):
					exo soft nofile 50000
exo hard nofile 70000
session required pam_limits.so
Book a Free Demo
To Learn How eXo Platform Can Help You Connect Your Teams
Automatic Redirection of Plain HTTP to HTTPS
Below you will find typical Apache and Nginx rewrite rules to redirect http to https.
WARNING: It breaks the mobile app on Android (haven’t tested on iOS). The developer is aware and answered on a Google Playstore comment.
Add this on top of your virtual host configuration file:
For Nginx:
					server {
    listen 80 default;
    server_name exo.mydomain.com;
    ## redirect http to https ##
    rewrite ^ https://exo.mydomain.com$request_uri? permanent;
}
For Apache:
					<VirtualHost *:80>
    ServerAdmin admin@mydomain.com
    ServerName exo.mydomain.com
    Redirect permanent / https://exo.mydomain.com/
</VirtualHost>
Cherry on the Cake: Custom Error Pages to Handle eXo Maintenance
Both Nginx and Apache can handle custom pages for http errors—especially a nice placeholder page for error 503 under maintenance (when the eXo Tomcat server is down or restarting).
This proves particularly useful for handling scheduled downtimes that occur during offline backups where the eXo server might need to be stopped.
You can also, using the same method, create a custom error page for 404 not found.
First you need to create an html page (50x.html in the example below) and store it (together with its assets) under the document root (defined in your virtual host configuration file, /var/www in this tutorial).
Then add these directives in the virtual host configuration file:
For Nginx:
					error_page 502 @maintenance;
error_page 503 @maintenance;
error_page 504 @maintenance;

location @maintenance {
	rewrite ^(.*)$ /50x.html break;
}
For Apache:
					ErrorDocument 502 /50x.html
ErrorDocument 503 /50x.html
ErrorDocument 504 /50x.html
Result: Qualys SSL Audit
For the Nginx configuration above:
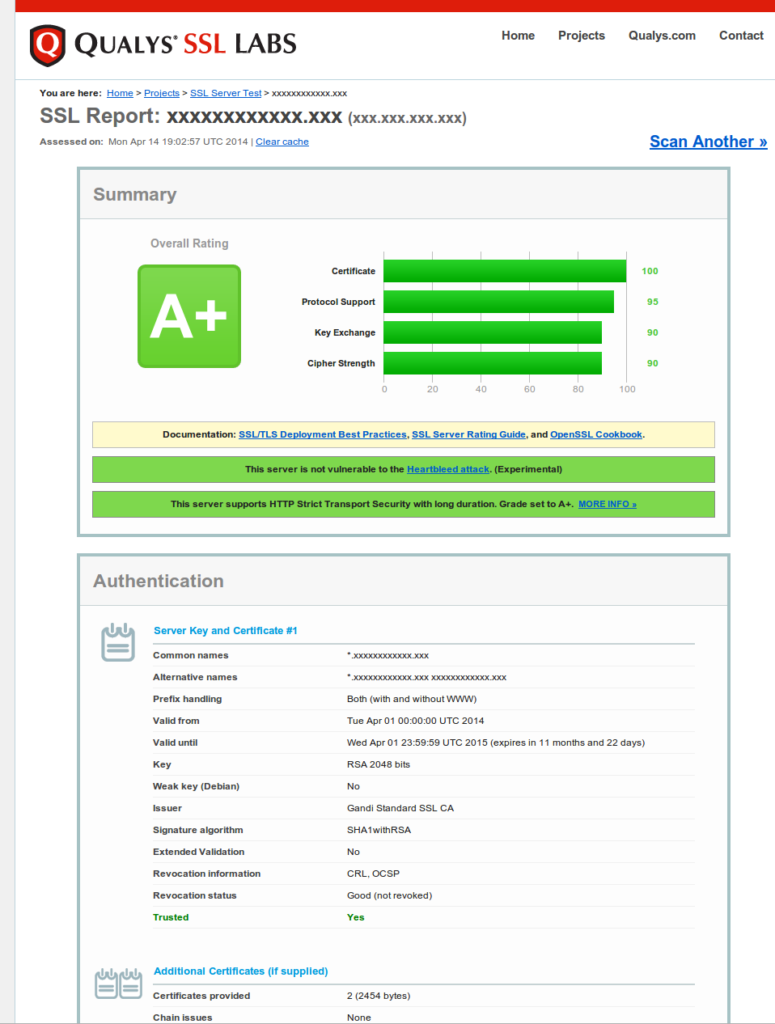
The >Full Audit in PDF format is available here.
You can test your installation at: https://www.ssllabs.com/ssltest/analyze.html
That’s all for now.
Stay tuned for additions to this tutorial and other posts related to JavaEE, Systems, Networks and Software architecture.
Thanks for reading, sharing and +1-ing!
Thanks again to Eric Taïeb Walch for his great post. Make sure to check his original article as Eric will make regular updates to his work.

Related posts
- All
- eXo
- Digital workplace
- Employee engagement
- Open source
- Future of work
- Internal communication
- Collaboration
- News
- intranet
- workplace
- Knowledge management
- Employee experience
- Employee productivity
- onboarding
- Employee recognition
- Change management
- Cartoon
- Digital transformation
- Infographic
- Remote work
- Industry trends
- Product News
- Thought leadership
- Tips & Tricks
- Tutorial
- Uncategorized


Leave a Reply
( Your e-mail address will not be published)