- Brahim Jaouane
- July 12, 2016
Developing with Java Persistence API in eXo Platform
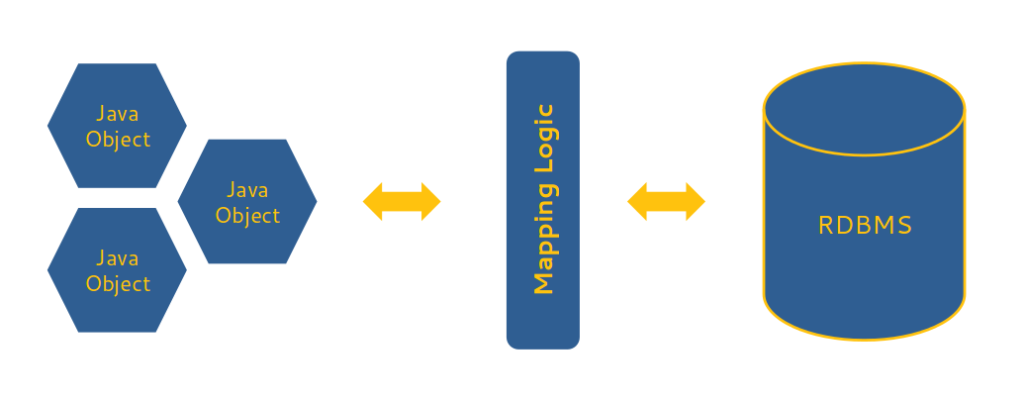
eXo Platform 4.3 comes with an integration of JPA (Java Persistence API).
JPA is a Java application programming interface specification that describes the management of relational data in Java applications. It is used to define how a Java class (called an entity) maps to a relational database table through standard annotations or XML.

Content
It also defines an EntityManager API for processing queries and transactions on the Java objects against the database.
If you are not familiar with JPA, you can learn more in the official documentation.
The integration we did in eXo Platform allowed us to start the move to our new data model and gave our developers the opportunity to build their own applications easily with JPA.
This article describes this integration and explains how to develop applications using JPA in eXo Platform.
Hibernate JPA integration
We use Hibernate as the JPA provider, since it is the reference implementation. Starting with eXo Platform 4.3, it is easy to map Java entities with JPA/Hibernate. We have prepared everything for you: the data source, persistence unit, entity annotations and generic DAO.
Data source
A new data source is available in eXo Platform by default, called “exo-jpa_portal” (you can change this name thanks to the property “exo.jpa.datasource.name” in the exo.properties file). This data source is used for all operations that use the eXo persistence unit.
Persistence unit and entity manager
All JPA operations need a persistence unit and an entity manager to act on a database.
The persistence unit defines the data source to use, the entities to manage and a set of configuration parameters.
We added a default persistence unit in eXo Platform, called exo-pu, which uses the default data source exo-jpa_portal, and does not declare any entities:
					<persistence xmlns="http://java.sun.com/xml/ns/persistence"
         	xmlns:xsi="http://www.w3.org/2001/XMLSchema-instance"
         	xsi:schemaLocation="http://java.sun.com/xml/ns/persistence http://java.sun.com/xml/ns/persistence/persistence_2_0.xsd"
         	version="2.0">
    <persistence-unit name="exo-pu" transaction-type="RESOURCE_LOCAL">
        <provider>org.hibernate.ejb.HibernatePersistence</provider>
        <non-jta-data-source>java:/comp/env/exo-jpa_portal</non-jta-data-source>
        <properties>
            <property name="persistenceUnitName" value="exo-pu"></property>
        </properties>
    </persistence-unit>
</persistence>
The configuration of this persistence unit can be changed easily by setting parameters, prefixed by “exo.jpa.”, in the exo.properties file. For example, you can tell JPA Hibernate to log all SQL queries by adding the following line in exo.properties:
exo.jpa.hibernate.show_sql=true
Entities
eXo Platform provides an annotation to add a JPA entity to its persistence unit (exo-pu): @ExoEntity. Let’s see an example:
					@Entity(name = "TaskTask")
@ExoEntity
public class Task {
    @Id
    @SequenceGenerator(name="SEQ_TASK_TASKS_TASK_ID", sequenceName="SEQ_TASK_TASKS_TASK_ID")
    @GeneratedValue(strategy=GenerationType.AUTO, generator="SEQ_TASK_TASKS_TASK_ID")
    @Column(name = "TASK_ID")
    private long    	id;

    private String  	title;

    private String  	description;

    ...
}
This is an extract of the task entity. As you can see, it is a standard JPA entity (annotated by @Entity). The only difference is the addition of the annotation @ExoEntity, nothing else. Adding this annotation and putting this class in the server classpath automatically adds this entity to the eXo persistence unit.
Transactions
@ExoEntity is not the only annotation provided by eXo Platform; we also added an annotation to define transactional methods: @ExoTransactional.
Setting this annotation on a method automatically uses the eXo entity manager to start a new transaction and close it, or to use an existing transaction if one is already open.
					@ExoTransactional
public Task createTask(Task task) {
    ...
}
To make it work, the JCabi Maven plugin must be enabled in your Maven configuration. You have two options:
 Either use the eXo addon parent POM (Project Object Model) as your project parent POM, as Task does:
					<parent>
    <artifactId>addons-parent-pom</artifactId>
    <groupId>org.exoplatform.addons</groupId>
    <version>6</version>
</parent>
and declare the plugin JCabi in the module that uses @ExoTransactional:
					<build>
    <plugins>
      <plugin>
        <groupId>com.jcabi</groupId>
        <artifactId>jcabi-maven-plugin</artifactId>
      </plugin>
    </plugins>
</build>
Or add the JCabi Maven plugin with the right configuration:
					<build>
  <plugins>
    <plugin>
      <groupId>com.jcabi</groupId>
      <artifactId>jcabi-maven-plugin</artifactId>
      <version>${version.jcabi.plugin}</version>
      <executions>
        <execution>
          <id>weave-classes</id>
          <phase>process-classes</phase>
          <goals>
            <goal>ajc</goal>
          </goals>
          <configuration>
            <classesDirectory>${project.build.outputDirectory}</classesDirectory>
          </configuration>
        </execution>
        <execution>
          <id>weave-test-classes</id>
          <phase>process-test-classes</phase>
          <goals>
            <goal>ajc</goal>
          </goals>
          <configuration>
            <classesDirectory>${project.build.testOutputDirectory}</classesDirectory>
          </configuration>
        </execution>
      </executions>
    </plugin>
  </plugins>
</build>
Generic DAO
To make developers’ lives even easier, we added a generic DAO, which defines all the basic operations, using the eXo entity manager: find, findAll, create, update, delete, …
You just need to extend your DAO class from the class org.exoplatform.commons.persistence.impl.GenericDAOJPAImpl to benefit from all these methods:
					public class TaskDAOImpl extends GenericDAOJPAImpl<Task, Long> {
    …
}
Initialize and update your data model
Now that we have designed our model in a Java object, we need to create the data.
Hibernate allows us to generate the data schema automatically from the Java model, thanks to the JPA annotations and the configuration property hbm2ddl.auto.
We believe that the modelization of the database is a very important phase in designing a solution. It should not rely exclusively on automatic generation from Hibernate but rather it should be part of a dedicated process (design and generation) managed by developers. It is important for the developers to master the model and fully understand it.
eXo Platform comes with Liquibase, a tool that allows you to init and incrementally update a database schema and the data. Its use is not mandatory for building custom applications, of course. It simply provides a good and efficient way to manage a database. It’s what we use for eXo applications.
Liquibase relies on changelog files to init and update the database. These files define a bunch of change sets. Each change set defines an operation on the database (table creation, constraint creation, index creation, SQL query execution, …). These operations can range from creating tables and constraints to executing SQL commands and adding indexes. As an example, here is an extract of the change logs of the eXo Task application:
					<?xml version="1.0" encoding="UTF-8"?>
<databaseChangeLog
	xmlns="http://www.liquibase.org/xml/ns/dbchangelog"
	xmlns:xsi="http://www.w3.org/2001/XMLSchema-instance"
	xsi:schemaLocation="http://www.liquibase.org/xml/ns/dbchangelog
                  	http://www.liquibase.org/xml/ns/dbchangelog/dbchangelog-3.3.xsd">


<property name="autoIncrement" value="true" dbms="mysql,mssql,h2,sybase,db2,hsqldb"/>
<property name="autoIncrement" value="false" dbms="oracle,postgresql"/>


<changeSet author="task" id="1.0.0-1">
    <createTable tableName="TASK_PROJECTS">
        <column name="PROJECT_ID" type="BIGINT" autoIncrement="${autoIncrement}" startWith="1">
            <constraints nullable="false" primaryKey="true" primaryKeyName="PK_TASK_PROJECTS" />
        </column>
        <column name="NAME" type="NVARCHAR(50)">
            <constraints nullable="false"/>
        </column>
        <column name="DESCRIPTION" type="NVARCHAR(2000)">
            <constraints nullable="true"/>
        </column>
        <column name="COLOR" type="NVARCHAR(100)">
            <constraints nullable="true"/>
        </column>
        <column name="CALENDAR_INTEGRATED" type="BIT" defaultValue="0">
            <constraints nullable="false"/>
        </column>
        <column name="DUE_DATE" type="TIMESTAMP">
            <constraints nullable="true"/>
        </column>
        <column name="PARENT_PROJECT_ID" type="BIGINT">
            <constraints foreignKeyName="FK_TASK_PRJ_TASK_PRJ_01" references="TASK_PROJECTS(PROJECT_ID)" nullable="true"/>
        </column>
    </createTable>
    <modifySql dbms="mysql">
        <append value=" ENGINE=INNODB CHARSET=UTF8 COLLATE utf8_general_ci"/>
    </modifySql>
</changeSet>

<changeSet author="task" id="1.0.0-2" dbms="oracle,postgresql">
    <createSequence sequenceName="SEQ_TASK_PROJECTS_PROJECT_ID" startValue="1"/>
</changeSet>

...

<changeSet author="task" id="1.0.0-23">
    <createIndex indexName="IDX_TASK_LABELS_01"
             	tableName="TASK_LABELS">
        <column name="USERNAME" type="NVARCHAR(50)"/>
    </createIndex>
</changeSet>

...

<changeSet author="task" id="1.0.0-25">
    <addUniqueConstraint columnNames="LABEL_ID, TASK_ID"
        	constraintName="UQ_TASK_LABEL_TASK"
        	tableName="TASK_LABEL_TASK"/>
</changeSet>Each change set defines an operation on the database (table creation, constraint creation, index creation, SQL query execution, …). As an example, here is an extract of the change logs of the eXo Task application:
The full content of the change log file of Task 1.0 is available at https://raw.githubusercontent.com/exoplatform/task/1.0.0/services/src/main/resources/db/changelog/task.db.changelog-1.0.0.xml.
As soon as a change set is applied, Liquibase remembers it and does not apply it again on subsequent calls. It relies on the change set ID, so it is very important not to update it once applied, and of course don’t have two identical IDs.
eXo Platform launches Liquibase at each startup. For the Task application, for example, this means that this change log file will be executed every time you restart your eXo Platform instance. If the Task data have never been initialized, all these change sets will be executed. Then, on subsequent calls, nothing will be done, until we add some new change sets.
To let eXo Platform know which change log files to apply, you simply have to add the following configuration in your extension:
					<external-component-plugins>
    <target-component>org.exoplatform.commons.api.persistence.DataInitializer</target-component>
    <component-plugin>
        <name>TaskManagementChangeLogsPlugin</name>
        <set-method>addChangeLogsPlugin</set-method>
        <type>org.exoplatform.commons.persistence.impl.ChangeLogsPlugin</type>
        <init-params>
            <values-param>
                <name>changelogs</name>
                <description>Change logs of task management</description>
                <value>db/changelog/task.db.changelog-1.0.0.xml</value>
                <value>db/changelog/task.db.changelog-1.1.0.xml</value>
            </values-param>
        </init-params>
    </component-plugin>
</external-component-plugins>
The value of the changelogs parameter allows you to define a list of paths (in the classpath) for the change log files. In this example, we define the change logs of Task 1.0.0 and 1.1.0. The convention we use at eXo is one change log file per version, but it is up to you to organize your change logs as you want.
Once these files are in your extension, you are ready to generate your first data schema using Liquibase in eXo Platform.
You can learn more about Liquibase from its official documentation.
Conclusion
Now that you know how to declare JPA entities, configure the persistence unit, create DAO classes, manage transactions and init/update your data, you are all set to develop applications with JPA.
eXo Platform takes care of all the boilerplate code, so you can focus on the essentials.
Of course, you can still manage all of this by yourself (creating and updating your data schema, creating your persistence unit, declaring your entities, implementing default DAO methods, managing transactions, …), but is it really worthwhile? 😉
Enjoy
eXo Platform 6 Free Datasheet
Download the eXo Platform 6 Datasheet and
discover all the features and benefits
discover all the features and benefits
- Tags: eXo
Rate this post

I am a Digital Marketing specialist specialized in SEO at eXo Platform.
Passionate about new technologies and Digital Marketing.
With 10 years' experience, I support companies in their digital communication strategies and implement the tools necessary for their success.
My approach combines the use of different traffic acquisition levers and an optimization of the user experience to convert visitors into customers.
After various digital experiences in communication agencies as well as in B2B company, I have a wide range of skills and I am able to manage the digital marketing strategy of small and medium-sized companies.
Related posts
- All
- eXo
- Digital workplace
- Employee engagement
- Open source
- Future of work
- Internal communication
- Collaboration
- News
- intranet
- workplace
- Knowledge management
- Employee experience
- Employee productivity
- onboarding
- Employee recognition
- Change management
- Cartoon
- Digital transformation
- Infographic
- Remote work
- Industry trends
- Product News
- Thought leadership
- Tips & Tricks
- Tutorial
- Uncategorized

Leave a Reply
( Your e-mail address will not be published)
Connexion
0 Comments
Commentaires en ligne
Afficher tous les commentaires