- Ayoub Zayati
- January 3, 2019
How to integrate Angular business applications in eXo Platform
Frequently, we develop business web applications with Angular framework.
With just a few steps, these applications can be migrated easily to get them integrated as eXo applications.

Content
That way, we will not only benefit from all eXo Platform native features, but also increase adoption by allowing access to our business applications from a unique point, with needed authorization and easier administration.
In this blog post, we would like to explain the required steps to migrate and integrate a sample of a business application into eXo Platform, with a particular focus on the steps that Angular developers need to take.
You can find the code base of the target application in the eXo samples Github repository.
This is a Maven-based project, so it should be easy to import and run as is.
1. Let’s in brief present the original angular application
The original application is an example of a CRUD application for github issues management based on Angular 6 as front-end framework.
The migration consists of upgrading to the latest stable version, Angular 7.1.1, in order to manage products instead of github issues.
2. eXo Add-on structure
The goal is to create an eXo Add-on that will be deployed on top of the eXo Platform 5.1.0 server.
It consists on a Maven project with the following structure:
- portlets: FrontEnd module to generate a web app with the product management portlet and a custom configuration to add a page displaying this portlet.
- services: BackEnd module to generate a jar file with CRUD services used by the portlet.
- packaging: eXo add-on package module to generate a zip file to be installed in the eXo platform server.
To find out more about eXo add-ons development, read the dedicated eXo documentation.
3. Migration steps
FrontEnd
The first step is to switch the original Angular application into an eXo portlet using the following portlets module structure:
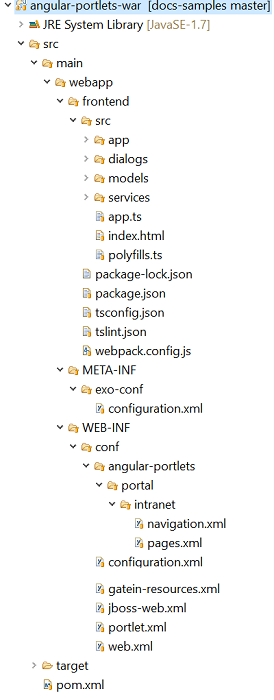
 Portlet.xml
Every eXo portlet is defined within the portlet descriptor portlet.xml.
In our case, we will develop an eXo GenericDispatchedViewPortlet with the following portlet.xml configuration:
					<portlet-app version="2.0"
	xmlns="http://java.sun.com/xml/ns/portlet/portlet-app_2_0.xsd"
	xmlns:xsi="http://www.w3.org/2001/XMLSchema-instance"
xsi:schemaLocation="http://java.sun.com/xml/ns/portlet/portlet-app_2_0.xsd http://java.sun.com/xml/ns/portlet/portlet-app_2_0.xsd">

	<portlet>
		<portlet-name>angular-sample-portlet</portlet-name>
		<portlet-class>org.exoplatform.commons.api.portlet.GenericDispatchedViewPortlet</portlet-class>
		<init-param>
			<name>portlet-view-dispatched-file-path</name>
			<value>/frontend/index.html</value>
		</init-param>
		<supports>
			<mime-type>text/html</mime-type>
		</supports>
		<portlet-info>
			<title>Angular Sample Portlet</title>
		</portlet-info>
	</portlet>

</portlet-app>
Gatein-resources.xml
In order to define the AMD js module and its dependencies of our portlet, we need to declare them in the eXo configuration file gatein-resources.xml:
					<gatein-resources xmlns:xsi="http://www.w3.org/2001/XMLSchema-instance"
	xsi:schemaLocation="http://www.exoplatform.org/xml/ns/gatein_resources_1_4 http://www.exoplatform.org/xml/ns/gatein_resources_1_4"
	xmlns="http://www.exoplatform.org/xml/ns/gatein_resources_1_4">

	<portlet>
		<name>angular-sample-portlet</name>
		<module>
			<depends>
				<module>angularSamplePortletBundle</module>
			</depends>
		</module>
	</portlet>

	<module>
		<name>angularSamplePortletBundle</name> <script><minify>false</minify>
			<path>/frontend/main.js</path></script> <depends>
			<module>polyfillsBundle</module>
		</depends>
	</module>

	<module>
		<name>polyfillsBundle</name> <script><minify>false</minify>
			<path>/frontend/polyfills.js</path></script> </module>

</gatein-resources>
To make this configuration work correctly, and since angular is using typescript language, we need to use webpack in order to generate only one js file /frontend/main.js.
This js file will be the entry path for angularSamplePortletBundle module, which needs also polyfillsBundle js module in order to keep our angular application running for all browsers.
Index.html
This file corresponds to the html template of the portlet to be used as is from the original application:
					<crud-app>
	<div class="lds-spinner">
		<div></div>
		<div></div>
		<div></div>
		<div></div>
		<div></div>
		<div></div>
		<div></div>
		<div></div>
		<div></div>
		<div></div>
		<div></div>
		<div></div>
	</div>
</crud-app>
Pom.xml
This is pom.xml of portlets module which should configure frontend-maven-plugin in order to install NodeJS and needed NPM modules:
					<plugin>
				<groupId>com.github.eirslett</groupId>
				<artifactId>frontend-maven-plugin</artifactId>
				<version>1.0</version>
				<configuration>
					<workingDirectory>src/main/webapp/frontend/</workingDirectory>
					<installDirectory>target/frontend-maven-plugin</installDirectory>
				</configuration>
				<executions>


					<execution>
						<id>install node and npm</id>
						<goals>
							<goal>install-node-and-npm</goal>
						</goals>
						<configuration>
							<workingDirectory>src/main/webapp/</workingDirectory>
							<installDirectory>target/node-and-npm</installDirectory>
							<nodeVersion>${nodeVersion}</nodeVersion>
							<npmVersion>${npmVersion}</npmVersion>
						</configuration>
					</execution>


					<execution>
						<id>npm webpack</id>
						<goals>
							<goal>npm</goal>
						</goals>
						<configuration>
							<workingDirectory>src/main/webapp/frontend/</workingDirectory>
							<installDirectory>target/node-and-npm</installDirectory>
							<arguments>install webpack -g</arguments>
						</configuration>
					</execution>


					<execution>
						<id>npm install</id>
						<goals>
							<goal>npm</goal>
						</goals>
						<configuration>
							<workingDirectory>src/main/webapp/frontend/</workingDirectory>
							<installDirectory>target/node-and-npm</installDirectory>
							<arguments>install</arguments>
						</configuration>
					</execution>


					<execution>
						<id>npm build</id>
						<goals>
							<goal>npm</goal>
						</goals>
						<configuration>
							<workingDirectory>src/main/webapp/frontend</workingDirectory>
							<installDirectory>target/node-and-npm/</installDirectory>
							<arguments>run build</arguments>
						</configuration>
					</execution>
				</executions>
			</plugin>
Typescript components
These files correspond to the Angular Typescript components to be used as are from the original application.
eXo Extension configuration
Configuration.xml
This file should be added under META-INF/exo-conf in order to get the portlet running as an eXo Extension:
					<external-component-plugins>
		<target-component>org.exoplatform.container.definition.PortalContainerConfig</target-component>
		<component-plugin>
			<name>Change PortalContainer Definitions</name>
			<set-method>registerChangePlugin</set-method>
			<type>org.exoplatform.container.definition.PortalContainerDefinitionChangePlugin</type>
			<priority>101</priority>
			<init-params>
				<value-param>
					<name>apply.default</name>
					<value>true</value>
				</value-param>
				<object-param>
					<name>change</name>
					<object
						type="org.exoplatform.container.definition.PortalContainerDefinitionChange$AddDependencies">
						<field name="dependencies">
							<collection type="java.util.ArrayList">
								<value>
									<string>angular-portlet-webpack</string>
								</value>
							</collection>
						</field>
					</object>
				</object-param>
			</init-params>
		</component-plugin>
	</external-component-plugins>
Web.xml
In this file, PortalContainerConfigOwner eXo Listener configuration is required for our eXo Extension:
					<web-app id="WebApp_ID" version="2.4"
	xmlns="http://java.sun.com/xml/ns/j2ee" xmlns:xsi="http://www.w3.org/2001/XMLSchema-instance"
	xsi:schemaLocation="http://java.sun.com/xml/ns/j2ee
	http://java.sun.com/xml/ns/j2ee/web-app_2_4.xsd">
	<display-name>angular-portlets</display-name>


  <listener>
    <listener-class>org.exoplatform.container.web.PortalContainerConfigOwner</listener-class>
  </listener>
</web-app>
Navigation and pages configurations
We should create a page with Products portlet in order to be accessible by /portal/intranet/products url after server startup.
For that UserPortalConfigService eXo Component should be configured under WEB-INF/conf/configuration.xml file:
					<?xml version="1.0" encoding="ISO-8859-1"?>

<configuration xmlns:xsi="http://www.w3.org/2001/XMLSchema-instance"
	xsi:schemaLocation="http://www.exoplatform.org/xml/ns/kernel_1_2.xsd http://www.exoplatform.org/xml/ns/kernel_1_2.xsd"
	xmlns="http://www.exoplatform.org/xml/ns/kernel_1_2.xsd">
	<external-component-plugins>
		<target-component>org.exoplatform.portal.config.UserPortalConfigService</target-component>
		<component-plugin>
			<name>new.portal.config.user.listener</name>
			<set-method>initListener</set-method>
			<type>org.exoplatform.portal.config.NewPortalConfigListener</type>
			<description>this listener init the portal configuration</description>
			<init-params>


				<object-param>
					<name>portal.configuration</name>
					<description>description</description>
					<object type="org.exoplatform.portal.config.NewPortalConfig">
						<field name="predefinedOwner">
							<collection type="java.util.HashSet">
								<value>
									<string>intranet</string>
								</value>
							</collection>
						</field>
						<field name="ownerType">
							<string>portal</string>
						</field>
						<field name="templateLocation">
							<string>war:/conf/angular-portlets</string>
						</field>
						<field name="importMode">
							<string>merge</string>
						</field>
					</object>
				</object-param>
			</init-params>
		</component-plugin>
	</external-component-plugins>
</configuration>
A navigation node should be added into navigation.xml file:
					<?xml version="1.0" encoding="ISO-8859-1"?>
<page-set>
	<page>
		<name>products</name>
		<title>Products</title>
		<access-permissions>*:/platform/users</access-permissions>
		<edit-permission>*:/platform/administrators</edit-permission>
		<show-max-window>false</show-max-window>
		<portlet-application>
			<portlet>
				<application-ref>angular-portlets</application-ref>
				<portlet-ref>products-management-portlet</portlet-ref>
			</portlet>
			<access-permissions>*:/platform/users</access-permissions>
			<show-info-bar>false</show-info-bar>
		</portlet-application>
	</page>
</page-set>
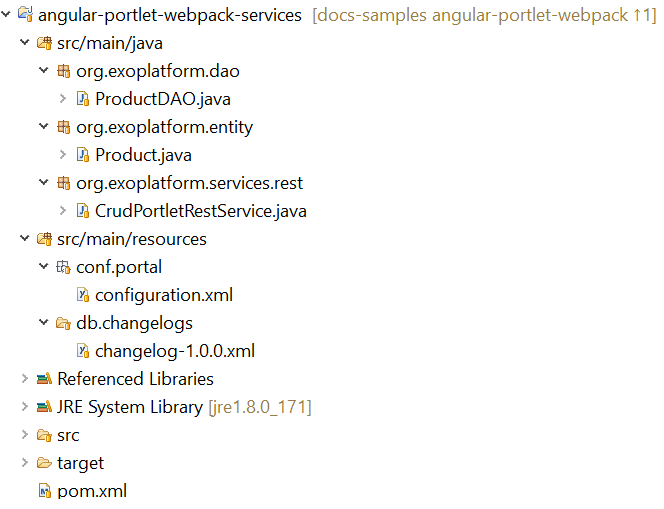
BackEnd
The second step is to develop CRUD rest services called by angular components using the following structure:
Data structure initialization
We have configured changelog-1.0.0.xml file to be interpreted by Liquibase in order to define the structure of Product Table:
					<?xml version="1.0" encoding="UTF-8"?>
<databaseChangeLog
        xmlns="http://www.liquibase.org/xml/ns/dbchangelog"
        xmlns:xsi="http://www.w3.org/2001/XMLSchema-instance"
        xsi:schemaLocation="http://www.liquibase.org/xml/ns/dbchangelog
                      http://www.liquibase.org/xml/ns/dbchangelog/dbchangelog-3.3.xsd">


	<property name="autoIncrement" value="true" dbms="mysql,mssql,h2,hsqldb"/>
	<property name="autoIncrement" value="false" dbms="oracle,postgresql"/>


	<property name="now" value="now()" dbms="mysql,hsqldb,postgresql,h2"/>
	<property name="now" value="sysdate" dbms="oracle"/>
	<property name="now" value="CURRENT_TIMESTAMP" dbms="mssql"/>

	<changeSet author="sample" id="1.0.0-1">
        <createTable tableName="PRODUCT">
            <column name="PRODUCT_ID" type="BIGINT" autoIncrement="${autoIncrement}" startWith="1">
				<constraints nullable="false" primaryKey="true" primaryKeyName="PK_PRODUCT_PRODUCT_ID"/>
            </column>
            <column name="PRODUCT_NAME" type="VARCHAR(250)"/>
            <column name="PRODUCT_AMOUNT" type="VARCHAR(250)"/>
        </createTable>
        <modifySql dbms="mysql">
            <append value=" ENGINE=INNODB CHARSET=UTF8 COLLATE utf8_general_ci"/>
        </modifySql>
    </changeSet>
</databaseChangeLog>
Then, we have configured ChangeLogsPlugin in order to initialize the Product table structure defined above in the database:
					<external-component-plugins>
<target-component>org.exoplatform.commons.api.persistence.DataInitializer</target-component>
	<component-plugin>
		<name>SampleChangeLogsPlugin</name>
		<set-method>addChangeLogsPlugin</set-method>
		<type>org.exoplatform.commons.persistence.impl.ChangeLogsPlugin</type>
		<init-params>
			<values-param>
				<name>changelogs</name>
				<description>Change logs of Atis</description>
				<value>db.changelogs/changelog-1.0.0.xml</value>
			</values-param>
		</init-params>
	</component-plugin>
</external-component-plugins>
Persistence layer
To persist products, we are based on eXo JPA implementation.
Product Entity is implemented according to Product table structure:
					@Entity
@ExoEntity
@Table(name = "PRODUCT")
public class Product {

  @Id
  @SequenceGenerator(name="SEQ_PRODUCT_PRODUCT_ID", sequenceName="SEQ_PRODUCT_PRODUCT_ID")
  @GeneratedValue(strategy=GenerationType.AUTO, generator="SEQ_PRODUCT_PRODUCT_ID")
  @Column(name="PRODUCT_ID")
  private Long productId;

  @Column(name="PRODUCT_NAME")
  private String productName;

  @Column(name="PRODUCT_AMOUNT")
  private String productAmount;
  ...
Then we need ProducDAO to be implemented and configured as an eXo component in order to be called by CRUD rest services:
					<component>
    <type>org.exoplatform.dao.ProductDAO</type>
</component>

--------------------------------------------------------------

package org.exoplatform.dao;
import org.exoplatform.entity.Product;

import org.exoplatform.commons.persistence.impl.GenericDAOJPAImpl;

public class ProductDAO extends GenericDAOJPAImpl<Product, Long> {

}
Business layer
We have configured CrudPortletRestService as an eXo component:
					<component>
<type>org.exoplatform.services.rest.CrudPortletRestService</type>
</component>
This component will expose CRUD rest services to be called by frontend angular components in order to perform getAll, add, delete and edit operations:
					package org.exoplatform.services.rest;

import java.util.List;

import javax.annotation.security.RolesAllowed;
import javax.ws.rs.GET;
import javax.ws.rs.Path;
import javax.ws.rs.PathParam;
import javax.ws.rs.QueryParam;
import javax.ws.rs.core.Context;
import javax.ws.rs.core.MediaType;
import javax.ws.rs.core.Response;
import javax.ws.rs.core.UriInfo;

import org.json.JSONArray;
import org.json.JSONObject;

import org.exoplatform.dao.ProductDAO;
import org.exoplatform.entity.Product;
import org.exoplatform.services.rest.resource.ResourceContainer;

@Path("crud")
public class CrudPortletRestService implements ResourceContainer {

  private ProductDAO productDAO;

  public CrudPortletRestService(ProductDAO productDAO) {
    this.productDAO = productDAO;
  }

  @GET
  @Path("/addProduct")
  @RolesAllowed("users")
  public Response addProduct(@Context UriInfo uriInfo,
                             @QueryParam("productName") String productName,
                             @QueryParam("productAmount") String productAmount) throws Exception {
    ...
  }

  @GET
  @Path("/deleteProduct/{productId}")
  @RolesAllowed("users")
  public Response deleteProduct(@Context UriInfo uriInfo, @PathParam("productId") String productId) throws Exception {
    ...
  }

  @GET
  @Path("/getAllProducts")
  @RolesAllowed("users")
  public Response getAllProducts(@Context UriInfo uriInfo) throws Exception {
    ...
  }

  @GET
  @Path("/getProductById/{productId}")
  @RolesAllowed("users")
  public Response getProductById(@Context UriInfo uriInfo, @PathParam("productId") String productId) throws Exception {
    ...
  }

  @GET
  @Path("/updateProduct/{productId}")
  @RolesAllowed("users")
  public Response updateProduct(@Context UriInfo uriInfo,
                                @PathParam("productId") String productId,
                                @QueryParam("productName") String productName,
                                @QueryParam("productAmount") String productAmount) throws Exception {
	...
  }
}
Addon packaging
4. Deployment
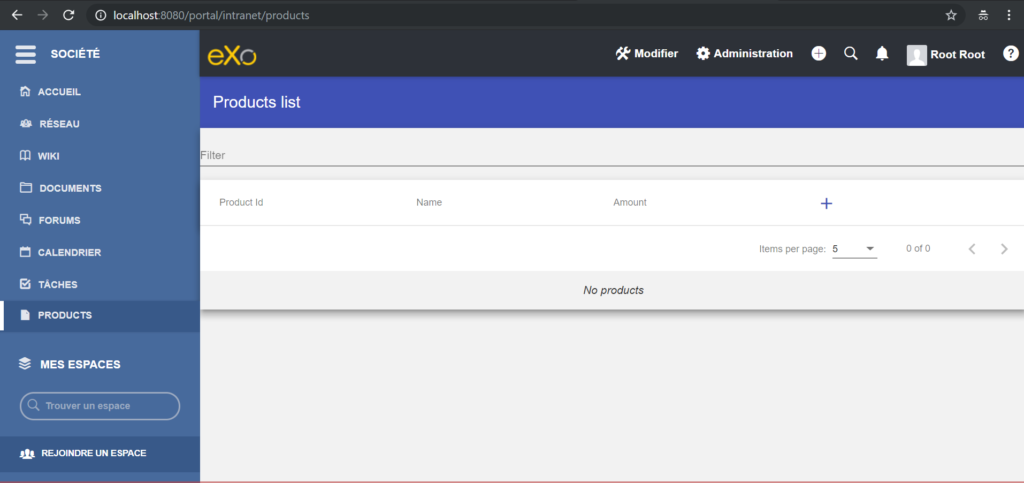
First startup
A welcome spinner is shown waiting the product list to be displayed:

For the first startup, the Product table structure is created without data:
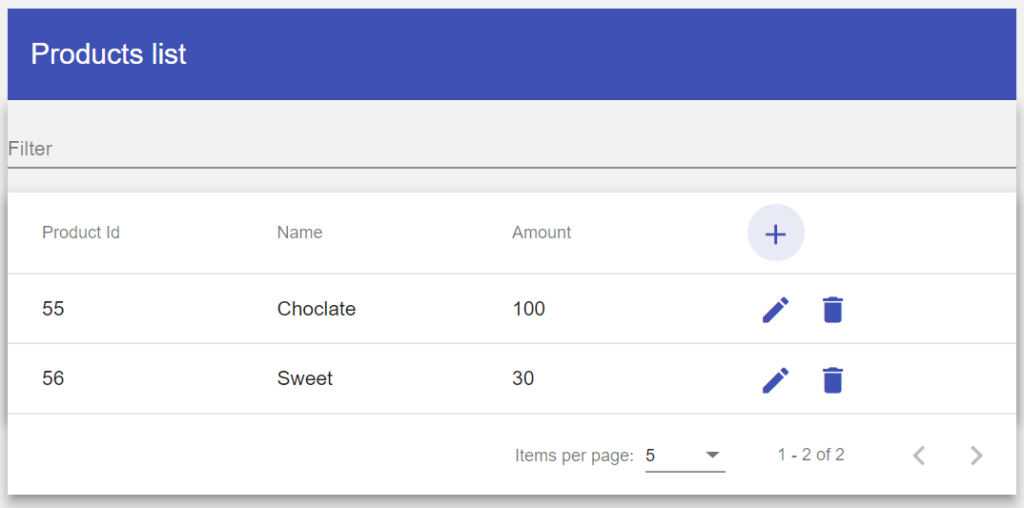
Second startup
In order to get data in the Product table, we can restore the original data from an SQL dump.
For the second startup, restored data are displayed and paginated. It is possible to filter and sort them according to our needs:
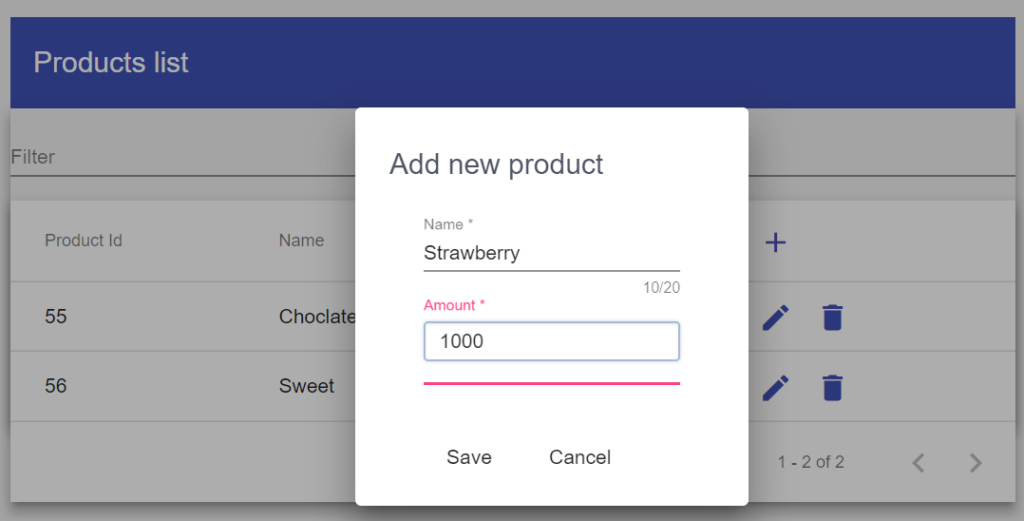
It is possible to add a new product as shown below:
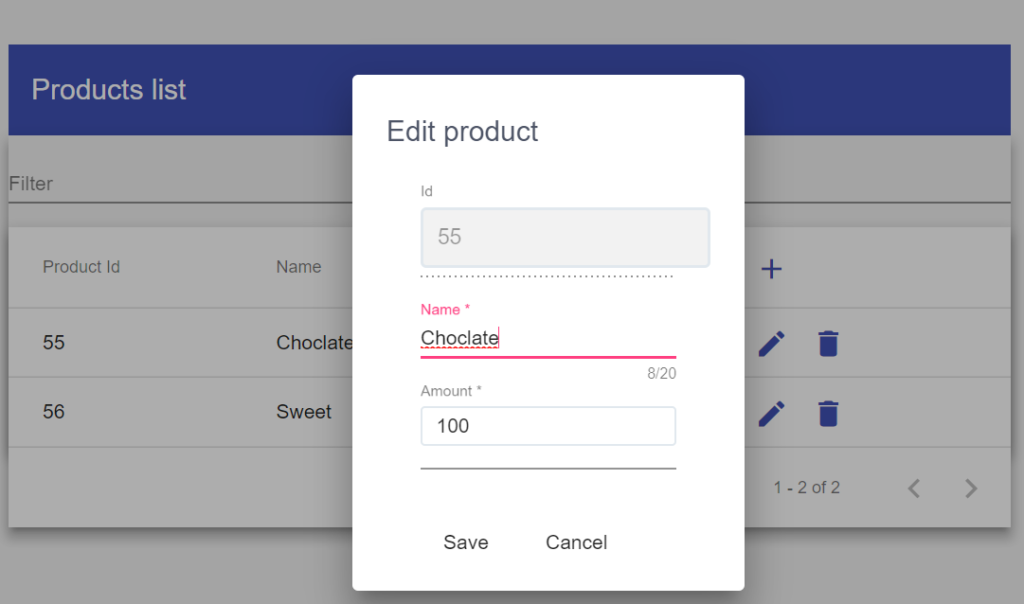
It is possible to edit a product as shown below:
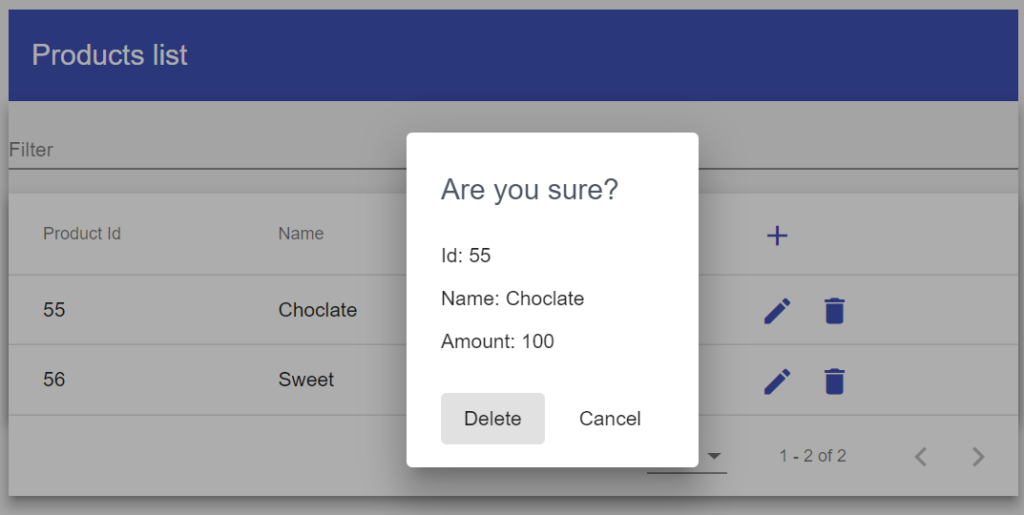
It is possible to remove a product as shown below:
Conclusion
In this article, we have tried to set up a step-by-step tutorial of angular 7 business applications migration to eXo portlets.
Don’t hesitate to share us your experience by applying this tutorial on your own applications and contact us if you have some questions or issues.
eXo Platform 6 Free Datasheet
Download the eXo Platform 6 Datasheet and
discover all the features and benefits
discover all the features and benefits

Related posts
- All
- eXo
- Digital workplace
- Employee engagement
- Open source
- Future of work
- Internal communication
- Collaboration
- News
- intranet
- workplace
- Knowledge management
- Employee experience
- Employee productivity
- onboarding
- Employee recognition
- Change management
- Cartoon
- Digital transformation
- Infographic
- Remote work
- Industry trends
- Product News
- Thought leadership
- Tips & Tricks
- Tutorial
- Uncategorized

Leave a Reply
( Your e-mail address will not be published)
Thank you very much
You’re welcome